If this is your first visit, be sure to
check out the FAQ by clicking the
link above. You may have to register
before you can post: click the register link above to proceed, registering will remove the in post advertisements. To start viewing messages,
select the forum that you want to visit from the selection below.
This means you should apply for your renewal now to avoid any disruptions to your membership whilst the renewal process is taking place! NOTE: If you have an auto renewing subscription this will happen automatically.
Sweeet got mine wired up! I got the cheapie kit ray has got for the cl since its got no power windows. Took about an hr coz at first i wired the wrong red/black wire but now works like a charm!
Problem solved, it's not that red/black wire as in the first post (at least not for me).
You can run power from the air pump's plug Pin 1 is 12V pin 3 is ground.
Then I hooked up pin 7 and 10 to the +12 and -12v lines I was using earlier. Works a charm, open and close. To be honest I don't know if I could be bothered hooking up the flashing lights thing, the windows I will work on, but it's not on the priority list.
Looks like I won't be getting the new electronics into the old fob without a bit of work, but on the upside the new fob has a little slot for your transponder chip making the switch nice and easy for those who need it
Looking good
Pedro ordered a unit for me and picked it up the other day. Wiring looks identical to the one I had, save for an extra window closure wire and extra indicator/siren wires.
Agreed with the quality of the key fob - definitely not as good as the OEM but I guess that's expected. My buttons don't fall out but they're quite easy to depress, as opposed to my OEM one. The pin that holds the key in place in the OEM unit is replaced with two screws in the Rightclick one - easy to take in and out but due to the size of the screw head, it fouls the key fob unit when you're disassembling the blank for key cutting. That said, it's hardly noticeable as it just fouls it by a mm.
The instructions that came with it looked like they were a Babelfish translation job from another language. The page they sent me were for positive pulse door locks, which I believe is the same as the American setup. Luckily, there are better instructions on their website - free to access but you just need to register a username.
As for the window roll-up, is it just a wire we have to tap into? I assume this is so because the keyless main unit only has one single wire that they labelled for window closure... and I don't understand the babble they have on the sheet they provided for it (also on their website).
Doing so now... I'm gonna follow the wiring instructions for the electric-pneumatic lock schematics (Type E/1 on the website) and see how that goes, since it resembles my current setup at the moment. As for the window closure, I guess I'll guess and check - I remember finding the wire that triggers the window closure but I didn't know what kind of signal it put out..
I didnt think u needed to tap into a window closure wire. Doesnt the unit just hold the signal longer than usual?
In theory, yes.
On my system I need to test if the unit holds the signal longer if you hold the button or not. From what I have read in the "instructions" (which really do look like a translation from greek to german to english) the auto close funtion is designed to hit a trigger, not output a longer signal. It also looks like it is designed to do *just* up, not up and down. Again the "instructions" simply talk about hooking up one wire to the trigger, will see what I can manage on that side when I get a chance.
In my case I can make the system always put the windows up and down or not at all, working on the inbetween.
Ray's wiring sounds a little different to mine too, I got the unit with the actuators included, mistake on my part, but for two pounds difference it's all good. In short mine seems to have extra wires to run the actuators where his does not.
If it has an engine or heartbeat it's going to cost you.
The website guide says that if u already have total closure by holding the ignition key, u dont need to hook up that wire. Im sure that if it can do windows closed, it can do open as well - that was the whole point in buying this kit yeh?
Any updates yet ray/hawk? Would love to hear progress
1. lock
Press (lock button) on the remote controller once with the direction light flash once, and then the central control door lock will be locked.30secondsnegative(-)output for window roll-up.The LEDwill outomatically flash.
I have tried to include all punctuation and grammer of the original
It looks like this kit has auto up only and it's an all or nothing, my earlier probing showed 12V on for 3.5 or 0.5 seconds set by the jumper, no longer option when held down.
I will re-probe the wires and double check, but that looks like the way it is.
Hahaha yeah gotta love those instructions. I did a few tests myself and found the same as yours on the lock wire, BUT I have an additional "windows closure" wire which puts out a 12V signal for 30 seconds (untimed; it's definitely more than 3.5 seconds) after the lock button is depressed. Pressing the unlock before the 30 seconds expires cuts the signal off.
My tester shows it's a negative 12V signal that passes from the unit to this wire... the manual goes on to say if the window closure wire runs by a negative pulse then it should be a simple matter of tapping into it BUT if it runs a positive pulse, then you'll have to start messing around with relays and such...
Still haven't found which wire is for the windows though... but while I was wiring the whole thing up, I accidentally shorted one of the wires and all the windows rolled down without any of the locks engaging... so I'm guessing there has to be a wire out of the 10 or so that is for the window closure.
Either way it still looks like it's an automatic close eveytime rather than something you can choose to do when you want
Yeah... Louis' alarm (before it sparked a fire in his engine bay!) had the remote feature where if he held on to the button for long enough, the windows would close/open until he let go... it was what made me want to get a keyless!!!!!
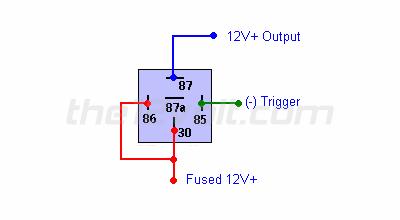
Anyway, here's a diagram for those who need to convert a negative 12V signal into a positive 12V signal:
Using a SPDT (30A) relay, hook up the keyless unit's negative 12V signal wire to terminal pin 85. A constant 12V+ wire must be tapped into pin 86 and 30. Connecting a wire from pin 87 will be your new positive 12V+ signal output.
One question... if I have the keyless unit in the hatch, where should I place the relay?
 Tweet
Tweet


Comment