G-8VXWWTRHPN Sliding Window Repair Kit - VWWatercooled Australia

Announcement

Collapse
1 of 2 < >

Email Notifications Failing (mostly Telstra)

Hello everyone. Seems there is an issue with Telstra (possible others) blocking email from our server. If you are trying to sign up I would suggest a different email if possible. If you're trying to reset your password and it fails please use the Contact Us page:
2 of 2 < >

Welcome to the new look VWWatercooled

After much work and little sleep there is a new version of the forums running on more powerful and recent hardware as well as an upgraded software platform.

Things are mostly the same, but some things are a little different. We will be learning together, so please post questions (and answers if you've worked things out) in the help thread.

The new forum software is an upgraded version of what came before, it's mostly the same but also a little different. Hopefully easier to use and more stable than before. We are learning together here, so please be patient. If you have questions, please post them here. If you have worked something out and can provide an answer,
See more
See less

Sliding Window Repair Kit

Collapse
X
 
  • Filter
  • Time
  • Show
Clear All
new posts

  • Sliding Window Repair Kit

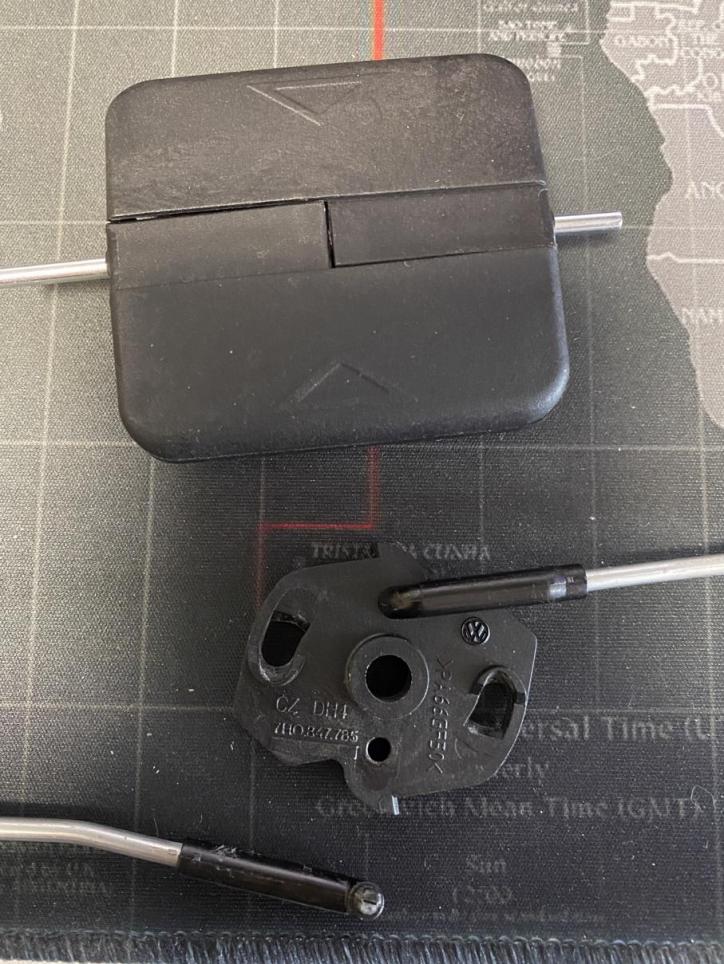
    The drivers side sliding window (in the sliding door) on our T5GP has snapped the little plastic connecting bit on the latch end on the lower operating rod.

    Part number 7H0847788A.


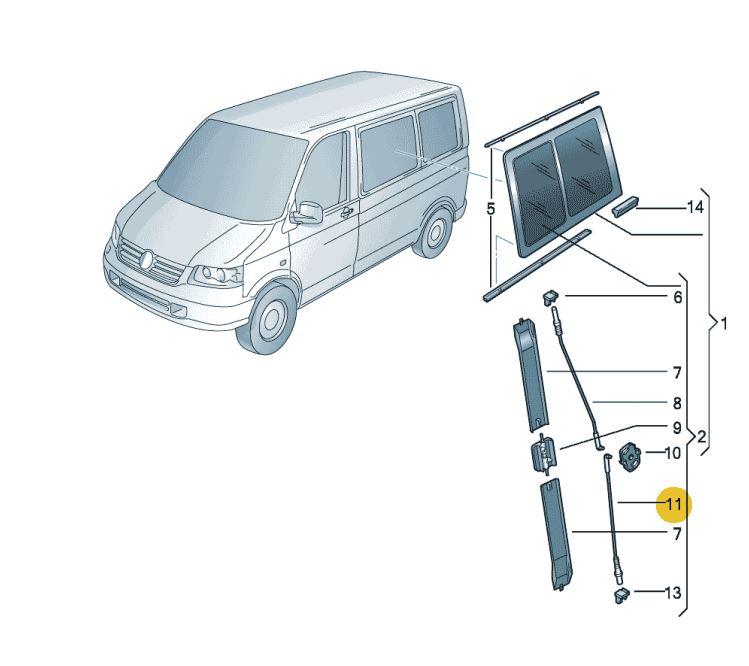
    That picture isn't quite right, I need the bent rod, left to right they are inverted so the bent one on the passenger side is on the top like in the picture.


    The part is on back order from Germany from VW themselves (no clue what it actually costs either, but the latch is $92!!) so I can't order one from there. Given how tiny the connecting ball is I wouldn't be surprised to find this is a very commonly broken part... which begs the question why there isn't any spares from VW??

    But in having a hunt around I see I can order an after market repair kit with all the parts like this one:
    Bross Auto Parts BDP964 Side Sliding Window Glass Latch Cover Repair Set 7H0847788A, 7H0847781B, 7H0847785 for VW T6 Caravelle|Interior Door Panels & Parts| - AliExpress

    Same thing on eBay stores too, but nothing in Australia... so one day eventually when this shows up I will likely try and use just the rod I need, but for AU$16.83 delivered it's worth a gamble.

    Plan B will be to find one in a wreckers one day... I actually need a few little odds and ends (like the Multivan Step light) so maybe it's something I should look into sooner unless someone on here happens to be wrecking one?

    If it has an engine or heartbeat it's going to cost you.

  • #2
    hi,
    on a some what connected topic.the runners/guide for the sliding window(part #5)have come adrift from the glass.this prevents the widow from sealing when closed.the runners appear to have metal bracing inside which has rusted....
    has any one had similar problems?

    Comment


    • #3
      I should look closer at that as I've noticed that same window tends to leak during heavy rain, so I might very well have the same issue! I haven't really looked because I couldn't open the window and had'nt taken the time to pull it apart until yesterday.

      If it has an engine or heartbeat it's going to cost you.

      Comment


      • #4
        both of my windows are leaking,,,,,perhaps I will use a sash clamp and timber to hold it in place and then Sikaflex.....

        Comment


        • #5
          The windows aren't used very often... so that's an option

          If it has an engine or heartbeat it's going to cost you.

          Comment


          • #6
            Hi I had the same problem ,some small plastic part of the lower latch broke it was definitely operator error , I bought the eBay one and used some of the old pieces mixed in with the new and have had no problems .It’s a little finicky to install and I dont think the quality is up to oem so I would say that I’m a bit more cautious when I use it now ,your mileage may vary if it’s used regularly but for 20 bucks vs 60-70 oem plus install I’m ok with it value wise.
            Cheers

            Comment


            • #7
              Originally posted by GeoffDY View Post
              Hi I had the same problem ,some small plastic part of the lower latch broke it was definitely operator error , I bought the eBay one and used some of the old pieces mixed in with the new and have had no problems .It’s a little finicky to install and I dont think the quality is up to oem so I would say that I’m a bit more cautious when I use it now ,your mileage may vary if it’s used regularly but for 20 bucks vs 60-70 oem plus install I’m ok with it value wise.
              Cheers
              It's been broken for at least a year... so no, not used much at all. This is something I've been "getting to" for a long long while and I was reminded when I was giving the inside a good clean with the wet vac and went to open the windows and remembered I couldn't. I originally thought it had just popped off it's mounting, but the rod part has a tiny plastic end which has had snapped off. I could probably MacGyver something... might still have to depending on the quality of the repair kit!

              If it has an engine or heartbeat it's going to cost you.

              Comment


              • #8
                I have also been through this, mine snapped off at the right angle at the operating butterfly levers.

                I went to all the trouble of ordering a repair kit from England containing four new rods, but they are so weak that two of them broke installing them, couldn't even use them.

                If you look closely at the right angle end, it look a lot like the hub end of a bicycle wheel spoke, so I went to a bike shop and bought four thick spokes, then cut them off and used thin aluminum tubing sleeves that I bought from a hobby shop. Then shortened the lock pin ends and glued them into the sleeves to join them to the bicycle spokes, but before glueing them I fed the spokes through the holes in the end that works them as they cannot be installed or removed once the sleeves are glued together. This all worked perfectly, and a million times stronger and better than VW's effort.
                Last edited by BrianJ; 06-01-2021, 04:46 PM.

                Comment


                • #9
                  Bross are pretty good with delivery , on average before covid I could order and receive parts under 8 days now its around 12 to 14 days still pretty good .

                  Comment


                  • #10
                    Originally posted by BrianJ View Post
                    I went to all the trouble of ordering a repair kit from England containing four new rods, but they are so weak that two of them broke installing them, couldn't even use them.
                    I was thinking that even the stock ones looked a little weak for what they intended. Very similar to you I was looking at creating a rod/loop running through the mechanism rather than relying on the plastic ball joint. I was thinking you could do this with wire rather than a steel rod (so it is a little flexible and wouldn't damage the plastic eyelet it has to run through) then cut the stock rod in half and connect the two parts together using a screw connector like this:


                    then if it loses tension you just tighten up the connector...

                    Will see soon enough when the parts show up if I can use them or not.

                    If it has an engine or heartbeat it's going to cost you.

                    Comment


                    • #11
                      Originally posted by The_Hawk View Post
                      I was thinking that even the stock ones looked a little weak for what they intended. Very similar to you I was looking at creating a rod/loop running through the mechanism rather than relying on the plastic ball joint. I was thinking you could do this with wire rather than a steel rod (so it is a little flexible and wouldn't damage the plastic eyelet it has to run through) then cut the stock rod in half and connect the two parts together using a screw connector like this:


                      then if it loses tension you just tighten up the connector...

                      Will see soon enough when the parts show up if I can use them or not.
                      Interesting idea, I didn't think of flexible wire at the time, from memory of the workings I think it might work. You may get better ones, but my replacements were really weak.

                      Comment


                      • #12
                        For $17... we will see

                        At the very least I will have all the other bits in case I break something!

                        If it has an engine or heartbeat it's going to cost you.

                        Comment


                        • #13
                          I recently went through this as the butterfly release latch exploded under unnecessary force (don’t ask).

                          There are good videos on YouTube showing the process. Just remove the pin enough to remove the latch, you don’t want the latch assembly and spring to come apart.
                          I sourced the parts from a wreckers and although not perfect (fair bit of wear) it’s holding up ok for now.
                          Interested to know how aftermarket options go as expected it will be required again down the track.

                          Good luck.


                          Sent from my iPhone using Tapatalk

                          Comment


                          • #14
                            Package turned up from Turkey today. That wasn't too bad at all!

                            As it turns out, it's a pretty simple job to replace it if you don't try all the mistakes I made first...

                            #1 The new plastic ends are ever so slightly smaller than the factory parts, this means you can't re-use the old centre piece or the old rods. I tried by the new rod would just fall out of the old centre when you tried to operate the window.

                            Originally posted by DownUnder View Post
                            There are good videos on YouTube showing the process. Just remove the pin enough to remove the latch, you don’t want the latch assembly and spring to come apart.
                            Yeah... sort of wish I had come back and read that before I started You're totally correct on the latch. Probably could have done with a youtube video too, it really far simpler than I had thought... and I'd already looked at the mechanism! As for the quality of the parts, they seem ok, not too thin and they don't feel flimsy. We don't use that window very much at all so I'm sure it will work just fine for ages and at the price it's not too bad if it goes again. For now I'll put all the old parts into my box of spare bits in case I need to MacGyver it again one day.

                            #2 You don't have to strip everything out of the handle. Again I tried then had to screw about getting it back together, it's not hard, just a little fiddly.


                            So, to replace.

                            Step 1. Remove the outside trim covers, pull the centre gently until it bends enough to release the clips on the outside edges.
                            Step 2. Remove the spring retaining clips top and bottom.
                            Step 3. Slide the pin in the handle down *just* enough that you can swing the top clear of the mounting hole.
                            Step 4. Slide the pin in he handle back up enough to clear the lower mounting hole, this then releases the handle without dissasembling it.
                            Step 5. Take note which rod is bent and which is straight then remove the centre piece and the OEM rods.
                            Step 6. Assemble the new rods and centre and install. If you didn't notice, one side is mostly flat, the other sticks out in the middle. The sticky out pit faces outwards.

                            Then work backwards to put the handle, springs and covers back on. I think I could knock one out in 10 minutes now that I know what I'm doing.

                            ...or... just watch this video:
                            Side Sliding Window Repair VW T5 ,VW T5 Side Window Removal - YouTube


                            Here is the first pic I took of the new lower rod and the OEM top rod. The new one looks slightly thinner.


                            The old parts out, you can just make out the half snapped ball joint at the bottom.
                            Last edited by The_Hawk; 18-01-2021, 01:22 PM.

                            If it has an engine or heartbeat it's going to cost you.

                            Comment


                            • #15
                              I bought the Turkish kit and it broke due to the thin plastic.... interested to see how yours performs.

                              Comment

                              Working...
                              X