 Tweet
Tweet
Originally posted by leitch
View Post
-
Leitch - if you've got any handy tips/links to any coil installation guides that would be pretty handy for when I get stuck in this friday! 2019 132TSI Tiguan
2011 Audi S4 Wagon
1988 MK1 Caddy
2006 Polo GTI -
I remember finding that blokes build thread when researching my AP coilovers. It seems to lose a little of it's GTI-ness without the black skirts I feel.Originally posted by nightphotographer View Post
Comment
-
They're not so bad on other colours, but with mine being white they just contrast too much, and they're so faded and scratched I just wanted something different...I think it's a really important aesthetic change, and getting rid of any plastic trim with colour coding is always a winnerOriginally posted by Bflat View Post
2019 132TSI Tiguan
2011 Audi S4 Wagon
1988 MK1 Caddy
2006 Polo GTIComment
-
Aah great, I'll be checking back here this weekend thenOriginally posted by nightphotographer View Post
As for the LCA bushes; The one time I did this with a buddy we had a workshop press. Just use the proper size tools when using the press. If you don't have one: HOW TO change the lower control arm bushing - TDIClub Forums However I would put something between the new bushings and the vice not the damage them.
Well exactly those two things.... The splitting of the hub won't be to much of problem I imagine; I have some materials to create makeshift tools for that. But what about mounting the new strut? How do you prep the hub? Do you clean it with a wire brush/sand paper and grease it up with something like a standard graphite grease?Originally posted by leitch View Post
How do you know the alignment of the strut regarding the mounting plate for the anti-roll bar linkage? Is there perhaps a non-symmetrical shape or male female setup on the end of the strut to ensure alignment?
To avoid noise problems I would change the top bearing as a precaution. On my 6n I've tried to loosen the top locking nut by hand the right way but the allen key went dull. I was able to release the top locking nut with a basic airtool (using coil compressors). How about that?
KW says replacing the drop links for short/adjustable ones isn't necessary. I assume this is true for the lowering range THEY specified? How about dropping it a bit lower than the allowed 40 mm?
Sorry to post this in your topic nightphotographer, but I imagined these question (and hopefully answers ) would be helpfull to you to.
CheersComment
-
The hub I just gave a really good clean, and then prepped with a thin layer of high pressure/temperature grease to prevent water penetration.
Alignment is assisted by an alignment/locking tab on the rear of the strut through which the hub's pinch bolt passes. You can sort of rotate the strut back and forth while jacking the hub up onto it to get the new one in.
KWs have a revised (elevated) drop link mounting tab to prevent the need for shorter links, even when low. The ride is pretty horrible when it's really low, though, so consider that, hah! If you want low, I would say just install without the purple spring perch adjusters in the rear (as low as possible), then match the front for height (or go about lower at the front).
The Allen key in the top of the stut is 7mm which is a prick of a size to even find to start with. In the at least it's 6mm. If you're not worried about potentially damaging your stock struts you may be able to loosen the top nut a could of turns while the struts are on the car/under load to make it easier to get off once it's all out of the car. Either way you will need an offset 13/16" ring spanner.
If I think of anything else I'll let you know.
'16 Octavia RS Wagon
Past - '07 Polo GTI
'08 RenaultSport Clio 197Comment
-
All this info is really handy guys - and please feel free to post anything else you can think off - I'm just absorbing it all now before the install tomorrow. Off to fit the TIP now - I've allowed myself a timeframe of 3-4 hours, but I'm going to time myself to see how my skills have come on since I first started playing with cars
2019 132TSI Tiguan
2011 Audi S4 Wagon
1988 MK1 Caddy
2006 Polo GTIComment
-
I'm now show ready - the badges are off
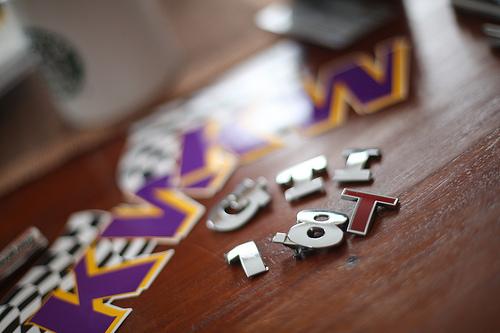
8D2B1213 by night photographer, on Flickr
Now I have one of these badges spare I wouldn't mind putting on the lower right side of the boot - what do you reckon? It's from an Ibiza Cupra (so nearly the same car, but different brand)

576511661_eff6ea67fc by night photographer, on Flickr2019 132TSI Tiguan
2011 Audi S4 Wagon
1988 MK1 Caddy
2006 Polo GTIComment
-
I debaged my tailgate, except for the centre VW badge, but I say go for it
06 VW 9N3 Polo GTI - Reflex Silver Leather/OEM Colour coded S/guard/OEM Lower Honeycombe Grille/NSP Boost Gauge/APR Stage 1+,Dogbone & DP/K&N filter/Forge s/shift,DV008 & Strut brace/PD 160/Samco camo TIP/Whitline RSB/FK AK's/17 x 8 Oettiger RE's/Alpine Head Unit & Sony Amp. OEM+FTWComment
-
I've just put it on...maybe it's my positioning but I'm not sure if it suits, fully debadged looks pretty good. I'll put a pic of the new badge up soon - maybe tomorrow when I'll have some more lowz
2019 132TSI Tiguan
2011 Audi S4 Wagon
1988 MK1 Caddy
2006 Polo GTIComment
-
Thanks leitch... really useful.Originally posted by leitch View Post
7mm Allen key is not a problem over here any bigger shop than the local-hobby-bob has them on stock. Where do you use the 13/16" for? I assume for loosening the top spring/bearing nut but shouldn't that be 21mm? And when i used the air tools i didn't even bother holding the piston, the nut should come off easily with that kind of tools since it's only tightened to 60Nm and it shouldn't really be seized because it's protected from dirt.
I've just been going through elsa, some tips:
Top strut mounting bolts (3 pc): 15nm + 90 deg [replace after removal]
Top strut spring/top bearing locking (on piston) nut (1pc): 60Nm [replace after removal]
coupling rod to suspension (drop link): 40Nm [replace nut after removal]
Elsa suggests using a workshop jack in order to reinstall the strut to hub carrier. It's says to mount the strut with the 3 bolts for the upper shock absorber mounting. Then position workshop jack under wheel bearing housing. While jacking push the brake disc TOWARDS the strut because the shock absorber tube can become skewed in the bore of the hub carrier.
keep it badge less. I would've removed the vw badge if it wasn't for the sinkhole.Originally posted by nightphotographer View Post
CheersComment
-
Yep sorry 21mm should work - I went with 13/16 because the deep spark plug style socket in my Sidchrome set fit perfectly and is 13/16 nominal size. You're right it shouldn't seize but after five years of disuse, I remember the nuts and threads on my stock struts had plenty of surface rust and were pretty hard to get off.Originally posted by polomaniac View Post
The comment about the jack under the hub is exactly right. I was going to mention it but couldn't really think of how else anyone would do it - you won't be able to lift the hub assembly onto the strut by hand, that's for sure. With it supported by the jack you have your hands free to ensure that it's aligned properly.
'16 Octavia RS Wagon
Past - '07 Polo GTI
'08 RenaultSport Clio 197Comment
-
Ok that's to bad about the corrosion, haven't remove the protecting caps yet. Just hope for the best then.Originally posted by leitch View Post
I've also had a look at the 'special' tool to spread/open the hub; it's basically a 1/2" closed socket with a small lip on top (like the tip of a flathead screwdriver). Elsa instructions are to place it and rotate it 90 degrees, and thus prying the hub open. This can be done by any other tool in my opinion as long as the absorber tube is not damaged. Something like a jig made from hardened steel would suffice.
I'm going shopping for kw v1's now
Comment
-
Here's this weekend's progress:
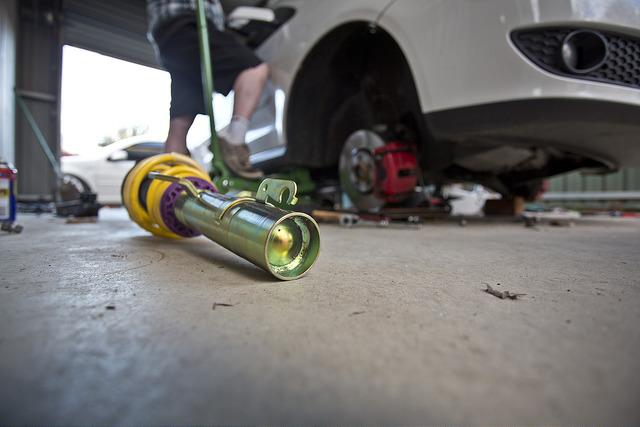
8D2B1238 raw edit by night photographer, on Flickr
Simon showing off some leg with before we put the front coils in.
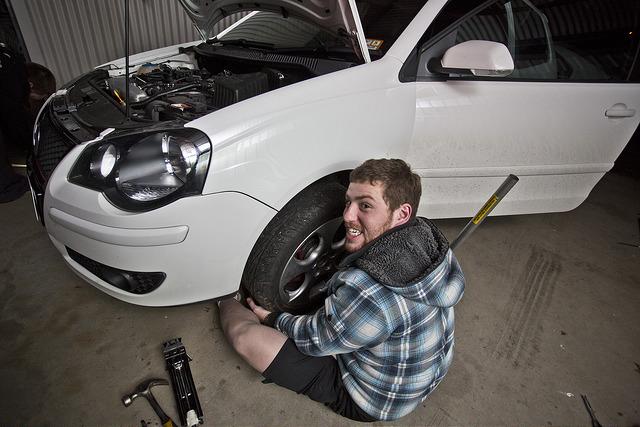
8D2B1240 raw edit by night photographer, on Flickr
DV008 Installed
8D2B1243 raw edit by night photographer, on Flickr
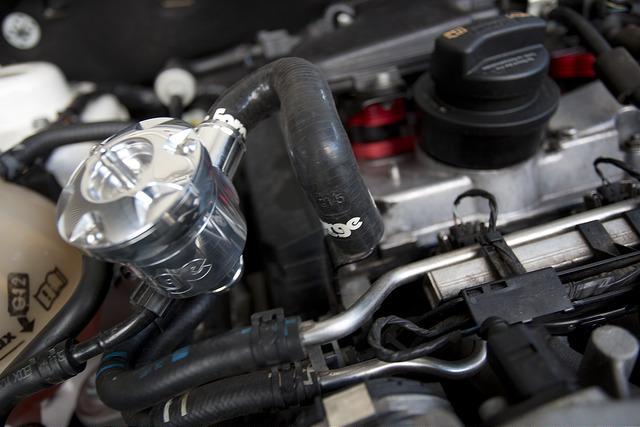
8D2B1244 raw edit by night photographer, on Flickr
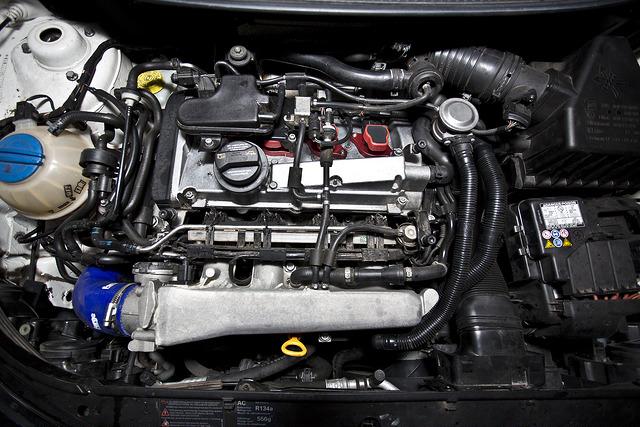
Engine bay - haven't actually put the new TIP and DV in yet, but I liked the picture
2019 132TSI Tiguan
2011 Audi S4 Wagon
1988 MK1 Caddy
2006 Polo GTIComment
-
Colour coded rear bumper is now done - looks like I need a massive detail to get the rest of the paint back to the original colour! Any tips would be appreciated, so far thinking just a mega cut and polish with a machine buffer - any other tips to getting the paint back to showroom condition would be awesome.
Untitled by night photographer, on Flickr
Now here's the annoying part, I've got my 9N Side Skirts painted too - they fit fine and look really cool, but I need some help choosing what adhesive to use to fit best. Whatever was used from factory to hold the originals in was REALLY good - how can I get some that good? Is it worth paying VW to do it - should only take an hour, I don't mind if I get a great fit that's going to last. Here's a test fit:
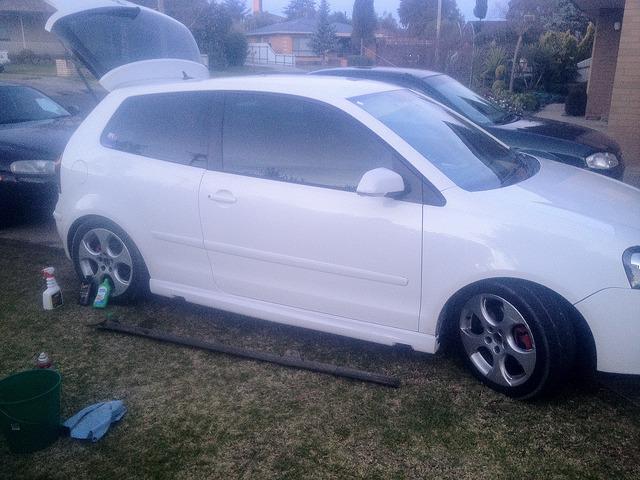
Untitled by night photographer, on Flickr
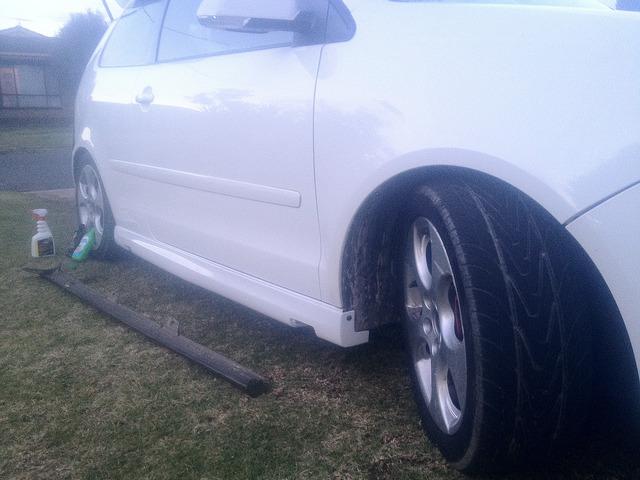
Untitled by night photographer, on Flickr
Those gaps are normal by the way, they're covered by these little blanking plates, I just hadn't fitted them.2019 132TSI Tiguan
2011 Audi S4 Wagon
1988 MK1 Caddy
2006 Polo GTIComment
-
Bunnings sell a good weatherproof mounting tape, I held lights on a bathroom wall for years, never budged. Might be a little thick tho, I'd run a small bead of something after they're on to make cleaning easier
Is the Bluemotion lip close?Comment
Comment