Above Forum Ad

Collapse

Announcement

Collapse
No announcement yet.

MountainBikeMike's Skodaru

Collapse
This topic is closed.
X
X
 
  • Filter
  • Time
  • Show
Clear All
new posts

  • Skooter,
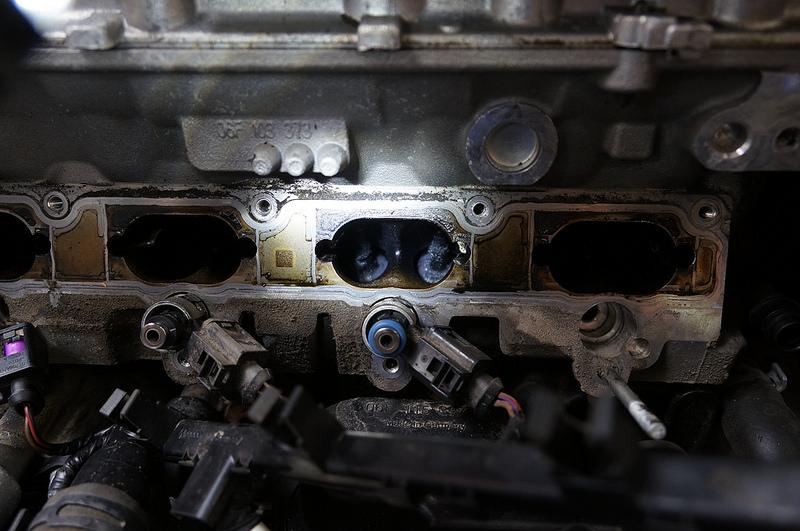
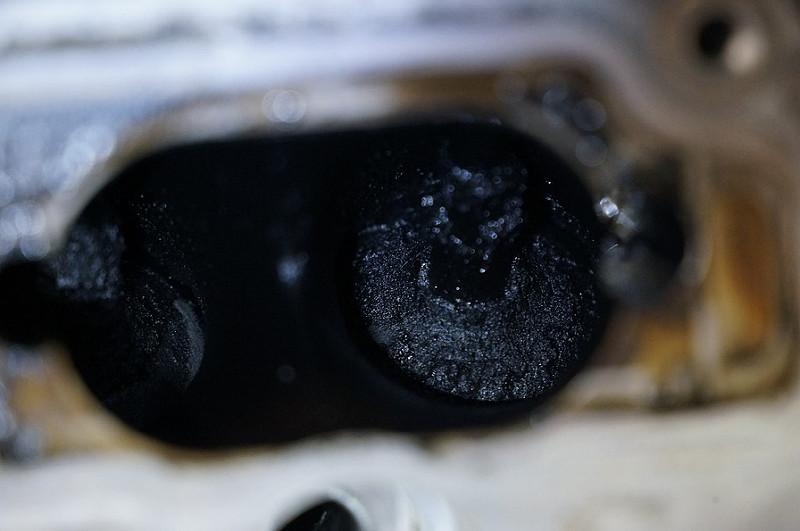
    How / why would a track day decarb the inlets to any noticeable degree? italian tune doesn't work on these cars - mainly because of DI - no raw fuel is hitting the valves to clean them.

    If that guy had put the water more onto "spray" it wouldn't be too bad. It's actually quite frightening how much water starts getting sucked out when it starts to self-syphon.

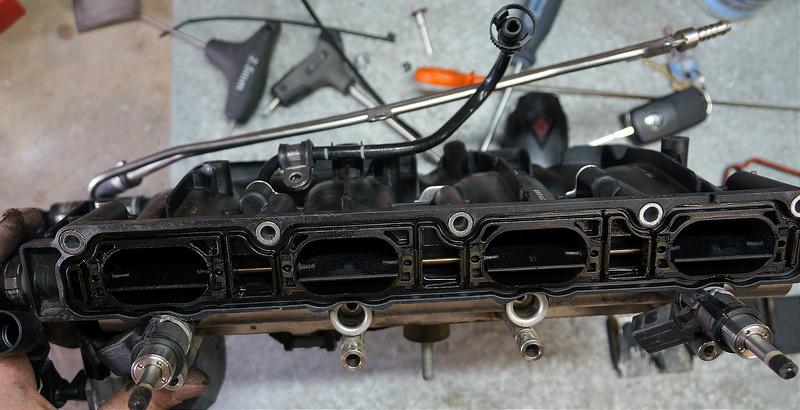
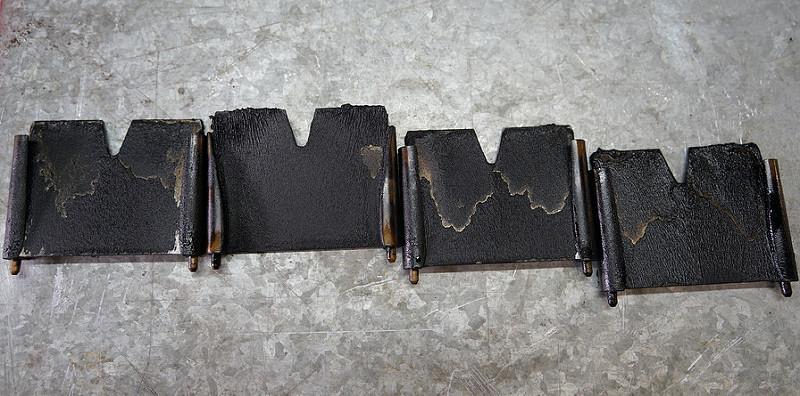
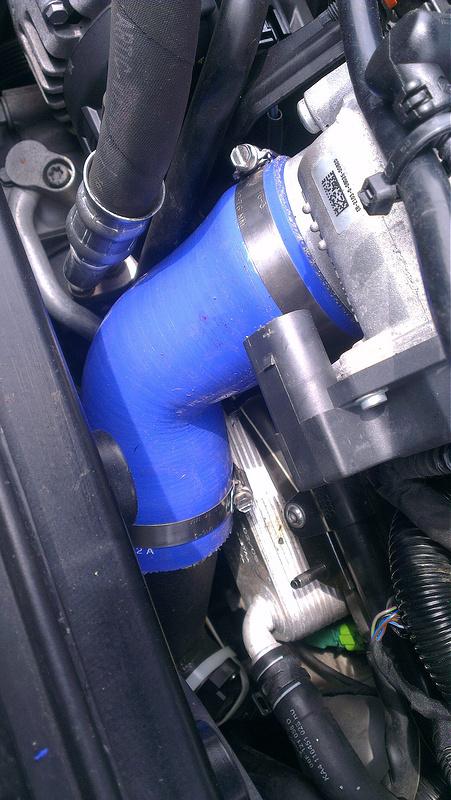
    I reckon I do everything right to minimise intake build-up & you should have seen the amount of crap on my inlets when they had the manifold off to do the water pump (110,000km??). That's when i decided to get pro-active via the air temp sensor port.
    carandimage The place where Off-Topic is On-Topic
    I used to think I was anal-retentive until I started getting involved in car forums

    Comment


    • Alright guys, to settle this I finally decided to start my full carbon clean at 1.30am. I thought you know what, it cant be to bad. I should finished by 7.30-8.30...... Bring on 1.30am to start it up!

      I'm sooo happy I did the clean. I've been having a number of issues since tuning included blue smoke, rough idles, and hesitations. I'll see if this has sorted these problems in the coming days once the ECU re-learns. For anyone thats done more than 50,000km I'd recommended this 100%. I did mine at 120,000 and you could tell, but to be honest it looks similar to a lot of others I've seen before.

      For anyone thinking that the Subaru or other foaming cleaners will work instead of a manifold-off clean, it JUST WONT. After all the km's this stuff is heat-baked on. I had to use a scribe/pick, and wire brushes on the valves, inlets, and throttle plates. Then I had to spray, soak, scrub, mop up, blow dry, pick/scribe, and repeat over ten times per valve, with heavy degreasers. Each valve took roughly an hour to clean. However, you may use the Subaru or other cleaning process AFTER this process or on new cars every 5-10,000km to help avoid build-up IMO. The factory seal gasket was in good nic, so like others, I re-used.

      If you are doing a method of cleaning with water, or even the same method as me, you have to be careful with the valves. On mine, 3 of the valves only were closed. I had to wait till they were done cleaning, put it in first and roll the car forward to close the last valve. But lots of degreaser and particles fell in to the cylinder even though it was only open a couple millimeters. So it took ages turning over to start.

      Heres so pictures of the process.


      A lot of other's DIY's didn't show cleaning of this. I didn't work out how to remove the whole flap plate, but starting from the right, most of it flexes out, so you can clean 90% of them. There is heavy build up here and you need a scribe or wire brush to remove it.


      Throttle plates look healthy aye


      First sight of the valves. Lets get a better look


      The injectors on the manifold had build up around the port but weren't ridiculous


      But injectors on 1 and 4 were atrocious. Completely caked on. Had to scribe off the junk

      Here's the results after the clean


      www.TheRapidWrench.Melbourne
      The convenient, professional and affordable mobile bicycle mechanic that comes to you!
      My RS build thread

      Comment


      • Very well done, Mike. You're leading in the way in DIY's, keep up the good work.

        Comment


        • Looking at the photos this work clearly needed to be done - and good effort/result

          So Brad - what is the cause of this?
          Is this a oil burning turbo VAG symptom?

          My Nissan 350Z with 252,000km on the clock is clean as a whistle and has never been torn down (it's NA however)
          2012.1 Skoda Octavia VRS DSG Wagon - Carbonio cold air intake and pipe - HPA Motorsports BBK 355mm rotors 6 pot calipers
          APR Stage II ECU - APR 3" exhaust down pipe & high flow catalyst
          APR/HP Roll bars - Eibach springs and Bilstien shocks
          Supaloy lower control arms - Enkei 18*8 Wheels

          Comment


          • That's a great DIY! Looks like a mission but!

            Originally posted by Martin View Post
            Looking at the photos this work clearly needed to be done - and good effort/result

            So Brad - what is the cause of this?
            Is this a oil burning turbo VAG symptom?

            My Nissan 350Z with 252,000km on the clock is clean as a whistle and has never been torn down (it's NA however)
            It's a direct injection thing, 'normal' injection engines the fuel washes over the valves. And a N/A will have far less blow by.

            Comment


            • Well done Mike

              Comment


              • Originally posted by 14nce View Post
                It's a direct injection thing, 'normal' injection engines the fuel washes over the valves. And a N/A will have far less blow by.
                Makes perfect sense - thanks
                2012.1 Skoda Octavia VRS DSG Wagon - Carbonio cold air intake and pipe - HPA Motorsports BBK 355mm rotors 6 pot calipers
                APR Stage II ECU - APR 3" exhaust down pipe & high flow catalyst
                APR/HP Roll bars - Eibach springs and Bilstien shocks
                Supaloy lower control arms - Enkei 18*8 Wheels

                Comment


                • Originally posted by Martin View Post
                  Looking at the photos this work clearly needed to be done - and good effort/result

                  So Brad - what is the cause of this?
                  Is this a oil burning turbo VAG symptom?
                  Heres some more helpful links:

                  Audi FSI Engine Carbon Build-up Megathread
                  Direct Injection Fouls Some Early Adopters - AutoObserver

                  -------------------------------------------------------------------------------------------------------

                  Now for a few scattered updates:

                  The other day I decided to fix up my initial dodgy ghetto muffler add-on. It wasn't sitting up high in the bumper, had the tendency to rotate downwards, and could potentially fall off.


                  First I shaved down the weld on the added piece of of pipe I stole out of the flange on the old downpipe. Now that the weld is shaved down I can fit a band clamp on properly, so it sits on a couple centimeters not one...


                  Then I belted the rear hook towards the rear, to bring the muffler position forward. It was sticking too far to the rear before. I also cut a little flange off the tail pipe end (the pipe coming to meet this muffler) so this brings it closer for a better fit.


                  Had to shave the damn band clamp because the bend in the piping was so close


                  Welded on a thick hanging hook on the opposite side of the muffler, so it gets supported at each end and cannot rotate. Hung it on with wire rated to 250kg breaking stregth, and it lets it swing as it should. I've got a 55" tv hanging from the ceiling in my bedroom with this stuff Highly ghetto, as usual.

                  Ended up having to run the home made band clamp again anyway as I got the wrong size.... sigh.

                  --------------------------------------------------------------------------------------------

                  Next thing, I've had the Tarmac Engineering turbo heat sheild sitting around for months because the engine cover mounts got stuff. I finally remove them with a dremel and was able to save the threads. I also received the red coil pack loom covers from ECS and got those fitted at the same time


                  The sticker is from some BMX company. Looked cool.


                  I had to cut a hole here for the wiring loom, an obvious difference from the R8...

                  THEN I went ahead and decided fu ck it, I'm going full retard


                  Fark stealth. And ignore the random off cuts I had left over which I accidentally left on the motor for the photos.


                  Most people don't like it but I dunno. For $20 of tubing, what evers. Could look better with some of them, just not ALL of them :p

                  --------------------------------------------------------------------------------------------------------------

                  Next I got a Forge Big Shift Knob Finally! No more sloppy shift! Feels great, looks great. Comes in at I think 350gm, which is more than a fair few others by 100gm.


                  And it came with this stick which had a rad fit on top of the rad

                  -----------------------------------------------------------------------------------------------

                  While we're on the subject of shifters, A WILD ECS SHORT SHIFTER APPEARS


                  I ended up going for this over the DieselGeek as its $120 cheaper, and I didn't really need to have a shorter side shift- stock is short enough and long enough to help me know which gear I'm in. It's very similar to the eBay one I had earlier, but the slot for the plastic slider is long so the slider can't fall out :p It also has the ability to change the weights, which makes a big difference to the notchy feel.


                  I ended up adding 4 of the 5 weights to the end first try, and going for the shortest shift point. This reduced the throw from 12cm to 4cm!!! ridiculous. I was so short I had a lot of trouble spotting what gear I was in from far, and also found it to be too much arm effort. The next day I changed it to the next longer position, giving me a 6cm throw (50% reduction). I also removed another weight (3 total) and may remove one more to dial in the feel. So far after 5 days and a Reefton run this combo feels like a winner!


                  For reference, this is the stock shifter. Looking at the shifter, the bottom hole is the pivot point, the top pin is the stock shift location. Look at the marks on the ruler. The mark on 6.7cm is the stock location, 4cm is where I chose to run it currently. The shortest point is just under the 3cm mark...
                  Last edited by MountainBikeMike; 16-02-2014, 01:16 PM.
                  www.TheRapidWrench.Melbourne
                  The convenient, professional and affordable mobile bicycle mechanic that comes to you!
                  My RS build thread

                  Comment


                  • Next I replaced the stock silicon on the throttle body. This was just before doing the carbon clean actually. It let me move the new charge air pipe a little higher and in to a better position, where I could attach the air sensor properly with screws instead of zip ties. The lower intercooler silicon pipe also has less of a bend on it now, should be less restrictive.


                    -----------------------------------------------------------------------------------------


                    Last night I went out with Melbourne Car Meets for a Reefton run. It was rad. About 15 rides, lots of jap, a rocco, rexs, libs, an ae86, skylines, and this neat M4 showcar. It had this super cool carbon twill going, and reflective edging. Looked like something out of Tron on the road. Very cool in person


                    Aaaaaaand sadly on the way home this red p-plater flipped his N/A auto Skyline, AFTER all the twisties and everything, going through a township....... he blames oil on the road... stay safe stay in school kids

                    -----------------------------------------------------------------------------------------


                    And finally I'm selling these side skirts, brand new and un-damaged. Decided it wasn't the look for this car. Bought for $170 on a super good group deal from the UK. Selling for $120 because now unemployed and need cash quick.
                    www.TheRapidWrench.Melbourne
                    The convenient, professional and affordable mobile bicycle mechanic that comes to you!
                    My RS build thread

                    Comment


                    • Originally posted by brad View Post
                      ...your car reminds me of teh Beverly Hillbilly's truck (not sure why)
                      After seeing the recent photos of the engine bay, Doc Emmett Brown's DeLorean comes to mind for me!

                      Nice work, Mike!
                      Current: MY18 TRANSPORTER CrewVan, Indium Grey
                      Previous: MY10 Tiguan 2.0TSI, Silver Leaf, APR StgII tune + many mod's

                      Comment


                      • You just never stop lol. Sorry to hear about the employment status

                        Comment


                        • Originally posted by 14nce View Post
                          It's a direct injection thing, 'normal' injection engines the fuel washes over the valves. And a N/A will have far less blow by.
                          Martin. ^^^^ This is the answer. For this reason the Mk7 GTI has a 2nd set of auxiliary injectors in the intake manifold that operate around 2000-4000rpm (???) that "wash" the valves.

                          I know a guy that is one of the better tuners of the BZR86 Toyobaru twins. They have the DI & auxiliary injectors. He says he's getting some very interesting output figures using various combinations of the two sets of injectors. Hopefully some of the VW tuners will think a bit outside the square & utilise the extra injectors on the Mk7 to similar effect.


                          Mike: Those valves are beautiful. That's a great job.

                          I still don't think you have your head around how to clean intake valves with water.

                          Rather than 1st gear & roll the car, why didn't you just leave in N & rotate the crankshaft with a socket & bar?

                          It's probably a good idea to do an oil change soon as well.

                          good luck with finding a new job. I'm sure you won't be unemployed for very long - look beyond bicycles at other mech/eng positions. It might be worth your while to give a "work wanted" at Rotorburn too? Maybe even offer to do one-off work as an independant? I'd bring my bike to you if you were local. (my Fox shock is weeping at the moment & the bike feels like a fatty-boombar.
                          carandimage The place where Off-Topic is On-Topic
                          I used to think I was anal-retentive until I started getting involved in car forums

                          Comment


                          • Originally posted by brad View Post
                            Martin. ^^^^ This is the answer. For this reason the Mk7 GTI has a 2nd set of auxiliary injectors in the intake manifold that operate around 2000-4000rpm (???) that "wash" the valves.

                            I know a guy that is one of the better tuners of the BZR86 Toyobaru twins. They have the DI & auxiliary injectors. He says he's getting some very interesting output figures using various combinations of the two sets of injectors. Hopefully some of the VW tuners will think a bit outside the square & utilise the extra injectors on the Mk7 to similar effect.
                            Very interesting!

                            Ok guys - so when are we meant to clean the intake valves?
                            I'm going to have re-read Brad's explaination of how to do it
                            2012.1 Skoda Octavia VRS DSG Wagon - Carbonio cold air intake and pipe - HPA Motorsports BBK 355mm rotors 6 pot calipers
                            APR Stage II ECU - APR 3" exhaust down pipe & high flow catalyst
                            APR/HP Roll bars - Eibach springs and Bilstien shocks
                            Supaloy lower control arms - Enkei 18*8 Wheels

                            Comment


                            • Originally posted by brad View Post
                              Mike: Those valves are beautiful. That's a great job.
                              I still don't think you have your head around how to clean intake valves with water.
                              Rather than 1st gear & roll the car, why didn't you just leave in N & rotate the crankshaft with a socket & bar?
                              It's probably a good idea to do an oil change soon as well.
                              good luck with finding a new job. I'm sure you won't be unemployed for very long - look beyond bicycles at other mech/eng positions. It might be worth your while to give a "work wanted" at Rotorburn too? Maybe even offer to do one-off work as an independant? I'd bring my bike to you if you were local. (my Fox shock is weeping at the moment & the bike feels like a fatty-boombar.
                              Thanks. I didn't turn the cam shaft because that would require me to jack the car up and take the fender off and remove the accessory belt and pulley... about 30-40 mins work return! Auto's would have to do that, manuals don't. Took a minute to roll it forward and close the last valve :p

                              Yeah will do an oil filter soon as well a few thousand k's after the track day and a few cruises. Wheres the best place to get an oil filter and install guide?

                              I got some bike building work for now, but yes looking to expand my horizons. Doing a lot of carpentry now for my sisters wedding and looking to start offering labor in that money pot area.


                              Photo booth, not finished


                              A-frame
                              www.TheRapidWrench.Melbourne
                              The convenient, professional and affordable mobile bicycle mechanic that comes to you!
                              My RS build thread

                              Comment


                              • So theres a lot of fibreglassing going on right now. But I really wanted to get this fuse box cover finished so that I could have it sealed properly again, instead of the plastic bags I ran for two weeks!

                                So this fuse cover project started like this:


                                A stock cover with the locks removed


                                Drew the Skoda logo by hand and cups looking at a pic of it


                                From sketch to blu-tac


                                First layer of fibreglass on


                                Lots of sanding, smoothing, and some builders bog to fill the bubbles. I had a real struggle with bubbles because my resin is white which makes bubbles impossible to see and stamp out, and I used 250g cloth instead of 100g derp


                                This is in between painting, wet-sanding, painting, wet-sanding, painting, wet-sanding, painting, wet-sanding, painting, wet-sanding, painting, wet-sanding, painting, wet-sanding, painting, wet-sanding, painting, wet-sanding, painting, wet-sanding, painting, wet-sanding, painting, wet-sanding, painting, wet-sanding, painting, wet-sanding, painting, wet-sanding

                                I still had a couple of little bubbles I couldn't remove, which made me angry. But overall the job was dragging on and I was happy enough, especially after seeing the completely shi7house job of one on a rocco @ 100mm on the weekend.

                                Wallah!


                                Theres some little bumps in it that I couldn't reach but overall I'm happy. It isn't the most ideal material for all this forming but I'm still happy.
                                www.TheRapidWrench.Melbourne
                                The convenient, professional and affordable mobile bicycle mechanic that comes to you!
                                My RS build thread

                                Comment

                                Working...
                                X