 Tweet
Tweet
We bought this a few months ago. 2009 4 Motion with the 2.5 Turbo diesel. After reading your story I'm hoping as hell it's been serviced properly. Has a full service history, 1 owner, 180K klms. And it wasn't cheap having already been converted to a camper.
-
We bought this a few months ago. 2009 4 Motion with the 2.5 Turbo diesel. After reading your story I'm hoping as hell it's been serviced properly. Has a full service history, 1 owner, 180K klms. And it wasn't cheap having already been converted to a camper. -
Should be fine, these things are like a Panzer tank when going, you just need to watch for the common issues:
Oil and water mixing ( water pump leak ), airbox back pulsing ( cam wear ), exhaust manifold leaks from warping / cracking, and if ever you take the cam out, I'd consider the injector bridge to hold those toggling injectors still! Keep the auto gearbox cool if you have one and do partial fluid and filter changes often! Keep up your engine oil changes, and given the dodgy plated bores I'm running Lucas upper cylinder lube each tank full.
My van is going like a trooper now, but given how much is new in my god damn engine bay, you'd expect that!2014 Skoda Yeti TDI Outdoor 4x4 | Audi Q3 CFGC repower | Darkside tune and Race Cams | Darkside dump pDPF | Wagner Comp IC | Snow Water Meth | Bilstein B6 H&R springs | Rays Homura 2x7 18 x 8" 255 Potenza Sports | Golf R subframe | Superpro sways and bushings | 034 engine mounts | MK6 GTI brakes |Comment
-
Hello Greg. Thanks for writing such a comprehensive summary of your experiences.
I have to replace the cam and lifters on my BPC motor too. At the beginning of your post on page 2 after replacing the cam and lifters you state you had to prime the fuel line. was this because you did some removal of the fuel system that is required to access the cams? And you also stated that it fired up and ran , noisy but ran. A few pages further you couldnt get it to run again, so i am just wondering what the time line was?
cheersComment
-
I also read a bit about priming the lifters. Can you explain what this is and if its necessary on this engine?
cheersComment
-
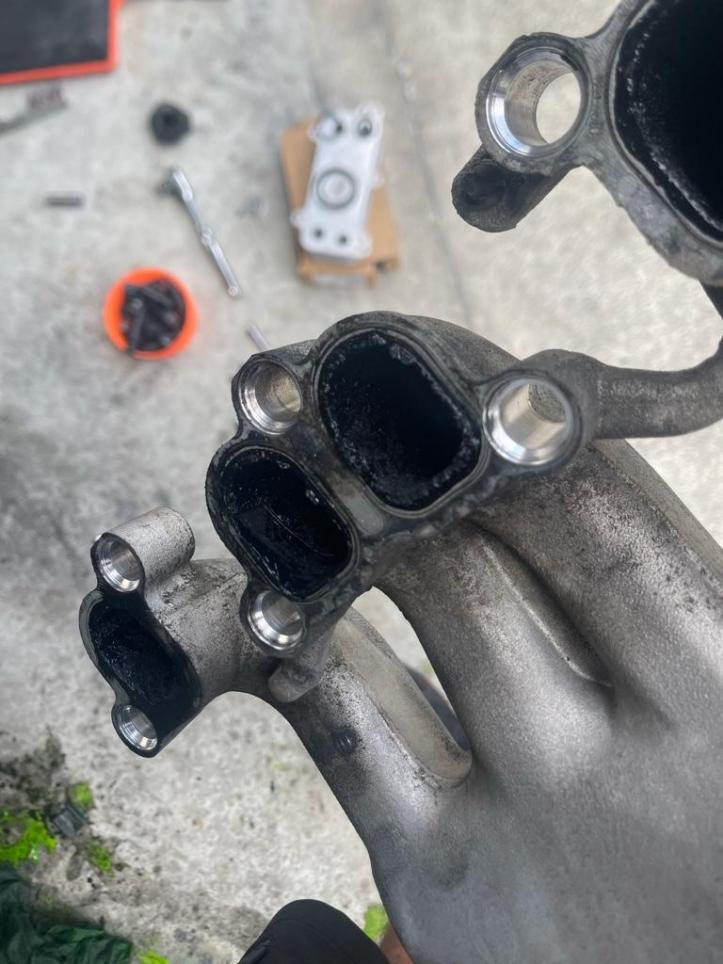
I’m in the process of changing the water pump and oil cooler and noticed serious amount of oily gunk built up on the intake manifold and on the intakes in the head. What’s the best way to clean the intakes on the head without removing it?

Sent from my iPhone using TapatalkComment
-
For a cam swap no fuel priming really necessary, just don't let the side mounted tandem fuel pump drain entirely. If it does, fill it back up with diesel best you can once back in place with a syringe or something. Air can be a pain to purge from the injector system, so simply avoid adding any as much as you can.
I had multiple issues at the same time, a straight cam and lifter cap swap should be straight forward, just make sure you line the old cam notch up with the head, drivers side with the lobes up at 10 and 2 o'clock, take pics, and put the new cam in exactly the same way. Timing is bloody everything.....Last edited by Greg Roles; 13-03-2023, 10:05 AM.2014 Skoda Yeti TDI Outdoor 4x4 | Audi Q3 CFGC repower | Darkside tune and Race Cams | Darkside dump pDPF | Wagner Comp IC | Snow Water Meth | Bilstein B6 H&R springs | Rays Homura 2x7 18 x 8" 255 Potenza Sports | Golf R subframe | Superpro sways and bushings | 034 engine mounts | MK6 GTI brakes |Comment
-
I'd start with lots of degreaser, and use a scraper and then oven cleaner on the really baked on / can't reach stuff, only leaving it a few minutes tops, not the 10-20mins for an oven! Sodium Hydroxide reacts quickly with Aluminium and makes Hydrogen gas....Originally posted by summersky View Post2014 Skoda Yeti TDI Outdoor 4x4 | Audi Q3 CFGC repower | Darkside tune and Race Cams | Darkside dump pDPF | Wagner Comp IC | Snow Water Meth | Bilstein B6 H&R springs | Rays Homura 2x7 18 x 8" 255 Potenza Sports | Golf R subframe | Superpro sways and bushings | 034 engine mounts | MK6 GTI brakes |Comment
-
Thanks Greg. I ended up using degreaser and a pressure washer for the intake and throttle body after scraping as much as possible.
As for the inlet ports on the head, lots of scraping and rubbing with a rag wet with thinners. Not perfect but certainly better than before.
Sent from my iPhone using TapatalkComment
-
Time to block or reduce that EGR, and add a decent catch can, even a China Provent 200 is better than nothing, I find only a thin, dry coat every year with that. Still needs a clean, but it's much easier.2014 Skoda Yeti TDI Outdoor 4x4 | Audi Q3 CFGC repower | Darkside tune and Race Cams | Darkside dump pDPF | Wagner Comp IC | Snow Water Meth | Bilstein B6 H&R springs | Rays Homura 2x7 18 x 8" 255 Potenza Sports | Golf R subframe | Superpro sways and bushings | 034 engine mounts | MK6 GTI brakes |Comment
-
They’re next on my seemingly never ending list. Though the catch can seems easy enough to fit. After some brief research the EGR delete/reduce seems there’s more to it with regard to the ECU…Originally posted by Greg Roles View Post
Anyone on here that’s on the Gold Coast that can help?
Sent from my iPhone using TapatalkComment
-
Get a blanking plate with at least a 7mm hole in it. That lets enough through to not throw an EGR error, but significantly reduces the amount ingested. If it throws a light remove it, disconnect the battery for at least half, and redrill it out to 8mm, then 9mm. 7mm was the minimum on my old GT TDI at 2.0 L, and I know you can buy 7-10mm hole ones on eBay, or even just make one yourself. Matters not what end of EGR inlet pipe you fit it. The EGR has to be happy for it to do regens of the DPF, so it needs to be error free.Originally posted by summersky View Post2014 Skoda Yeti TDI Outdoor 4x4 | Audi Q3 CFGC repower | Darkside tune and Race Cams | Darkside dump pDPF | Wagner Comp IC | Snow Water Meth | Bilstein B6 H&R springs | Rays Homura 2x7 18 x 8" 255 Potenza Sports | Golf R subframe | Superpro sways and bushings | 034 engine mounts | MK6 GTI brakes |Comment
-
This is just a note to say a massive thanks to Greg!
After 9 months + of my Multivan being up on jack stands, several $$$$ having been spent at Darkside and 07eins amongst others and most importantly of all, Greg's meticulous details and information in this entire thread ... I can now confirm that my Multivan has been roady'd, rego'd and back on the road. Man-o-man, the kids love this vehicle.
Best of all, she fired up first time thanks to all of Gregs great instructions!
For a 360K Km vehicle, she runs strong and smooth and is an absolute pleasure to drive.
As she's a 4 Motion, I've decided I'm going to go with a light UK Swamper style setup. I've fitted 245/65/17 on Amarok alloys and I'll be ordering a lift kit from Transport HQ in the next month or so.
So, as I currently stand, in order to get her running again, I've done the following::
- New head gasket, cylinder head bolts, cam replacement set + bolts , injector seal kit (Darkside)
- New injector Bridge (07eins - what a magnificent piece of engineering)
- New VITON injector seal kit (07eins)
To say this BPC engine has tested my knowledge, patience and amateur mechanical skills would be an absolute under statement ... but I can say I know it a little bit better now .
.
Thanks Greg!
Last edited by JimmyFingerz; 02-05-2023, 10:26 AM.Comment
-
Originally posted by JimmyFingerz View Post
Glad I could help, and that my often frustrating misadventure could help someone else along the way, the whole point of the thread. My engine has been perfect since, and it runs like clockwork. I'm now trying to get the notorious auto to the same point, and no doubt will be a bit of a windy path, but I am persistent if not overly smart!
Thanks for the post, and sorry to be so slow to reply, I should bloody log in here more often!2014 Skoda Yeti TDI Outdoor 4x4 | Audi Q3 CFGC repower | Darkside tune and Race Cams | Darkside dump pDPF | Wagner Comp IC | Snow Water Meth | Bilstein B6 H&R springs | Rays Homura 2x7 18 x 8" 255 Potenza Sports | Golf R subframe | Superpro sways and bushings | 034 engine mounts | MK6 GTI brakes |Comment
-
Finally into a bit more my scene when it comes to engines....time for some fun stuff!
Used two x 2.25" 90 degree alloy elbows, two silicon joiners and clamps, and just cut the VW swaged end off the factory pipes. Had to trim the elbows, but talk about a perfect fit. The intercooler dimensions are 2.25" ( 57mm ) in / out, 550 x 230 x 55mm core. Just needs a bracket. All up cost about $400! I'm changing the current trans cooler to a wider, less tall one, as this fat intercooler takes up a lot of room towards the top, and the trans cooler pictured fouls the top edge of the bumper below the grill.
Replaced my dodgey looking radiator while in there with a quality China one, again about $300.
Last edited by Greg Roles; 13-06-2023, 04:49 PM.2014 Skoda Yeti TDI Outdoor 4x4 | Audi Q3 CFGC repower | Darkside tune and Race Cams | Darkside dump pDPF | Wagner Comp IC | Snow Water Meth | Bilstein B6 H&R springs | Rays Homura 2x7 18 x 8" 255 Potenza Sports | Golf R subframe | Superpro sways and bushings | 034 engine mounts | MK6 GTI brakes |Comment
-
Looks good Greg. ��
I'd be interested to know if you find the find the new intercooler makes a noticeable difference, in which case, I'll be sending you a PM for more details .
I reckon I'll need to pull my front bumper off again anyway as I think my aircon radiator might be leaking.Comment
Comment