 Tweet
Tweet
oh and re the whiteline droplinks, the torn boots have been replaced with two brand new ball joints and all they needed was some extra washers to space them out a bit off the strut to prevent the boots touching anything. They are set at the same length as the OE droplinks and are plug and play good to go. If you believe the whiteline literature their extra stiffness over OE droplinks will be the equivalent to adding 1mm extra to a roll bar, not that I could feel it (everything else was pretty soggy) but if you're stuck on a stock front bar it might give you the little increase you're after?
-
-
When you order the swaybar from Whiteline ask for the shorter (lowered suspension) links. If you already have the swaybar then return the longer links and ask for replacement shorter links. This is a common problem with strut mounted links.Originally posted by rgvlee View Post
Cheers
GaryGolf Mk7.5 R, Volvo S60 Polestar, Skyline R32GTSTComment
-
The drivers side droplink fitted. Fairly perpendicular to the bar at the straight ahead but still not wonderful. But like Gary said look what happens when you go to full lock to the right. The strut puts some nasty angles into the droplink and pulls upwards on the bar on that side. Problem is, with either the OE or whiteline bar fitted there doesn't seem to be scope to fit droplimls from the bar directly onto the lower control arm, because the front edge of the lower control arm is actually set back from the tips of the bar (no mounting point on the lower control arm that's directly beneath the bar) and the LCA doesn't have any obvious points to mount too anyway which is a bugger.
This is a picture taken of the passenger side when the wheels are pointed to the left at full lock. Pic taken from the front looking back. You prob have to zoom in to see but the tie rod collides with the kink of the FARB. My car has a shade over 6 degrees pos castor done with the subframes and the balljoint (at the bottom) which is what is causing it. There seems to be plenty of room between the tie rod end and the rim so I think I'm going to have to flip the tie rod ends from left to right so that there offset puts the tie rod away from the FARB a little. In the position its in there if you were cornering hard or head into a driveway etc that's when you'll get that thunk through to the cabin. Been chasing this one for a while but pretty sure its what that sound comes from. I'll do it soon and report back on clearances etc when its done.
This is how I do my toe measurements. Get two hard nylon place mats, cut them in two and put the two halves face down on one another. If you're really finicky you can put talcon powder between the surfaces. Its very effective and as you adjust the toe you can see the tyre moving effortlessly on these 'skid plates'. Makes things very easy.Last edited by sambb; 09-11-2017, 09:48 AM.Comment
-
Feel free to post up a picture of your lower control arms (from the top, looking down, with the swaybar end and the drive shaft in vision) and I'll have a look for a solution.Originally posted by sambb View Post
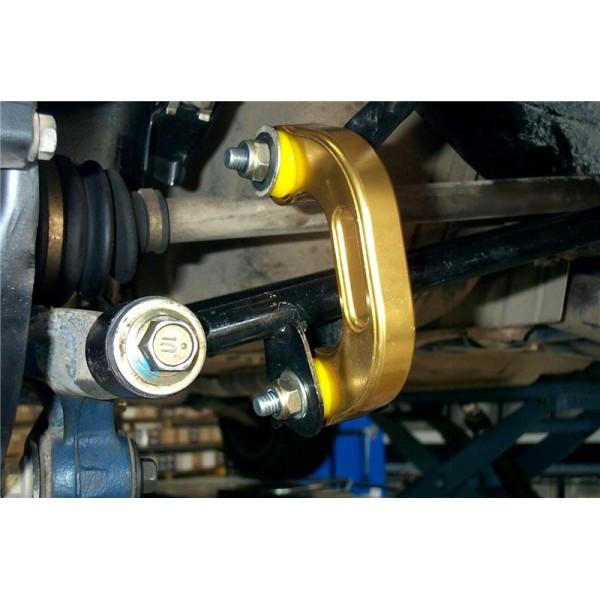
On the Porsches, for example, we used to use a curved swaybar link to clear the toe arm;
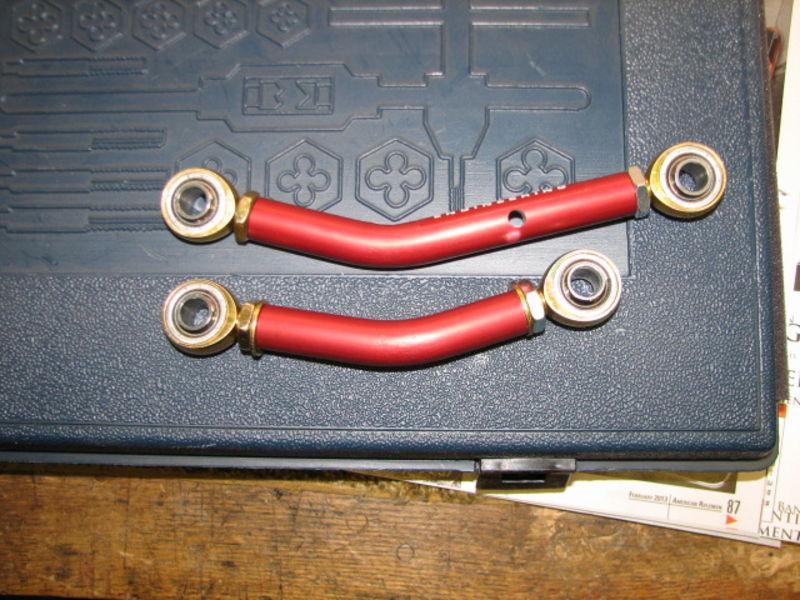
WRX's have the step out links to clear the lower control arm;
I use 2 pieces of aluminium sheet with some axle grease smeared in between.This is how I do my toe measurements. Get two hard nylon place mats, cut them in two and put the two halves face down on one another. If you're really finicky you can put talcon powder between the surfaces. Its very effective and as you adjust the toe you can see the tyre moving effortlessly on these 'skid plates'. Makes things very easy.
Cheers
GaryLast edited by Sydneykid; 07-11-2017, 01:00 PM.Golf Mk7.5 R, Volvo S60 Polestar, Skyline R32GTSTComment
-
righto - i'll be under there tomorrow looking at getting brake ducting in so I'll try to take some pics. thxComment
-
Brake ducting for hillclimbs, does it really need it? I wouldn't have thought the brakes got that hot?Originally posted by sambb View Post
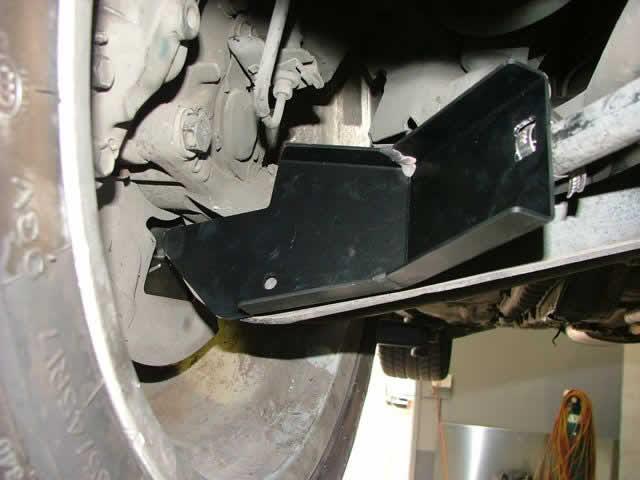
On the Skyline (for track days) I use a pair of scoops, bolted to the lower control that deflect some air to the inside of the rotor;
Cheers
GaryGolf Mk7.5 R, Volvo S60 Polestar, Skyline R32GTSTComment
-
Not sure why but I only just noticed the pics associated with your post re the droplinks just now. I can see there are a few ways to skin a cat now. No in the hillclimbs I definitely don't need ducting and would run blockers for that. They will be for the rsllysprint. They were getting pretty hot there. DBA were surveying everyones disc temps so when you came into time control they were heat gunning your rotors. I cant remember what temp the fronts were at but the guy raised his eyebrows at mine and they sure as hell smelt like they were cooking.Comment
-
This is the adjustable spring platform fitted at the bottom.
The top spring seat fitted. There's a little grommet you remove at the top. With mine the top hole had to be reamed to 14.1 from 13.95 and then was a hand push fit to get it fully home. You could just do it with a drill bit easy enough.
All fitted up. Spring base had to be adjusted to the lowest setting to match the H&R ride height of 320mm from hub centre to guard lip.
Comment
-
As I mentioned in a previous post one of the better handling turning aids for FWD car is the rear ride height, so you want as much up and down adjustment as you can get. With that in mind, unless you can shorter the shock length enough (reduce the droop travel) the main spring isn't trapped at full droop so you can't remove the tender/helper spring. As an alternative, to allow you to go both higher and lower, you could remove the locking ring (below the bottom spring seat). There are no rotational forces at work (like there is on a front strut) so the bottom spring seat shouldn't move, a narrow piece of race tape will also stop any slim chance of rotation. The top rubber spring seat isn't really required either, so I'd remove it. I'd leave the plastic bottom spring seat protector ring in place as the tender/helper springs can dig into the alloy seat making it hard to adjust.
I'd also suggest wrapping some race tape around the exposed threads on the height adjusters as they get damaged from rocks etc.
The seat kit bottom mount onto the control arm looks a bit over engineered to me, I'd probably stick it in the lathe and machine it down by 50%. That would save some unsprung weight and give a bit more travel at the same time
I assume the bump stops are on the shock shaft? You might want to check that they are effective in relation to preventing the main spring coil bind.
Cheers
GaryGolf Mk7.5 R, Volvo S60 Polestar, Skyline R32GTSTComment
-
Hi Gary, Sorry that pic of the fully extended springs is before I've attached the dampers to the beam. The main springs are captive at full droop but I'm not sure if its 100% correct how they are - the divider between the main spring and the helper will sit about half way along the adjuster threads. Is that ok? From a fitting point of view its not nice because as the spring seats as you lower the car off the jack its impossible with one person to prevent the springs rubbing hard against the spring adjuster threads. From a driving point of view its hard to see how they'd ever extend that much that fast and reach full droop especially with a RARB connected so hopefully its never a drama (unless I get all dukes of hazard).
Nice idea about the race tape over the threads to protect them. The adjuster threaded base is also open at the top so will fill up with crud and moisture and then probably seize the bolt that holds it into the beam old spring seat so i'll have to look at a way to plug that.
Yep bump stops are on the shock shaft just below the adjuster. I know Gav's car which was the guinea pig went on MCA's hoist and they did the damper travel setup. But having said that my spring seats my spring seats (top) look different to his and he didn''t have helper springs and in addition they set the spring seats 15mm higher than where I am now (perhaps assuming more rake) and these are X-R's rather than blue's so since a few things have changed it should probably be checked. How do I run a 350lb odd rear wheel rate to the bump stop manually though?
Re rear ride height I'm not sure I'd ever go lower to be honest. With the front at a ride height that puts the LCA pivots level it makes the car level/borderline bum down with the rears where they are. Once I emptied the interior and run with no fuel the arse used to rise a little (but that was on much softer H&R's) - I'm not sure with these springs if the rear will stay more fixed in its height when the rear gets lightened or if it doesn't work that way with spring load. not sure. Either way its level and can only move into a raked position from where it is now. Do FWD competition cars ever run anti-rake?Comment
-
I'd suggest running a couple of layers of race tape over the top of the threaded sleeve, that'll stop the crud getting in, then wrap the tape around the threads. You may have to replace the tape occasionally, on the race cars I do it about every 3 or 4 race meetings. You could put the tender/helpers at the top, but if you can keep the main spring trapped at full droop I'd just leave them off.
Measuring to bump stop contact, it'll take me longer to write this than for you to do it. Count how many coils are in the main spring, then measure the diameter of the wire. For example, 8 turns of 11 mm wire = 88 mm height at coil bind. With the springs out of the car and the shocks bolted up, jack up one side. What you need is for the bump stop to contact long before there is 88 mm between the spring seats. Well over 100 mm as a minimum, so the bump stop has to be compressed a fair bit (say half its free height) before the spring gets anywhere near coil bind.
Rule of thumb, the front roll centre needs to be somewhere around the crankshaft centre line, so on a strut based car that means lower control arm inner bush pivot points higher than outer ball joint pivot points.
On a FWD car the rear roll centre (CoR) needs to be as low as possible, ground level is not a bad place to start, which is hard (impossible) with torsion beam suspension (without engineering it for a Mufford link). Since you can't get your CoR anywhere near where we would like it, the next best is to lower the CoG. So to answer your question, negative rake is the go as long as there is enough suspension travel. That's why adjusting the rear ride height is a good handling tuning tool.
With a higher spring rate the rear will settle less under load than it will with a softer spring rate. Consequently it will rise less when you take the load out.
I think I may have suggested it before, but just in case, stick a small note book and a pencil (pens run out of ink at inconvenient times) in your glove box and write down everything that you measure. Ride height (centre of wheel to guard) is an important one. So next time you know what height did what last time. These days I carry an iPad with me, with everything on every car from every session loaded into individual spreadsheets that are uploaded to the cloud. That way I can look stuff up anywhere anytime with my iPhone, iPad or on the Mac at home.
I hope that answered all of your questions, if not ask away ................
Cheers
GaryLast edited by Sydneykid; 09-11-2017, 12:02 PM.Golf Mk7.5 R, Volvo S60 Polestar, Skyline R32GTSTComment
-
I'm stoked you said that regarding negative rake. I've tried that many different springs/heights to run the car raked, level and slightly bum down and always found that the latter gave the best handling despite everyone telling me its not right. Ive always run the front ride height at what would give level control arm piviots. Of course I can go up a tad and will if you think it'll help. One thing I've always been unsure of is working out the LCA pivot point to work off when comparing its height to the balljoint. The OE setup has anti-dive built into it as the front LCA pivot is much lower than the rear. So do I measure the rear LCA pivot height, the front, and then take an average. Or once I know the LCA inner pivot axis, do I work out a point along it that lines up in top view with the balljoint and that becomes a virtual inner pivot - make sense? Because at the moment I'm just working off the front inner pivot/bolt centre. I do remember Ortiz somewhere saying that the only thing on a rear twist beam that would limit how low you should/could go is ground clearance - alright i'll whip out the lowest collar initially and see what it gets me.
Today I jacked the car so that it was 2wheeling. The inner rear main spring was wholly over the threads and two of the helper coils had started to unbind on the back edge so maybe keep the helpers in?Comment
-
Gary (and anyone else who's interested) here are the NSW hillclimb 2018 dates and series rego:
CAMS NSW Hillclimb Championship >> NEWS: 2018 Racing Calendar - Panorama 3/4th March
CAMS NSW Hillclimb Championship >> NEWS: New Registration Procedure for 2018 - 50 bucksComment
-
Oh wow. Those dates are terrible for me! Bathurst is on my wedding anniversary weekend, and Grafton the weekend of my wife's birthday... Hmmm.Comment
-
she's going to be very disappointedComment
Comment