 Tweet
Tweet
Originally posted by veew
View Post
-
Can confirm that if you follow all the codes in here it works.'16 Polo 6C GTi | Flash Red | H&R Touring Cup Kit 35/55 | Milltek Cat-Back NR | Phillips/Konik 5000K -
Group Buy: Aftermarket Bixenon Headlights (WinPower Lamps)
I'm going to have another go installing these headlights on Sunday as Mark is pulling something dodgy with KWS and therefore I want to know if I have to open up a Paypal dispute within 45 days of payment.
My installation questions are:
1) Regarding step 1: The last time I removed all the screws on the black grill (top and front facing), I wasn't able to lift it adequately to loosen the front grill and remove it from the bumper. What did you guys do?
2) Regarding step 2: Once you remove the M10 "nuts" from underneath the side bumper, do you have to pull the sides of the bumper down before pulling it out to the sides? I wasn't able to get it to swing out to the side and thats as far as I got before bailing on the installation.
3) Regarding step 3: There were only 2 Torx screws for that metal bracket that holds the headlights in place, the PDF file states there are 3 screws. How many screws did you guys encounter?
Also for the group buy participants, if there are any issues with your headlights, please post it up on the forum as it gives me an idea of the quality of the headlights received and also for future potential purchasers. I would like to remind you that you only have 4-6 days left to open up a Paypal dispute if you have any issues with the headlights that require Mark to address. I paid on the 20th of July so today is 40 days following payment.
An issue that is in progress b/w Mark and KWS is KWS is asking Mark to send another ballast. The VCDS coding suggested by Mark did not address the issues experienced. Mark contacted KWS via Paypal (a dispute is currently open) stating he would send the ballast. Mark, however, emailed KWS outside of Paypal stating he would only send the ballast if KWS closed the Paypal dispute.
In this situation if KWS closes the dispute, he CANNOT reopen it and therefore will not have any protection from Paypal.
In light of the dodgy behaviour exhibited by Mark, I would like to remind you your Paypal Buyer Protection is the only thing that will ensure Mark does the right thing. Use the Paypal dispute if you have an issue that needs to be resolved, if it is then you can close the dispute. The dispute and claim process provides up to 50 days for you and Mark to resolve the issue.
Refer to the first page of this thread (http://www.vwwatercooled.com/forums/...ml#post1069640) for all the Paypal Protection policies and fine print.Last edited by veew; 30-08-2014, 07:53 AM.Current:
2017 Mk2 Tiguan 162TSI, R-line, White
2020 Mk7.5 Golf R Wagon, WhiteComment
-
hey veew, so I've coded and installed mine and they are in perfect working order, no complaints from me. Re. your questions:
1: So once you remove the two screws left and right from the grille, you just need some extra pressure - since the grille is attached down into the bumper and back perpendicular to it, you need to pull it in two ways.
2) Once you remove the 6 screws from underneath the wheel well/bumper cover, you need to unsnap the bumper, it's just attached via plastic clips. It needs quite a lot of force, but it's pretty sturdy, don't worry about breaking it. Once you unsnap the bumper, you'll need another hand to pull it while you take out the headlights - that was the most tricky part of the process.
3) There's three - two on the metal bracket, and one deep down near the bottom of the headlight, you'll need to look carefully - maybe use a torch.'16 Polo 6C GTi | Flash Red | H&R Touring Cup Kit 35/55 | Milltek Cat-Back NR | Phillips/Konik 5000KComment
-
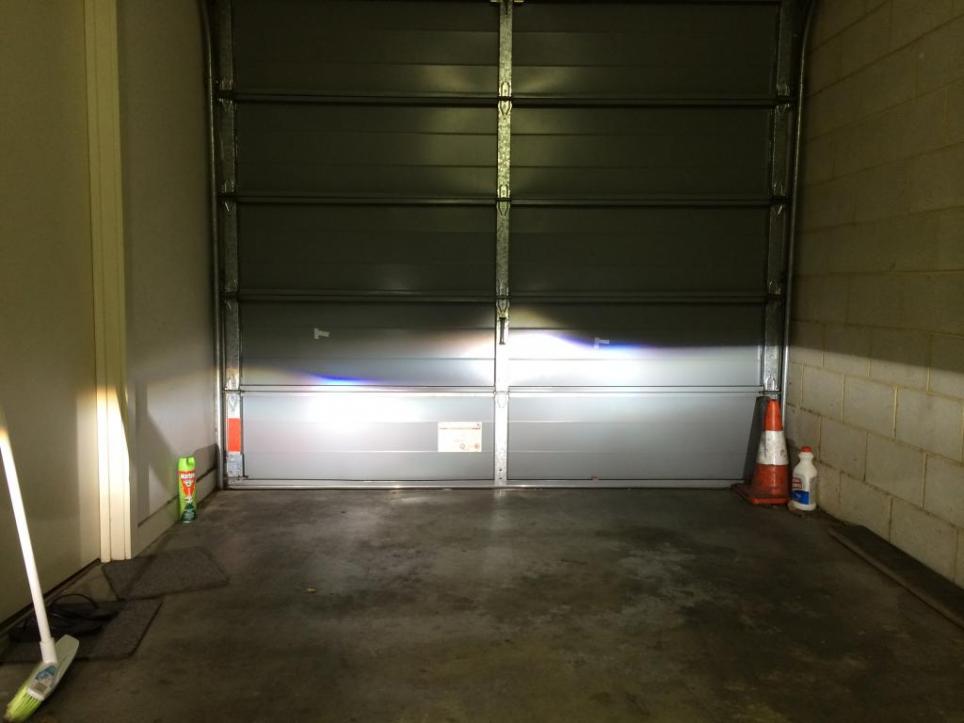
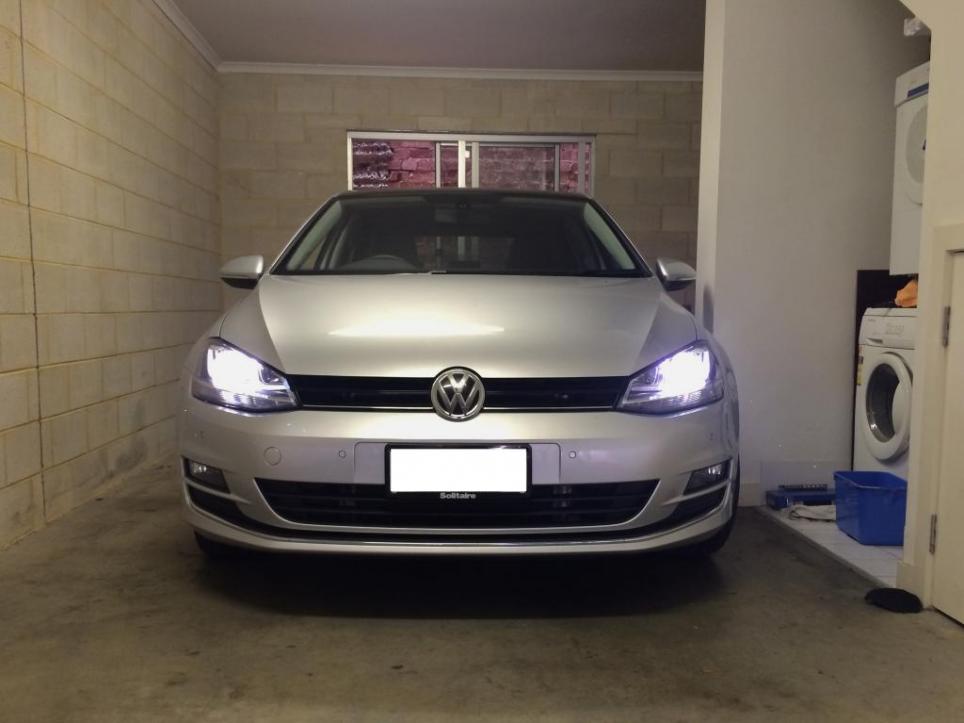
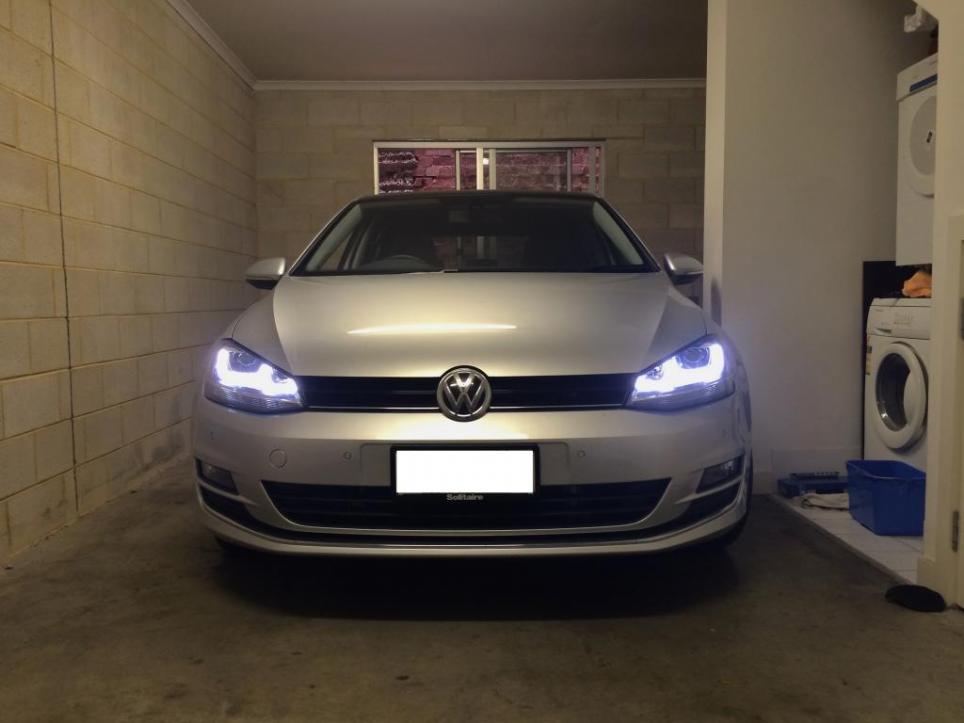
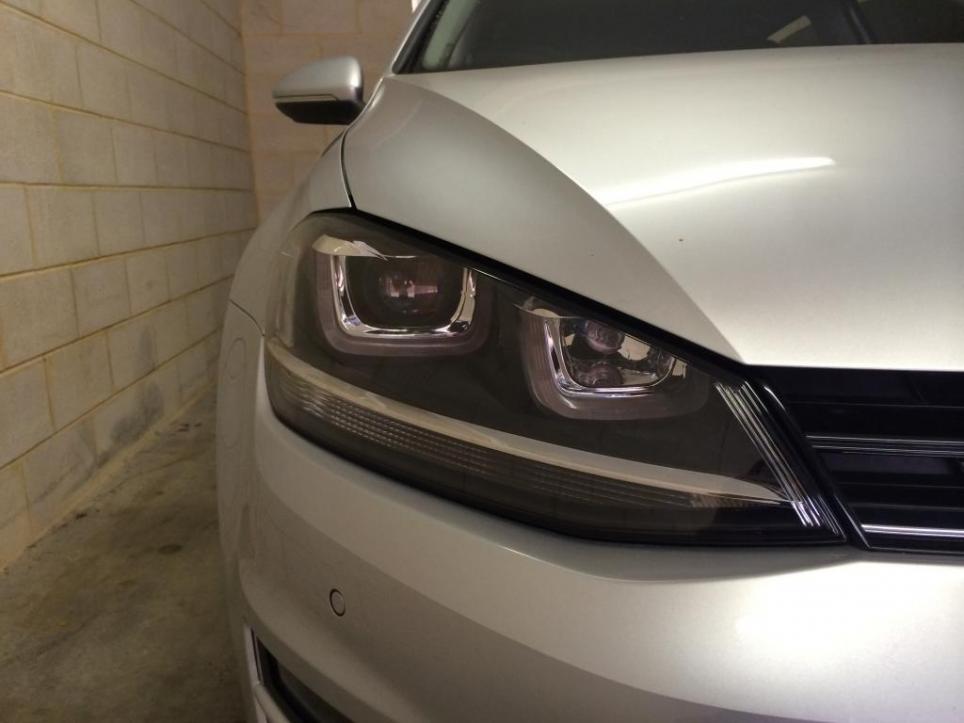
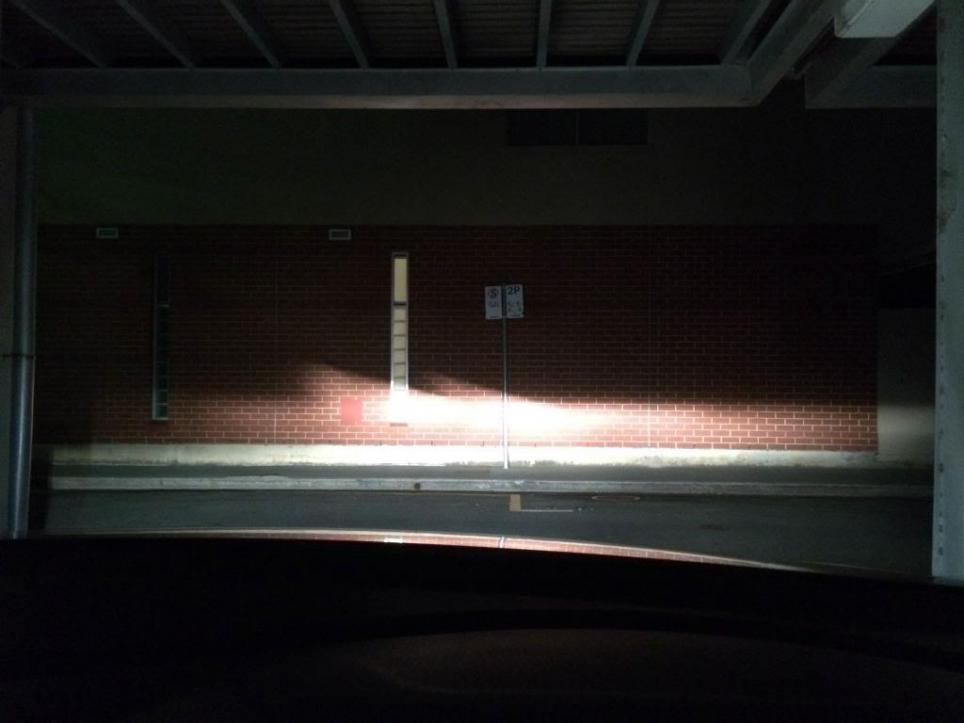
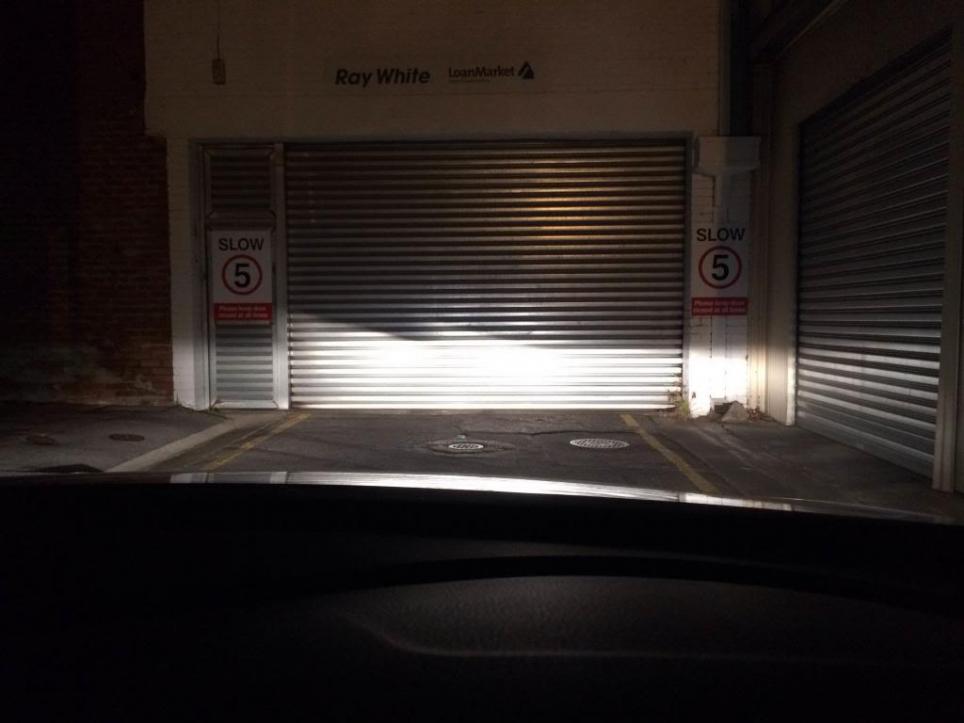
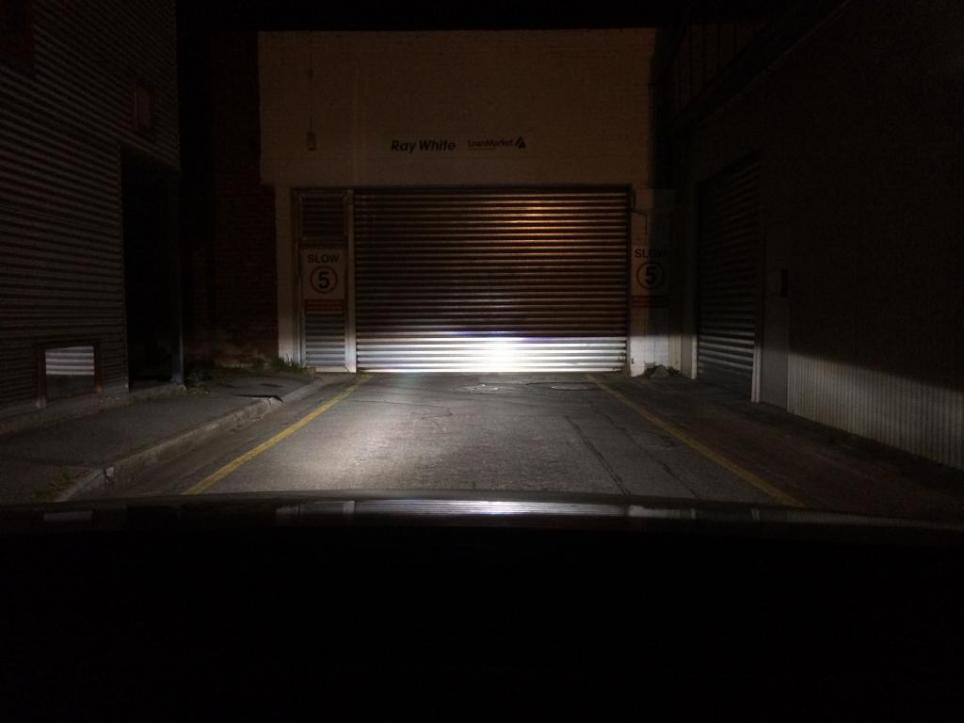
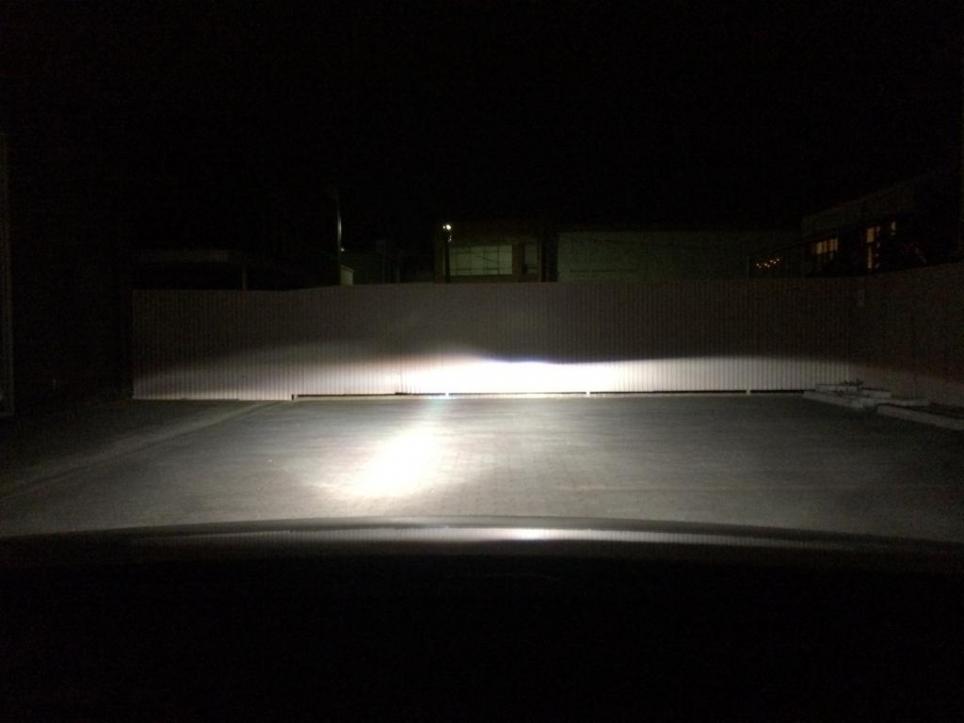
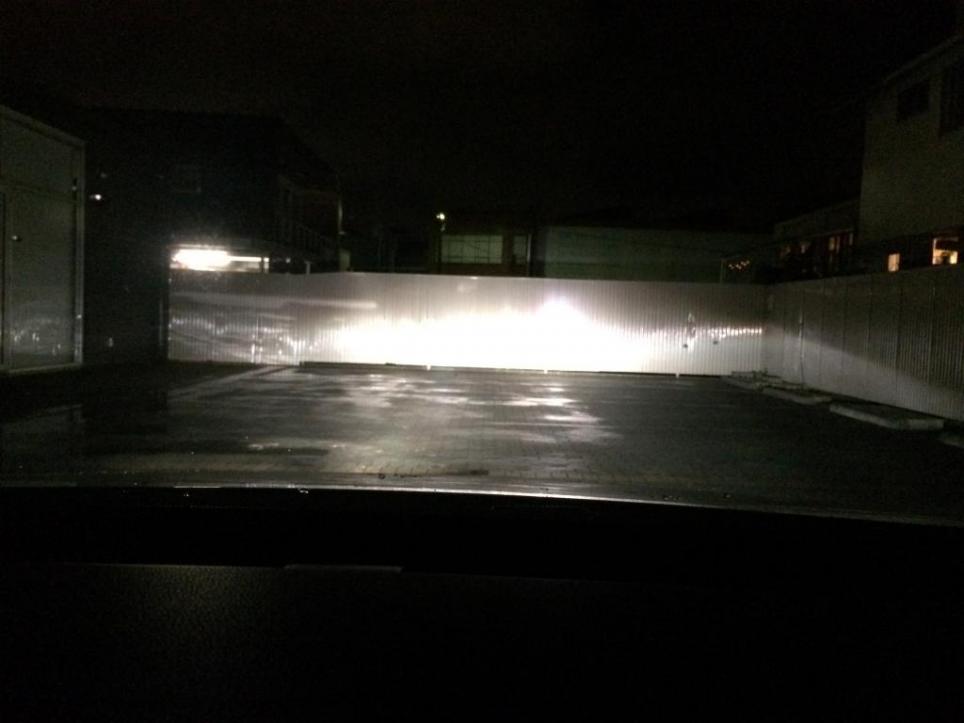
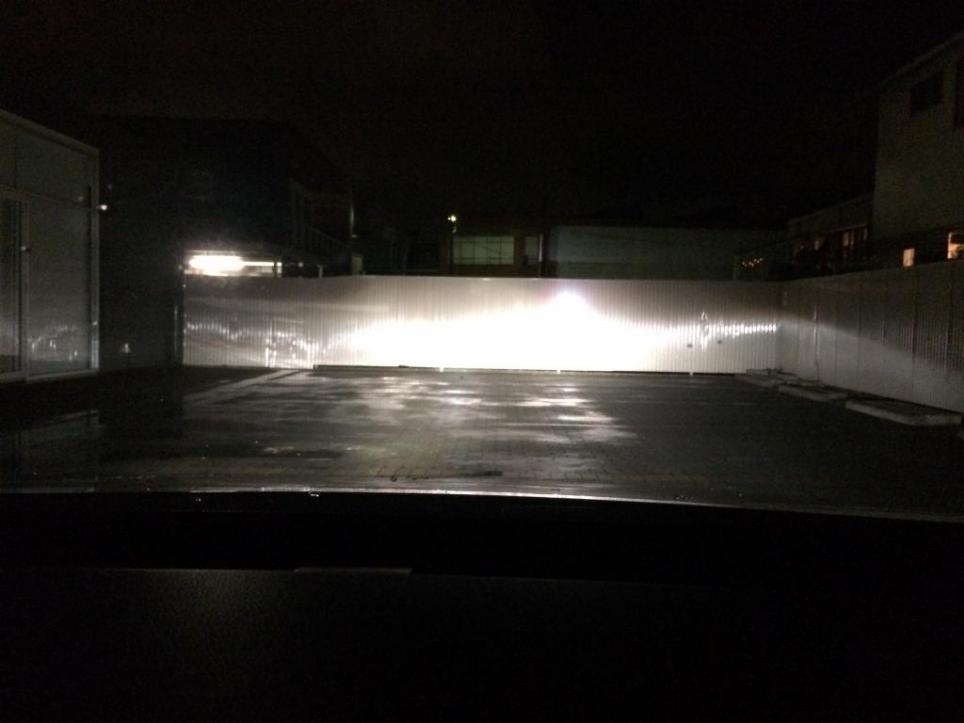
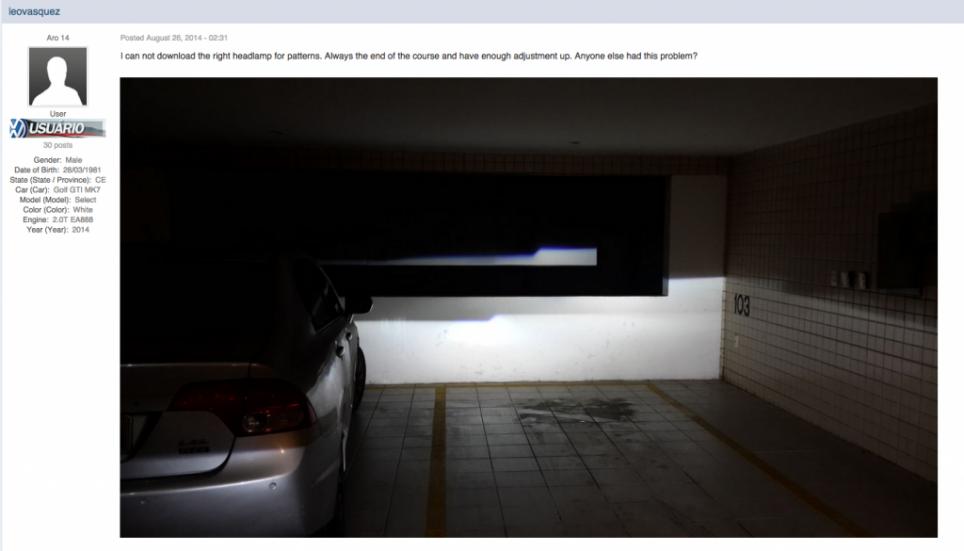
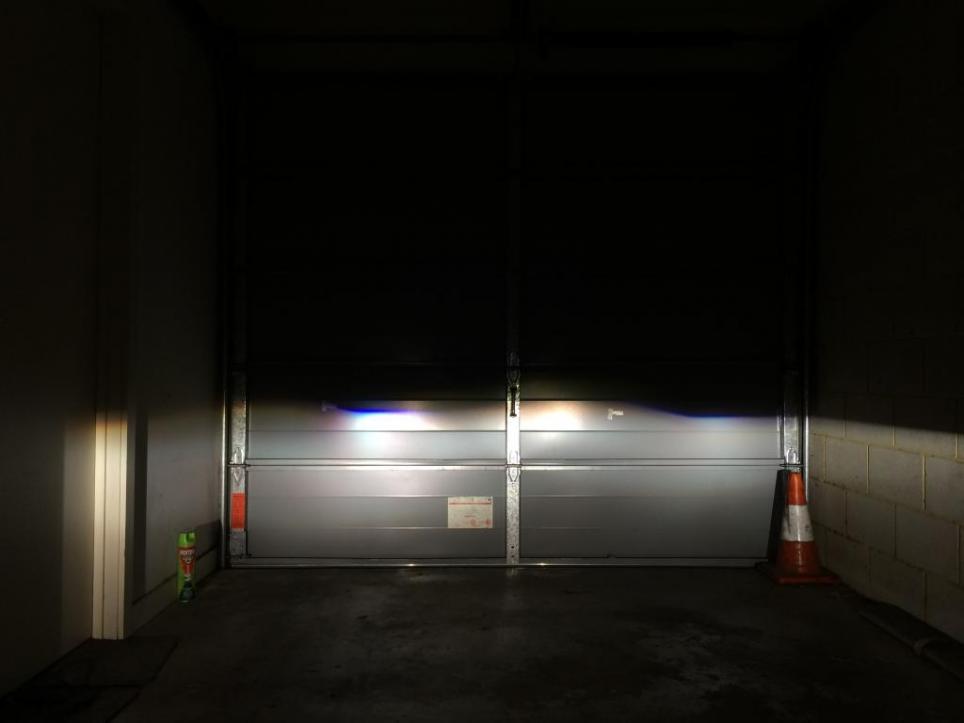
Well I've finally installed my headlights. I had a few issues along the way but they're finally in now.
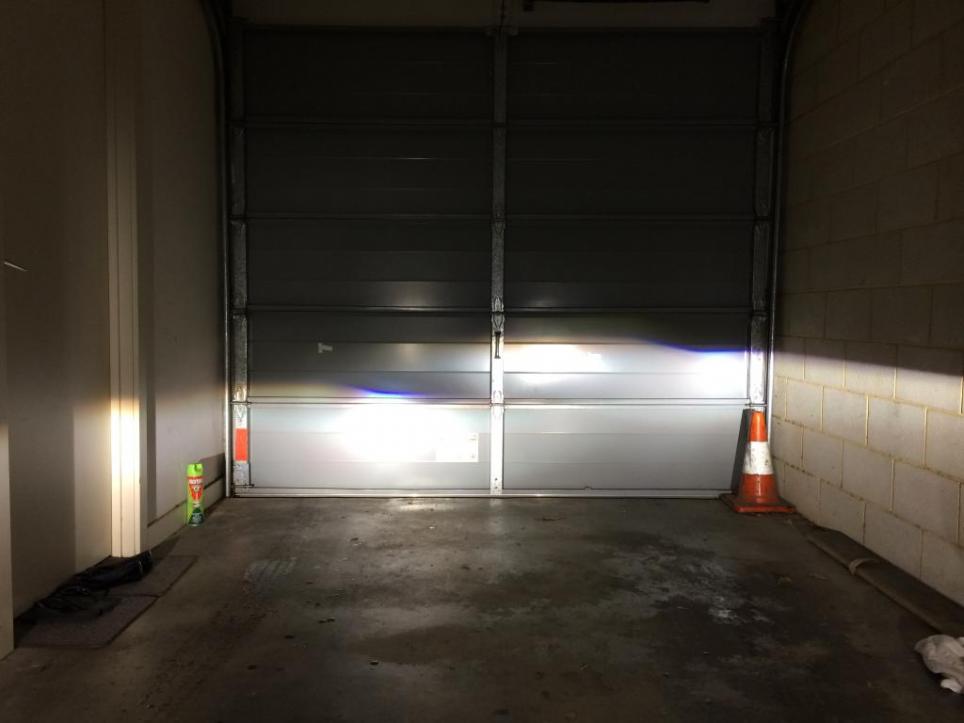
The major issue is the left headlight doesn't adjust high enough, I've definitely got the adjuster at the rear of the headlight clicked to its limit and the interior adjustors are also at their highest setting. The distance to the garage door is only about 3 to 4 metres so the left headlight would be useless in normal driving conditions.
The duct tape on my garage door indicate my OEM halogen cutoff height when the interior adjustor is set at the half way mark (1.5). There still is significantly more adjustment up and down that could be made with the adjustors on the back of the OEM headlight.
I am annoyed this issue wasn't seen as part of WPlamps QC process, it is a very simple thing to check.
Videos of the problem:
WPlamps Golf 7 faulty headlight adjustor - YouTube
WPlamps Golf 7 headlight adjustor problem - YouTube
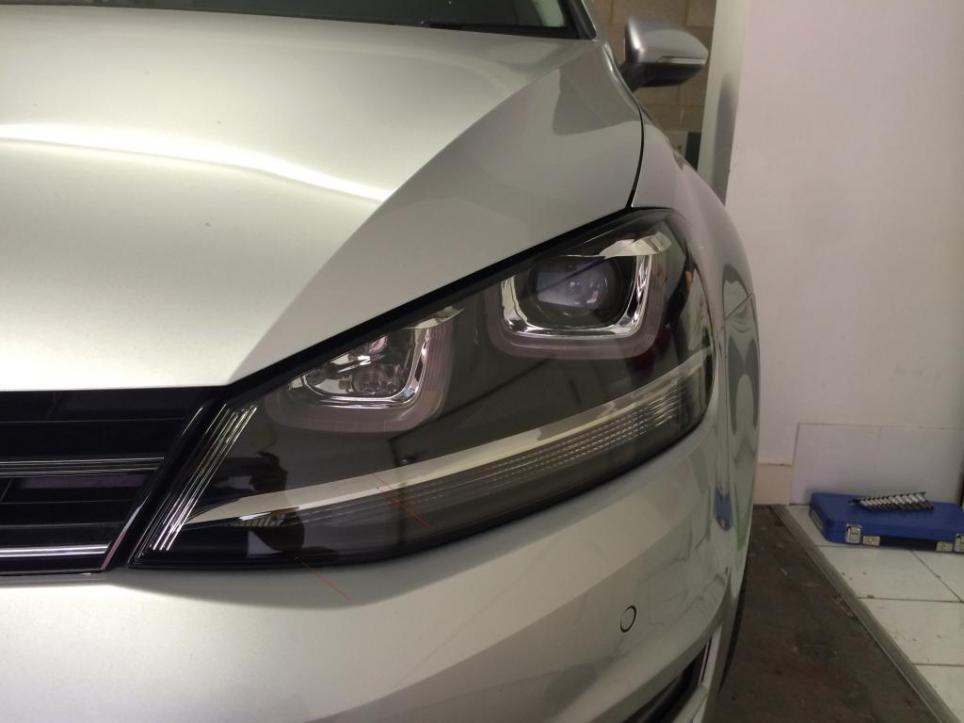
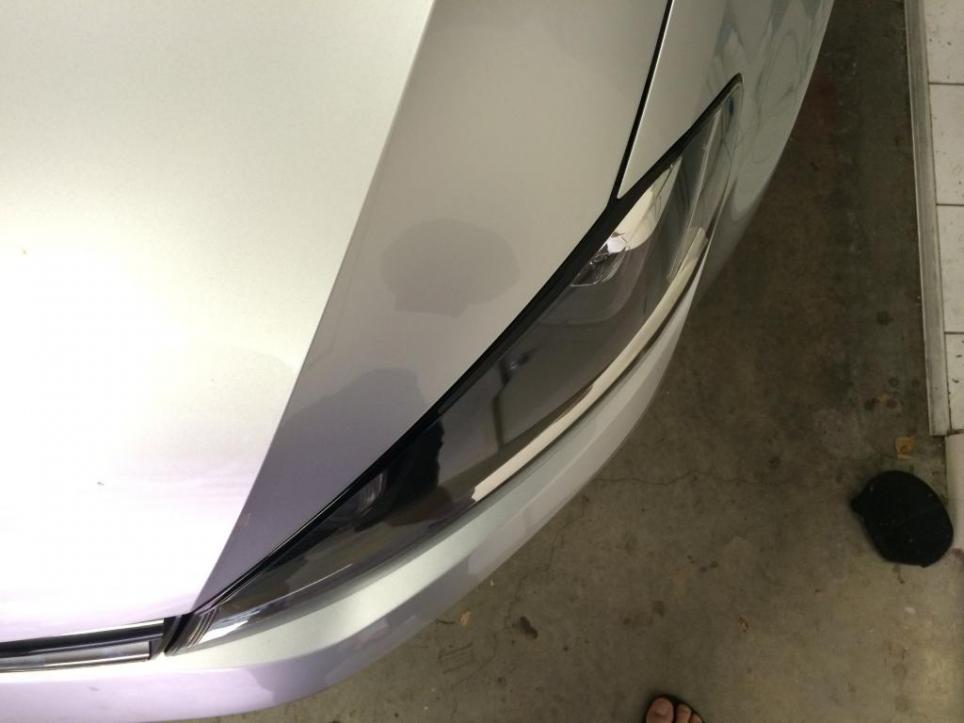
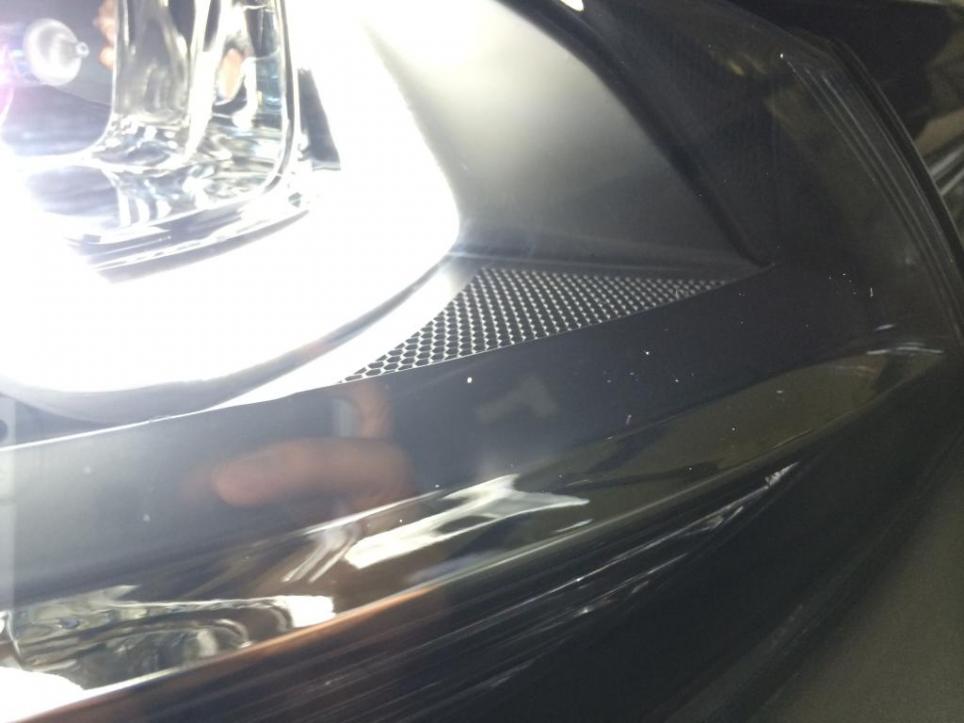
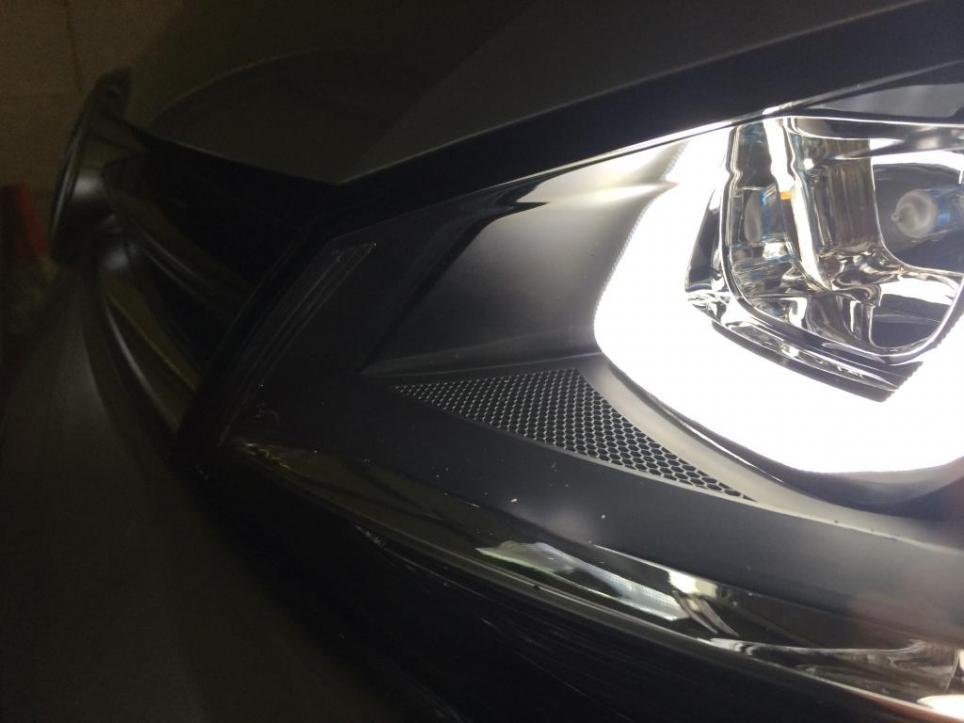
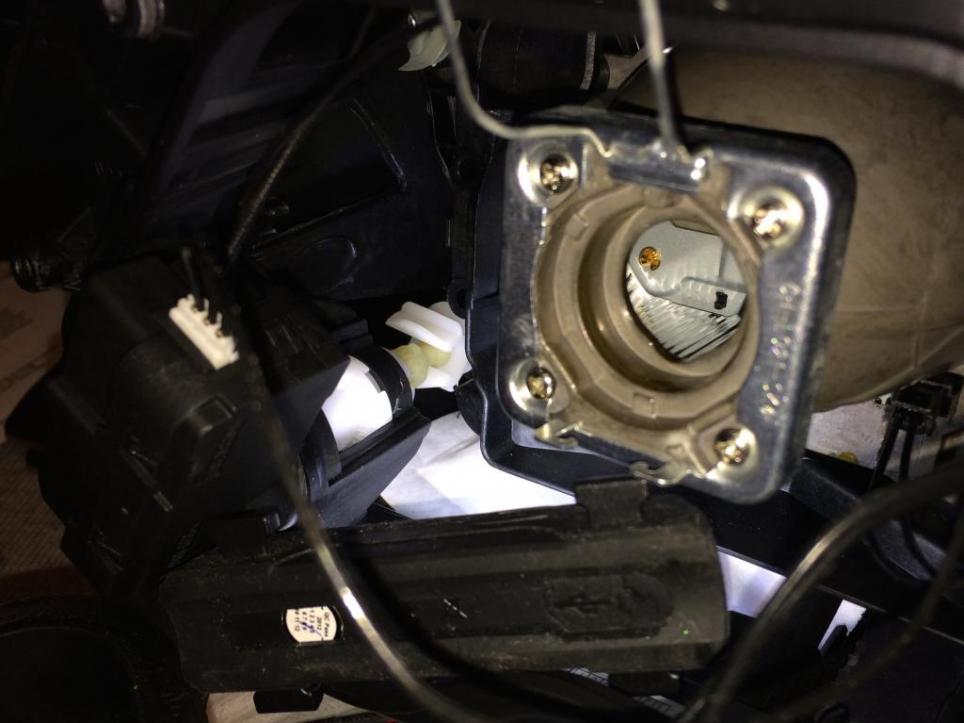
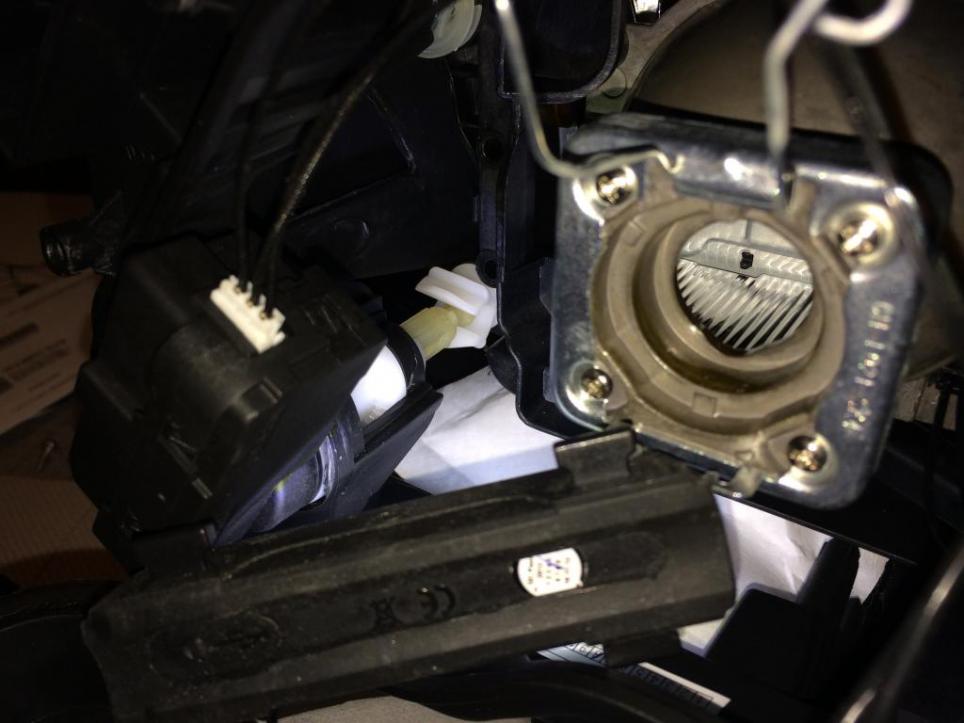
The other minor issues that I could live with include dust and lint inside the headlight (pointed to by the red lines), damage to the hexagonal plastic just like DeusLucern's headlight and broken connectors requiring the OEM ones to be used instead.
Fit and finish once installed is otherwise satisfactory. The dust and lint on the inside of the headlight lens doesn't bother me too much as it doesn't affect the headlight projection itself but the left beam is useless as it only illuminates about 10 metres of ground ahead of the vehicle.
 Last edited by veew; 31-08-2014, 06:59 PM.Current:
2017 Mk2 Tiguan 162TSI, R-line, White
2020 Mk7.5 Golf R Wagon, WhiteComment
-
Today was my turn to have something stuffing up with my WinPowerLamps... A vehicle warning icon has popped up!!!
Error code - check right dipped headlight beam!
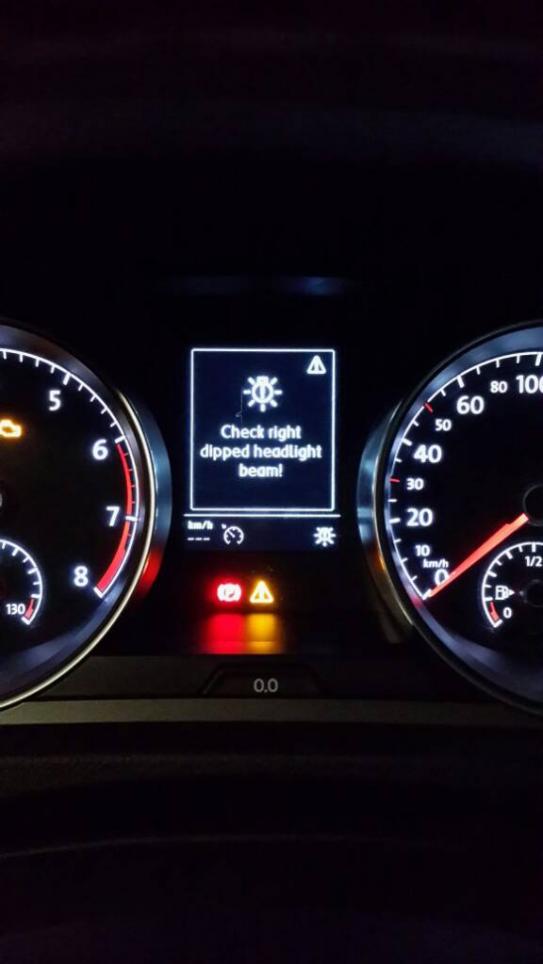
If I can't get it fixed tomorrow I will open a dispute with PayPal. I hope this is an easy fix for Mark!!! I'm starting to think this is just another backyard company from China......Comment
-
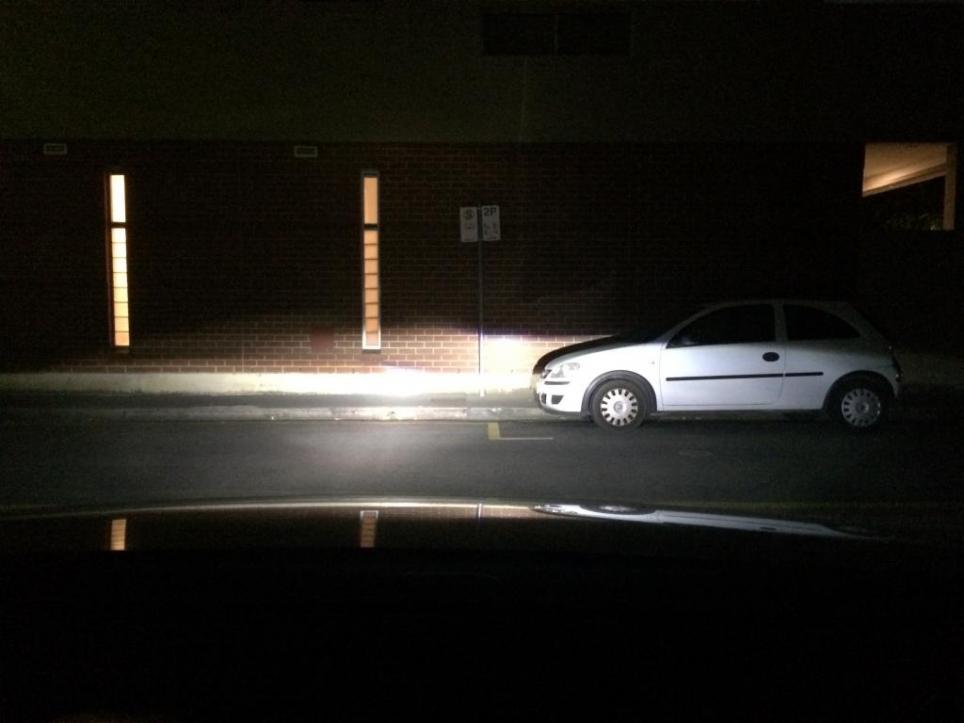
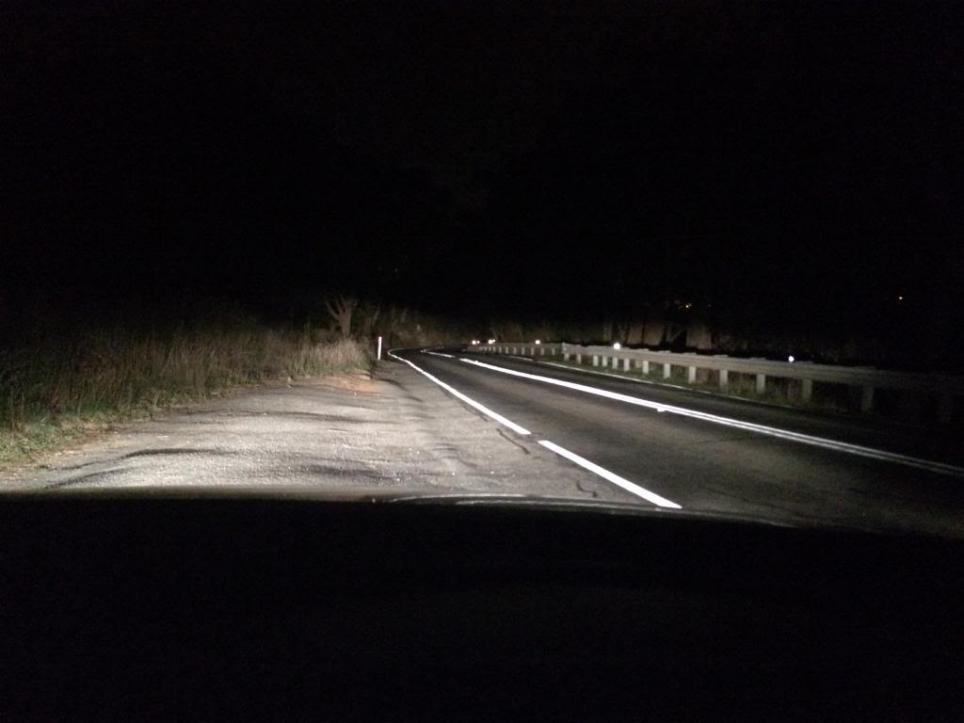
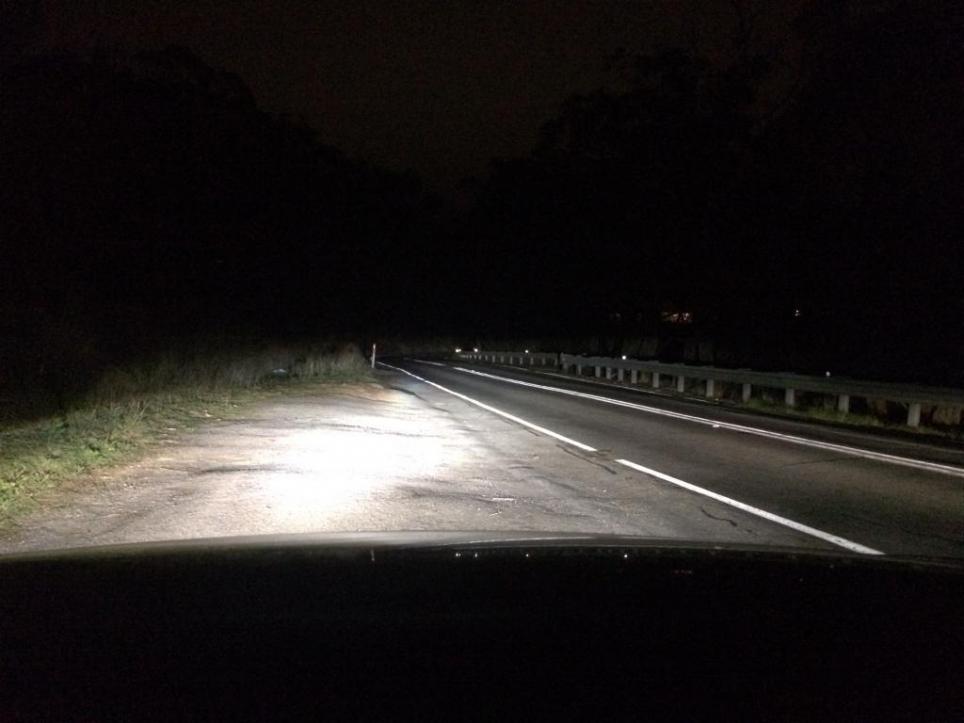
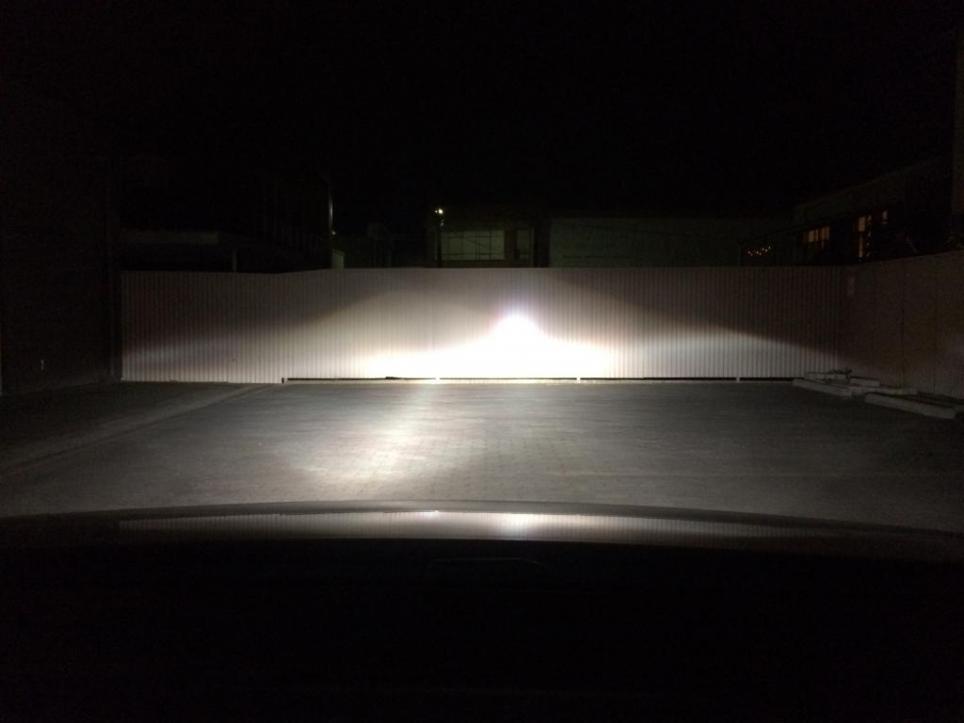
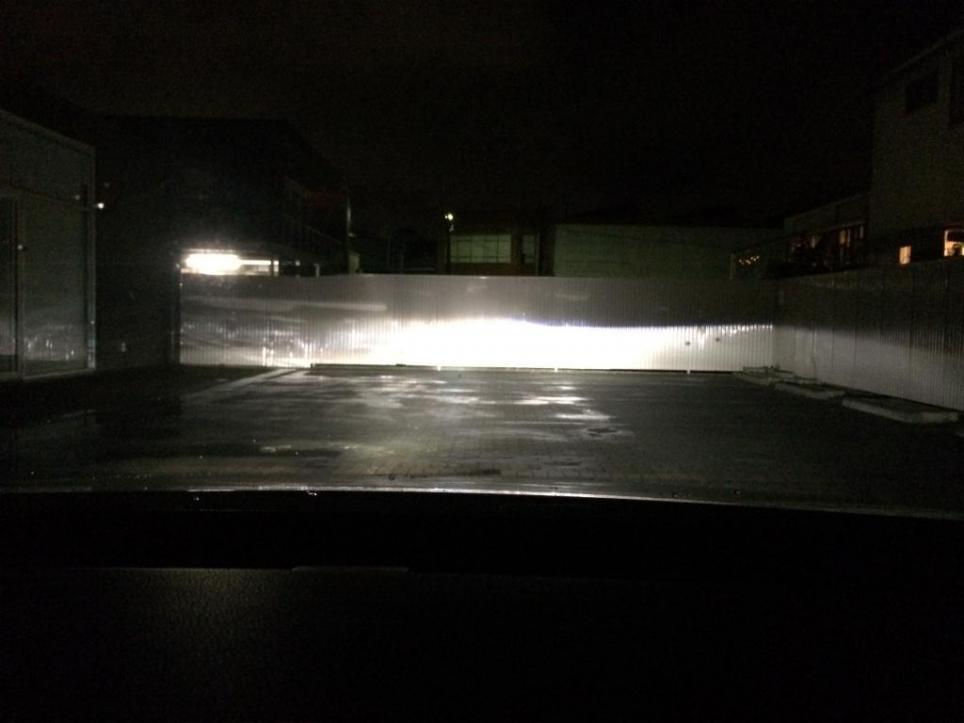
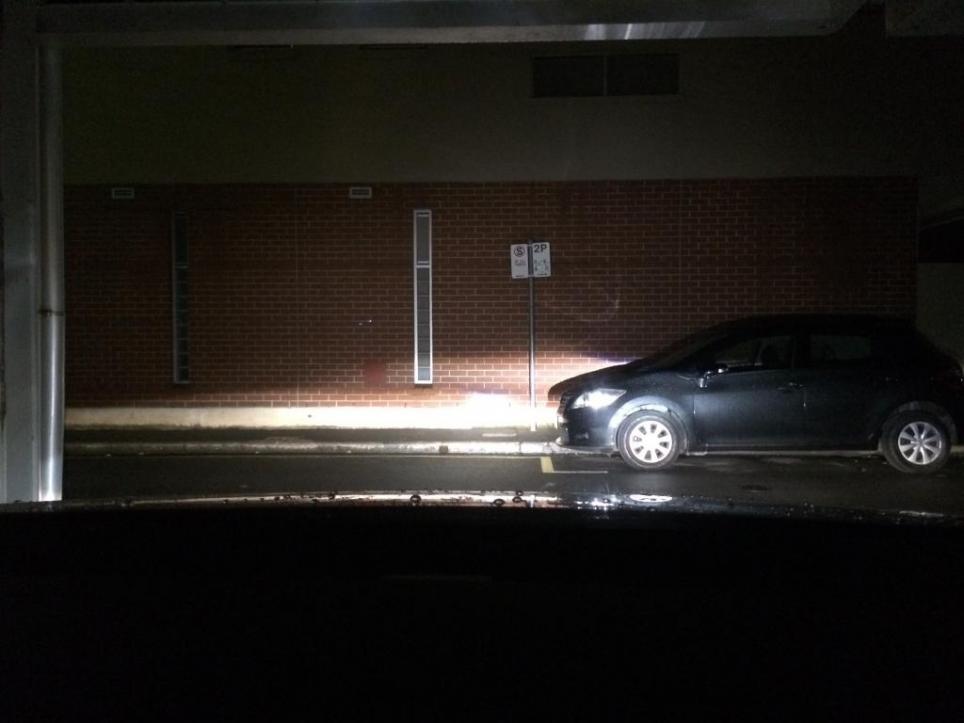
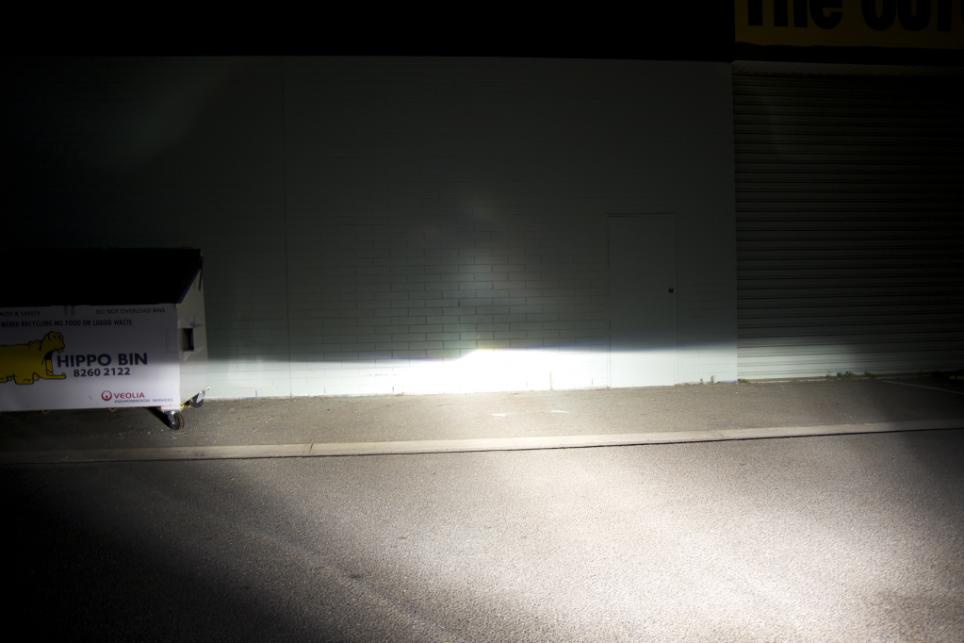
Well I've just finished going for a night drive. The left headlight is absolutely useless, illuminates only 5 metres ahead of the vehicle. The right headlight at the maximum height is not high enough. Around town the right headlight beam is passable only because there are plenty of street lights around but when there aren't (as you'll see in the 2nd video), the light beam is inadequate in distance and power.
I took the following videos on my GoPro Hero 2:
Driving around town WPlamps Golf 7 - YouTube
WPlamps Golf 7 driving in the hills - YouTube (or the short version: Driving in the hills WPlamps Golf 7 V2 short version - YouTube)
Comparison photos of OEM headlights with Osram Nightbreaker Unlimited vs WPlamps V2 headlights:
Osram NBU
WPlamps (the cutoff isn't as crisp as the OEM halogen lights which is disappointing, also doesn't stay nice and horizontal off to the sides)
Osram NBU
WPlamp
Osram NBU
WPlamp (notice how the left side is not as well lit, also the right side trees and road guards are not lit as well as the stock halogen headlights)
WPlamp low beam (notice the left beam cutoff seen as a hotspot)
WPlamp high beam
 Last edited by veew; 03-09-2014, 10:07 PM.Current:
2017 Mk2 Tiguan 162TSI, R-line, White
2020 Mk7.5 Golf R Wagon, WhiteComment
-
I installed mine today, when I first installed them the right headlight was way too low but after lots of adjustment I think they're all good now. Sorry to hear about you guys having problemsComment
-
Well I contacted Mark Sunday night about my issues, he said that the reason why the left headlight was limited in upward adjustment was because the left/right adjustments were at their maximal. Well, after much adjustment with the left headlights (both with the lights on and off the car) there was almost no difference in beam height. The right headlights adjusted much better. With the internal headlight beam adjuster set to the highest, it was able to go higher than I needed when adjusted to its highest setting using the rear headlight adjuster (useful for driving on dark, empty country roads with infrequent oncoming traffic without necessitating the use of high beams).
A drive around town demonstrated an improvement compared to before. As the source of illumination was solely from the right headlight (the left headlight just pointed to the ground or at the left rear tyres of cars in front) there wasn't the power you would expect of xenons. If only the left headlight was able to be aimed up at the same level there would be additive lighting power where the beams crossed over.
https://www.youtube.com/watch?v=R6CKZBtw2oM&feature=youtu.be
Before maximal adjustment (low beam)
After maximal adjustment (low beam)
Before maximal adjustment (high beam)
After maximal adjustment (high beam)
Driving in the hills again demonstrated an improvement but was disappointing in illuminating the left roadside (useful to see wildlife or mobile speed cameras around town?). As the WPlamps xenon beam cutoffs taper downwards the further away from the beam, it doesn't illuminate corners as well as my motorbike used to (which had $120 projector bixenon headlights) just before entering corners.

My motorbike bixenon beam

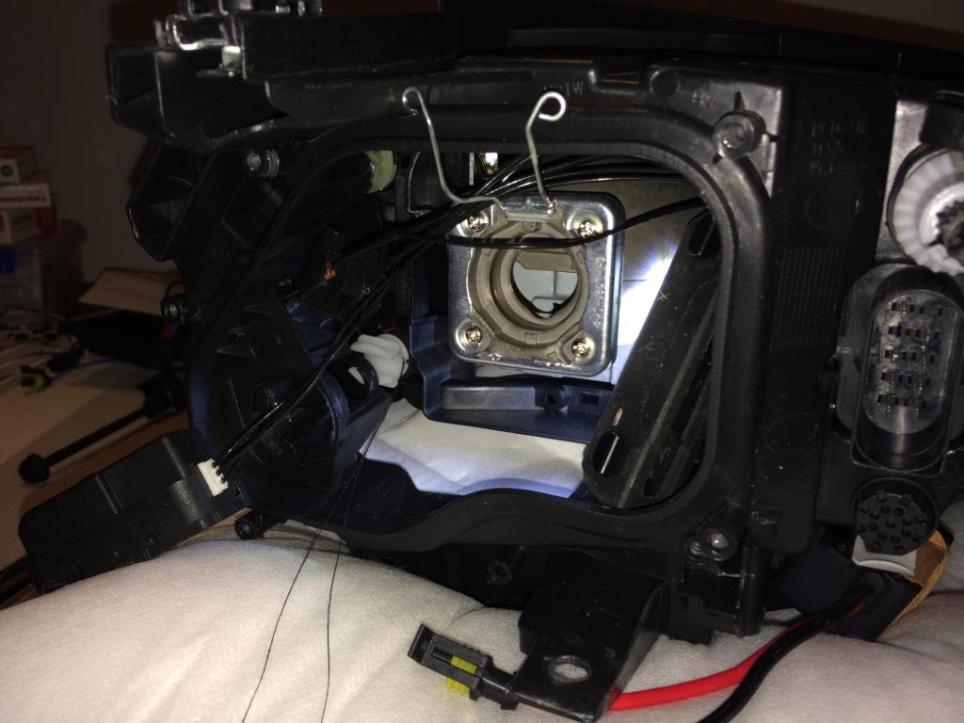
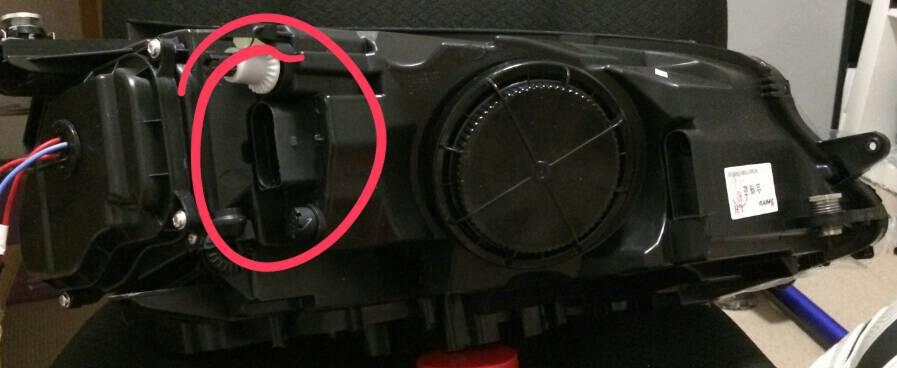
I've had a good look inside the low beam housing to make sure that turning the adjustors was actually doing something. The yellow plastic part in the bottom left adjusts the headlight height.
The adjuster set at the lowest beam height
The adjuster set at the highest beam height
An interior inspection video of the low beam housing: https://www.youtube.com/watch?v=oVCt..._n_46H15LIsUUw
As the adjustors chew up easily, as seen by the left/right adjustor on the left headlight, I could only adjust them with the headlights off the car.
They should look like this:
Overall I'm just frustrated with the whole process with these headlights. They're not up to scratch, shouldn't have passed their QC as they are and as a result I've wasted a sh*tload of time on these headlights. I'll see what Mark will offer but I'm not sure what I'm going to do just yet.Last edited by veew; 02-09-2014, 08:26 AM.Current:
2017 Mk2 Tiguan 162TSI, R-line, White
2020 Mk7.5 Golf R Wagon, WhiteComment
-
I spent all yesterday afternoon and night trying to reset the headlights multiple times. I tried to reinsert the adjustor fully extended and fully shortened and tested to see what the headlight level was like and how much it could be adjusted. Unfortunately it wasn't able to be adjusted any different despite having the right/left adjuster in the middle of its range.
This is the video Mark sent me to reset the adjuster: Golf 7 Wplamps V2 - resetting the headlight adjuster - YouTube
I saw Leovasquez have the opposite problem to me where one beam was too high.
Entrar - forum.VWGolfClub.com
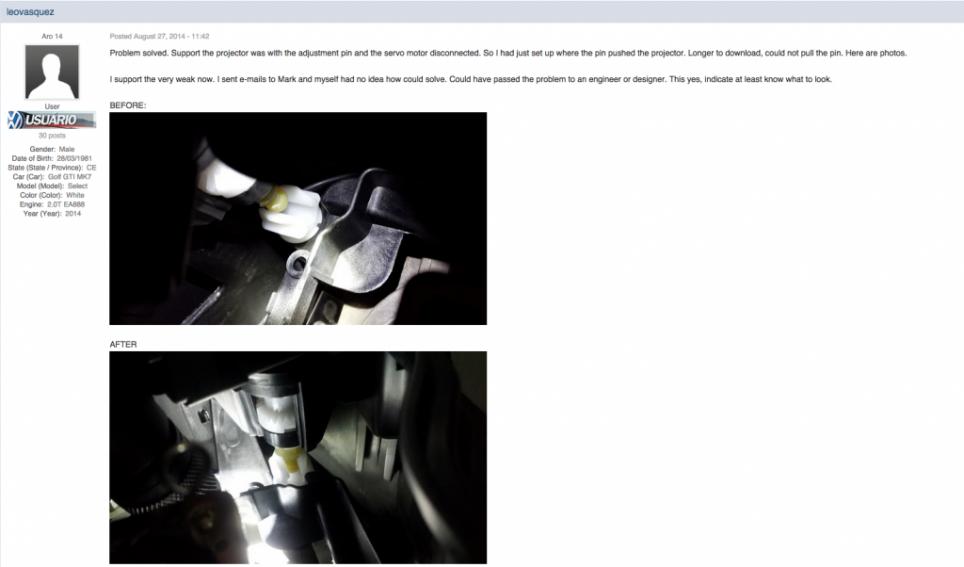
His problem was the headlight adjustor was not clicked into the white piece as shown in the photos. After he clicked it in it was in the right adjustment range. The problem with my headlights was there was not enough range with the adjustor to push the bottom of the headlight to aim the beam high enough. I ended up leaving the yellow adjustor not clicked into the white plastic, I tied shoe lace string (I tried sewing thread but that broke) around the white part and the yellow adjustor ball so they stay together when I adjust the yellow adjuster up and down. This has resulted in the left beam higher than before and is within acceptable normal limits.
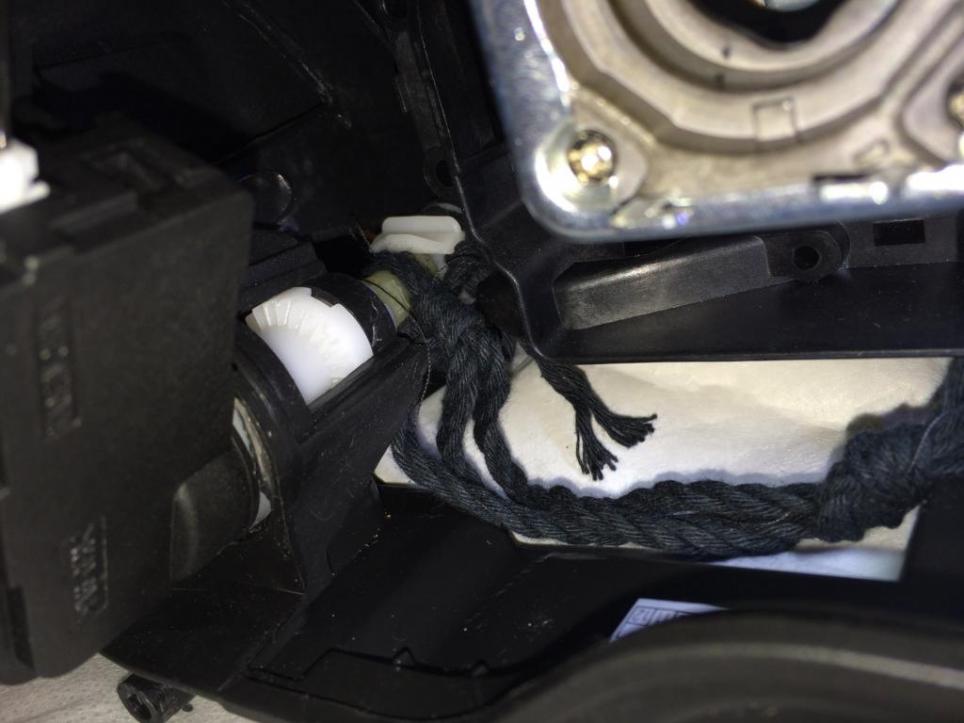
This is a short video showing part of how I went about doing the ghetto modification, it wasn't easy but was made slightly easier with decent gloves and mosquito tweezers and needle tip clamps. The video starts after I had already made my initial loop around the white plastic part.
Video driving around town after the ghetto mod:
Video driving in the hills after the ghetto mod:
Despite finally reaching a satisfactory light beam output and height, I'm very unhappy with how these headlights were sent. Without the modification the left headlights would still be pointing down at the road only 4 metres in front of the car.
This is a fault with the headlights and it should have been picked up in QC.
I spent considerable time researching and making sure I would end up with a good product that didn't require me to spend days fixing and installing the headlights! The problem with this whole group buy was Mark rushed us into completing the group buy, with a reduced minimum number of units before August, promising they would be made before their busy production period in August. Mark failed to check with production that they had enough material to fulfil the promise of producing the headlights and shipping them out 4 days after payment. There were multiple delays, the rush in production causing quality control issues resulting in further delays, these headlights came so late in the Paypal Buyer Protection period. Today is the last day for me to open a Paypal dispute which is why I had to make sure these headlights reached a level I could use. The option of returning the headlights would come at a considerable cost to me and therefore is a last resort.
I'm currently seeing if Mark will compensate me for the substandard headlights, the amount of time I've put into the group buy and the business I've brought him. We'll see what he says, for me this was a lesson learnt. No amount of preparation with Chinese manufacturers such as WPlamps will minimise the amount of sh*t that will hit the fan.
Edit: I opened up a Paypal dispute, will see how this goes.Current:
2017 Mk2 Tiguan 162TSI, R-line, White
2020 Mk7.5 Golf R Wagon, WhiteComment
-
OK...so after seeing a few people with issues, I decided to check out my own headlights. I managed to get the grill off, but then I got stuck with trying to remove the second screw holding the bumper in place (the one closer to the front) - I just couldn't find it.
And it could be just me but the plastic cover shown in Page 3 doesn't look like mine. Mine looks like 2 pieces and the bottom part seems very firmly fixed. Anyway, I didn't investigate too much further because it started raining so I quickly put everything back together =(
However, I would like to test that at least the lights work, does anyone have any pics or instructions on what connectors I need to use to test the lights?
And given the crappy weather in Sydney right now, I am very tempted to pay someone to install and code them at this stage.Comment
-
Yeah mate, all the cables from the light plug into the ballast cables and then the cable from the car headlight plugs into the back of the ballast. Just sit your new headlights on top of the old ones, they're pretty easy to test outComment
-
I know this might seem dumb but if I plug in all the cables from the headlight into the ballast, there are no cables left. I've only got 3 cables and the headlight has 3 cables. Did I get a dodgy ballast?
And which cable should I pull from the existing headlight?
Comment
-
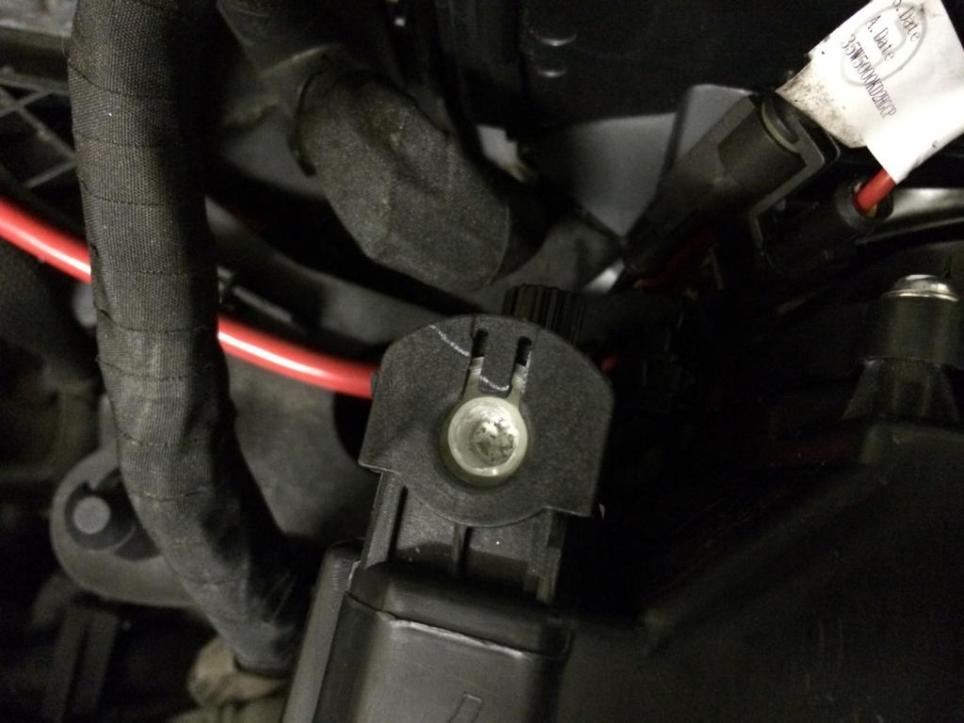
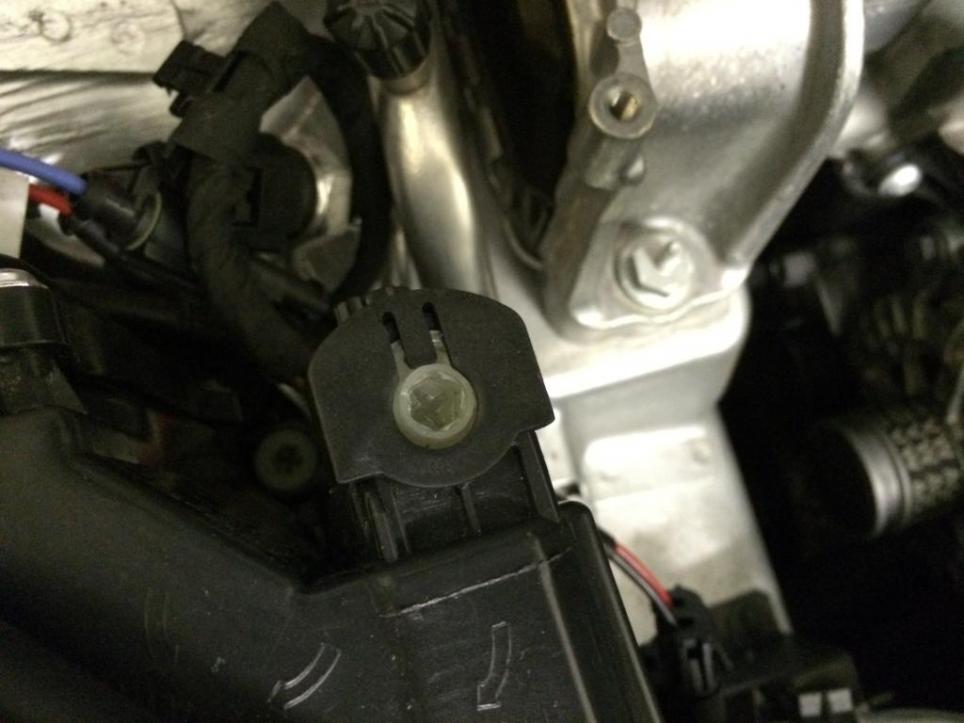
Pull this plug:
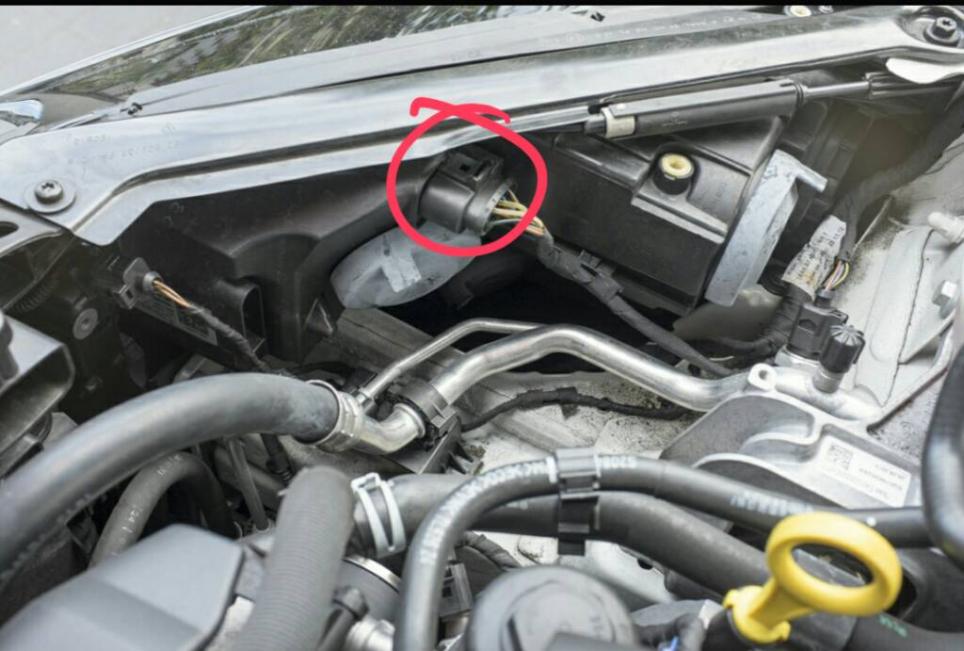
Insert it to here:
PS. - Sorry Andrew I took your pic :-pComment
-
DeusLucem, see the front page of this thread, theres a picture with red circles on how to connect the ballast to the headlight.
Pull the cable with red circle out, and put it into to your new headlight. Theres a slot that you can see if you look carefully on the inside of the WPlamp headlight
edit: michael beat me to it. lol'16 Polo 6C GTi | Flash Red | H&R Touring Cup Kit 35/55 | Milltek Cat-Back NR | Phillips/Konik 5000KComment
-
Hey Deus, after my first attempt to do the install, I came across this video, it is an awesome walkthrough of how to do the headlights! Shows you how much force the car will actually take (a lot more than you expect)
Current:
2017 Mk2 Tiguan 162TSI, R-line, White
2020 Mk7.5 Golf R Wagon, WhiteComment


Comment