If this is your first visit, be sure to
check out the FAQ by clicking the
link above. You may have to register
before you can post: click the register link above to proceed, registering will remove the in post advertisements. To start viewing messages,
select the forum that you want to visit from the selection below.
This means you should apply for your renewal now to avoid any disruptions to your membership whilst the renewal process is taking place! NOTE: If you have an auto renewing subscription this will happen automatically.
Above Forum Ad
Collapse
Announcement
Collapse
No announcement yet.
VW Golf R OEM Versus Aftermarket Brakes - rotors and pads, braided lines
Front and rear conversion done.
Fronts were pretty easy and went well. The rears though, were a PITA !!
Main issues were that the rear heatshields didn’t fit (and the current ones are installed prior to rear hubs, so some butchery involved to get them off). Damaged a wheel speed sensor, but getting a new one posted Monday.
Braking great from short drive, but all sorts of problems warning lights due to missing rear speed sensor.
As I suspect that you already know - the "official" method for fitting new brake pads on MQB platform cars that have an Electric Parking Brake (EPB) is to retract the caliper using a good diagnostic device.
But, if you promise NOT to tell anyone else, I can share a secret - it IS possible to complete the task without a diagnostic device!
The problem that is encountered when fitting new pads is getting the caliper to fit back over the new pads because of the increased pad width.
Part 1 of the "official " method solves this problem by activating the electric motor to retract the caliper-piston
Part 2 of the "official" method re-calibrates the caliper-piston position to suit the new pad thickness after the new pads are installed
However, it is possible to achieve the same result by manually winding the spline that open/closes the caliper piston.
To do this for Part 1, do the following:
Ensure that the EPB is NOT engaged!
Remove the caliper and fit the new pads to the pad-mount
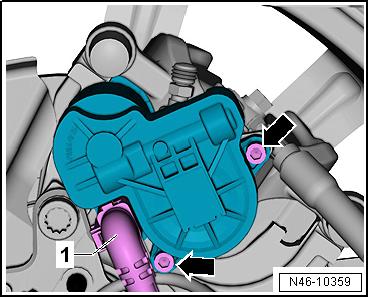
Before re-fitting the caliper, remove the electric motor from the caliper housing (remove the 2 x hex bolts - see "arrows" in picture below). This will reveal the working parts of the OPEN/CLOSE mechanism.
With the motor removed, you should see that the "multi-spline" part is secured to the "fixed" part of the OPEN/CLOSE mechanism by a "C" clip as per the picture below
To manually open the caliper, grab a T45 socket and a set of multi-grips. Using the grips, hold the body of the caliper and the fixed part of the OPEN/CLOSE mechanism.
Then insert the T45 socket into the multi-spline and manually turn by hand - you should see the rubber-boot end of the piston retract as the multi-spline rotates (reverse the rotation direction if the piston-end doesn't retract)
When the piston is retracted fully into the caliper housing, refit the electric motor back onto the caliper body and bolt the caliper back onto the brake-pad mount
Part 2 - In car procedure post the completion of the pad replacement
Press the brake pedal repeatedly until the pedal is "hard"
Activate the EPB using the center console switch (you should hear the EPB motor activate). The calipers are now re-calibrated for the new pads
Deactivate the EPB
Turn-ON ignition and test EPB again
Of course, the recommended way of brake-pad replacement is ALWAYS the "official" method - but!!!!
Don
PS: The liability that I accept for my instructions above EXACTLY equates to the financial return that I receive for the provision of the information (which is EXACTLY zero)!!
Please don't PM to ask questions about coding, or vehicle repairs. The better place to deal with these matters is in the forum proper. That way you get the benefit of the wider expertise of other forum members! Thank you.
Hiya Don,
Many thanks for that guide, and whilst I didn't do the "official method" as I didn't have the good diagnostic device.
I sorta worked around it by disengaging the park brake manually and set to work, only for the vehicle realising that it hadn't applied the brake while the ignition was on, and went to Health & Safety mode. PFBB. Didn't really matter, as it was applied to the caliper I was removing.
Beat the Health & Safety mode by simply unplugging the other caliper when it came to do that side.
Have go a replacement wheel speed sensor, and will fit that tonight. The Carista EVO scanner is ordered, but not in stock , so will buy Lucas R's older unit off him in the meantime to clear the codes.
Brakes work well considering the missing sensor, but no fanging until the codes are cleared.
Michael: hmm......... I'm not sure that I entirely understand your process. However, if you didn't use either my method, or the official method and unless the width of the old/new pads were very similar - I would be very concerned that the caliper settings are incorrect !
As we will both agree, brakes have a "special" role in car safety - so ensuring that Part 2 of pad replacement process is undertaken correctly is kind-of important - even if you aren't "fanging" the car (I haven't hear this term in many years!)
Don
PS: Do you know where the term "fang" originated? It was from Juan Manuel Fangio - an Argentine racing driver.
Please don't PM to ask questions about coding, or vehicle repairs. The better place to deal with these matters is in the forum proper. That way you get the benefit of the wider expertise of other forum members! Thank you.
Michael: hmm......... I'm not sure that I entirely understand your process. However, if you didn't use either my method, or the official method and unless the width of the old/new pads were very similar - I would be very concerned that the caliper settings are incorrect !
...
Car only has 320km (yes, three hundred and twenty only), so the pad thicknesses were the same. Brakes were bled with the new calipers so pedal was hard, and EPB was applied after.
As I suspect that you already know - the "official" method for fitting new brake pads on MQB platform cars that have an Electric Parking Brake (EPB) is to retract the caliper using a good diagnostic device.
But, if you promise NOT to tell anyone else, I can share a secret - it IS possible to complete the task without a diagnostic device!
The problem that is encountered when fitting new pads is getting the caliper to fit back over the new pads because of the increased pad width.
Part 1 of the "official " method solves this problem by activating the electric motor to retract the caliper-piston
Part 2 of the "official" method re-calibrates the caliper-piston position to suit the new pad thickness after the new pads are installed
However, it is possible to achieve the same result by manually winding the spline that open/closes the caliper piston.
To do this for Part 1, do the following:
Ensure that the EPB is NOT engaged!
Remove the caliper and fit the new pads to the pad-mount
Before re-fitting the caliper, remove the electric motor from the caliper housing (remove the 2 x hex bolts - see "arrows" in picture below). This will reveal the working parts of the OPEN/CLOSE mechanism.
With the motor removed, you should see that the "multi-spline" part is secured to the "fixed" part of the OPEN/CLOSE mechanism by a "C" clip as per the picture below
To manually open the caliper, grab a T45 socket and a set of multi-grips. Using the grips, hold the body of the caliper and the fixed part of the OPEN/CLOSE mechanism.
Then insert the T45 socket into the multi-spline and manually turn by hand - you should see the rubber-boot end of the piston retract as the multi-spline rotates (reverse the rotation direction if the piston-end doesn't retract)
When the piston is retracted fully into the caliper housing, refit the electric motor back onto the caliper body and bolt the caliper back onto the brake-pad mount
Part 2 - In car procedure post the completion of the pad replacement
Press the brake pedal repeatedly until the pedal is "hard"
Activate the EPB using the center console switch (you should hear the EPB motor activate). The calipers are now re-calibrated for the new pads
Deactivate the EPB
Turn-ON ignition and test EPB again
Of course, the recommended way of brake-pad replacement is ALWAYS the "official" method - but!!!!
Don
PS: The liability that I accept for my instructions above EXACTLY equates to the financial return that I receive for the provision of the information (which is EXACTLY zero)!!
Hi Don,
Being new to the whole MQB (let alone any VW platform aside from 1950's VW Beetles), I really appreciate the details re the "official" way to do the rear brakes.
Now that I have to take off the calipers and rotors to fit the correct disc heat shields and hubs, can you please enlighten me to whether the Carista EVO dongle can do the retraction ?
Or does it need a proper OBDII device that costs bukku $$ which I don't have ?
The other dilemma that I have is to ensure the EPB doesn't activate whilst the caliper is off - is simply releasing the EPB and then unplugging the EPB an acceptable method ? And then reverse the procedure after ?
Cheers
Michael
PS - not used to modifying cars that have multiple (nay actually 32 ECU's ) - lots with 1970's Celica's and RX2 Rotaries. Even my 2012 Opel Insignia was simpler ... just.
VW Golf R OEM Versus Aftermarket Brakes - rotors and pads, braided lines
The Carista dongle will work just fine to retract the EPB mechanism. Once it is retracted it will remain in “service mode” until you re-engage the EPB mechanism via Carista.
There is no need to disconnect the battery or anything else. Just remember to switch the ignition off after engaging service mode so you dont potentially run your battery flat while you do a few hours work.
Totally not necessary, but if you are worried then once you have engaged service mode of the EPB via Carista, then you can unplug the electrical connection that goes to the EPB motor.
As I suspect that you already know - the "official" method for fitting new brake pads on MQB platform cars that have an Electric Parking Brake (EPB) is to retract the caliper using a good diagnostic device.
Part 1 of the "official " method solves this problem by activating the electric motor to retract the caliper-piston
Part 2 of the "official" method re-calibrates the caliper-piston position to suit the new pad thickness after the new pads are installed
…..
Of course, the recommended way of brake-pad replacement is ALWAYS the "official" method - but!!!!
Don
OK. About to start the rear brake fix and hub swap, but once Carista is connected, there is no option to do the EPB Service ????
I’ve followed the Carista how to instructions on the web, but don’t even have the option listed in. The service tab !
So how do I do it ?
HELP
Can I disconnect the EPB motor so I can at least replace the hubs without causing issues ?
Must be another lock down ‘feature’ that VAG is putting on newer cars so owners can’t fiddle with anything. I have used Carista on VAG cars up to about 2019-2020 models but I don’t think ive ever used it on anything newer.
Im curious as to why you didn’t try Carista beforehand, even though you didn’t have the parts yet.
Im curious as to why you didn’t try Carista beforehand, even though you didn’t have the parts yet.
Did the conversion before I new about Carista.
Inexperience on new fangled cars (did brakes etc on my 21012 Insignia no issues)
Assumed that Carista does not differ from what I read online and saw on youtube.
Asked questions and got answers that made sense, but seems being latest model, things have changed.
Have sent Carista a Query, so see what they say.
Only alternative is to seemingly unplug the caliper (to stop it activating) and then do the necessary work. Then pending the outcome and majority of codes sorted, look at taking it to the dealer to reset EPB and then deal with any codes remaining.
That'll teach me to be impatient and expect cars to not have evolved that much in a few years !
 Tweet
Tweet

 , so will buy Lucas R's older unit off him in the meantime to clear the codes.
 ) - lots with 1970's Celica's and RX2 Rotaries. Even my 2012 Opel Insignia was simpler ... just.

Comment