Above Forum Ad

Collapse

Announcement

Collapse
No announcement yet.

1.8T GT28RS Big Turbo - nearly done

Collapse
X
 
  • Filter
  • Time
  • Show
Clear All
new posts

  • 1.8T GT28RS Big Turbo - nearly done

    Hey, it's been a while since I've posted on here...almost 8 years!

    I bought my MKIV back in '08 and in late 2014 cracked the sump, dropped the oil and spun a main bearing.

    Anyway rather than guess the rest, here's a bit of a story of how she's (almost) back on the road. Hope it helps those who might be thinking about doing this, and I'll probably have a few questions too when I get to the bit where I fire her up and she wont run!

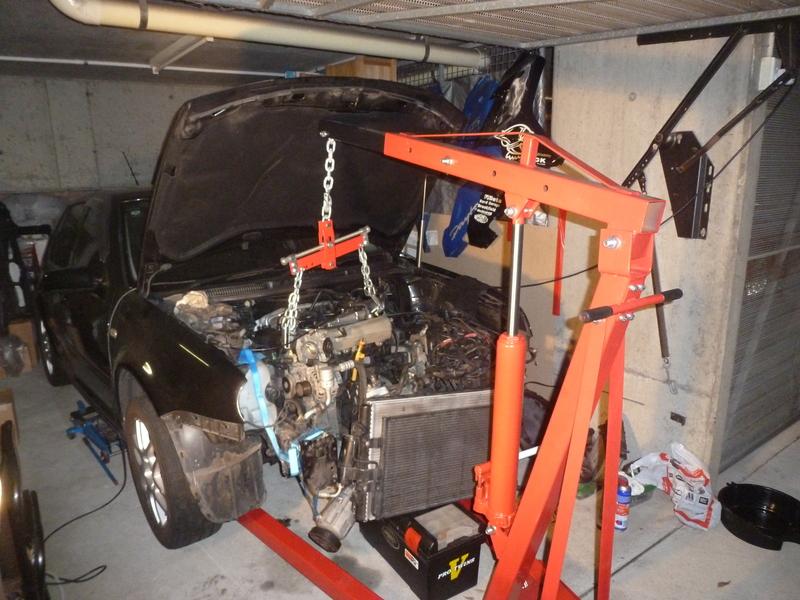
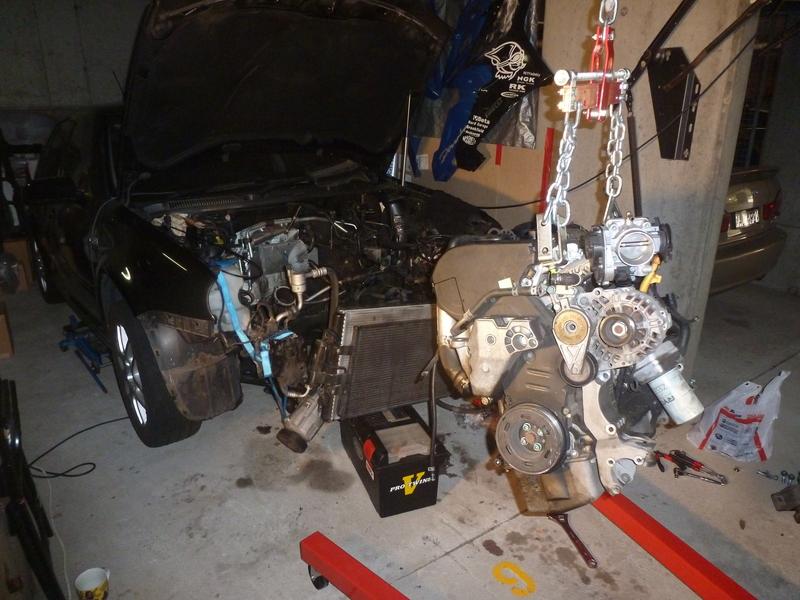
    So in Xmas 2014, out came the engine.....


  • #2
    Pulling the gearbox and flywheel, and a few pics of the old pea-shooter k03 setup. They might be useful references for someone. Note the improv'd flywheel holding tool.....


    Comment


    • #3
      Once I got the gearbox out of the way, the engine went up on the stand.


      Removed all the ancillaries:


      Off with it's head!


      And then the sump and flywheel end seal


      Fingers crossed here as I wasn't sure what I would find, although the sump was pretty clean so not as bad as it could have been....


      Big ends were OK.....


      Not so much the LH main bearing, nearest the oil pump...


      There's an old fashioned technical term for this:

      Comment


      • #4
        Ha! That same technical term also means (on Urban Dictionary) 'to be in love with two sisters'. Anyway, moving on.....

        Turns out that the crank was salvageable and cleaned up with Scotchbrite; only the soft coating from the bearing had welded itself to the journal. I can't find any pics of this bit, the only pic I could find is the broken socket adaptor from a failed attempt to get the crank bolt out. Meh. Persistence wins....from memory I used two breaker bars and length of tube between them to get the f**ker loose...

        Ordered up some ACL bearings shells (made in Tassie). Given that the factory had shut down they were impossible to get in Aus so ended up getting them from the US, although they did re-open the factory last year.

        Whilst waiting for those to arrive cleaned up the block, rehoned the bores and got all the crap out of the oilways....


        Got new pistons & rings (OE), rods (Brute) and set about sorting the bottom end.


        Bearing clearances came up to spec:


        New oil pump while we're there....


        And new crank gear and bolt.


        I used the old sump to cover the crank while I got on with cleaning up the head. I bodged some Araldite onto the crack that started this whole shemozzle - it wasn't a huge crack (that's what he said) but enough to cause a few problems, lol.....

        Comment


        • #5
          Cleaned up the head and got the gasket face skimmed.


          Replaced the exhaust valves with the Supertech nitrided valves, as the OE ones were a little pitted. Inlet valves were in good condition. Engine had approx. 170,000kms on it before it was stripped.

          The valve seats were in pretty good condition, no need for a re-cut , just lapped in the new and existing valves to the seats. Pics show that they came up well. I use the water soluble lapping paste which gives a nice fine finish.

          No point porting the head IMO, I don't have the option to play around and test things on a flow bench and if you're stuffing around you can end up doing more harm than good.


          New stem seals:


          And setting up the cam timing:


          With the skim I may need to dial the cams in with a slotted drive wheel, but for now its set up with the stock timing marks and pulley - not really had time to consider whether there is any way to tweak the inlet cam timing given the chain drive aspect. I'm sure there is plenty of info around if I can be arsed to look.....
          Last edited by simmo675; 18-09-2016, 05:48 PM.

          Comment


          • #6
            A few more pics of the engine coming together. Fitting up the OE stuff was easy enough.....


            then we get to the ATP turbo kit, which, on the face of it, went together OK. We'll come back to this later.....


            hybrid sump, steel beats rock....


            competition for real estate beginning.....


            Again, things getting tight before we've really got going..


            So at the time the engine side of things was going well. Gearbox was out, so, rebuild time there too.....


            Innocuous looking 5th gear eh? Well, let me tell you, this was a bitch to get off. The only way was heat, and lots of it. Propane doesn't get anywhere near. Tried a few times with propane and ended up cracking the teeth on the gear, and breaking a (kukko!!) puller arm. We had to get the whole gearbox to an oxy torch. Anyway, once this was off the rest was pretty easy.....


            Quaife LSD went in, re-used the original primary gear....


            Replacement 5th gear from a TDi.....


            and done....

            Comment


            • #7
              Great to see another mk4 gti getting some big turbo love!! What are your plans for engine management?
              <<Mk7 Golf R | Ecotune reflex | PMax G25-660 >>

              Comment


              • #8
                Added a pinion brace...


                and filled the gearbox with the highborn purple.....


                went for the ECS stage 3 clutch kit with the G60 single mass flywheel


                engine & gearbox done....

                Comment


                • #9
                  I have to laugh at the previous pic with the downpipe sticking out beside the timing belt cover, for reasons that will become obvious....

                  Got the engine back in the car, and got to this point:


                  Hmmmm.

                  So, who put the brake booster there? On reflection I guess it was naive to expect a LHD aftermarket setup to fit a RHD car. Why that didn't occur to me while I was researching the kits I don't know (Cookie Monster is a muppet, right?) Or to ATP for that matter, sending parts to Aus. Anyway, **** happens, move forward, problem solve. So what next?

                  Comment


                  • #10
                    Oh, the joys
                    losing the vband and putting on a tight elbow style may clear, I think the OEM Nissan may be close
                    mind you that will kill power

                    I am putting a Gt28rs on mine, but that is a MK1 chassis and I am on a pedal box

                    Comment


                    • #11
                      Originally posted by Lito View Post
                      Great to see another mk4 gti getting some big turbo love!! What are your plans for engine management?
                      Good question! Looking on here it seems like the custom code option is the least labour intensive. I see you've gone for a re-wire to go 7.5. How much work is in that? It makes some sense to go that way too but I cant afford to keep fiddling. Maybe go custom code now and swap out later

                      Comment


                      • #12
                        Originally posted by Notso Swift View Post
                        Oh, the joys
                        losing the vband and putting on a tight elbow style may clear, I think the OEM Nissan may be close
                        mind you that will kill power

                        I am putting a Gt28rs on mine, but that is a MK1 chassis and I am on a pedal box
                        I ended up going for the CTS turbo manifold.


                        Top mount works better on the cold side, and I ended up getting a v-band turbine housing to give a bit more clearance in around the brake booster and master cylinder.

                        Comment


                        • #13
                          I still had to do something about the air con pipes, and the mostly useless heat shielding.


                          so the air-con pipes came out and were re-worked by Autofrost out at Milperra. Actually I should mention that I'm now working on the car at MotorRetro in Seven Hills - the boys are ex-TAFE teachers and after they closed the North Sydney automotive department they started the MotorRetro business in January - they do metalworking courses and classic car and bike restoration and modifications. If anyone in Sydney is looking to learn metalworking or welding they are the guys to see. Anyway its great to be working above ground, with natural light!

                          I digress - we ran some weld wire in the new pipe location as a template and the re-worked pipes came back bang on. I got them to run a flexible section over the top of the master cylinder so I could get to the reservoir and bleed screws later.


                          So with Vaughan's help we fabricated a custom downpipe. Me on the hacksaw and Vaughan on the TIG.


                          Test fit on the fab'd downpipe was encouraging:


                          but still tight!


                          Finally settled on the wastegate out and down screamer style we'll see eh?


                          What wasn't immediately obvious was the water line to the TIAL MVS bumps the bulkhead; the build up of the exhaust v-band, coolant banjo and clearing the downpipe with the dump-pipe adds up to just a little too much for the space available.


                          so I ended up re-plumbing the coolant feed to the turbo and wastegate and pushing everything in toward the block as far as possible. Motorsport Connections are just around the corner, and they have all the speedflow -AN fittings and hose in stock.


                          Pretty much done here.

                          Comment


                          • #14
                            While all that was going on I went bananas with the heatshielding


                            the corrugated stuff is the Platinum heatshield from SCA - pretty good for 60 bucks.


                            it fits! (just)


                            So currently in the process of re-fitting and re-plumbing all of the pipes and wires....more pics to come as things progress.....

                            Comment


                            • #15
                              very nice!


                              what size turbine housing are you using? looks like you are using an adaptor plate at the bottom of the flange to the mani???
                              t25 to t3 (as i know that mani is only available in T3.... so annoying)

                              also - without the heat shield on top of the turbo - how much clearance is there above it?? looking at a mani without the EWG but maybe add this?

                              T3 to T3 Turbo Flange Adapter, Flanges, XS Power Inc.
                              Last edited by IanPGonzaga; 19-09-2016, 07:53 AM.

                              Comment

                              Working...
                              X