 Tweet
Tweet
Yeah the issue was I couldn't get a happy medium. The wire was too thick. Plus the helmet was way too dark. I couldn't see what I was doing when i tried to stitch it so I just ran a bead. It'll do I guess. haha.
-

APR Tuned | KW Suspension | INA Engineering | Mocal Oil Control |
Website: http://www.tprengineering.com
Email: chris@tprengineering.com -
remind me again what cams you're using in this? (not that i would be considering upgrading mine or anything, haha)Comment
-
TT 276 hyd. cams.Originally posted by mikinoz View Post
APR Tuned | KW Suspension | INA Engineering | Mocal Oil Control |
Website: http://www.tprengineering.com
Email: chris@tprengineering.comComment
-
I dummied up the alternator kit today.. Here's what I've found...


I've sent this email off to INA Engineering to see what they say..
G'day Issam.
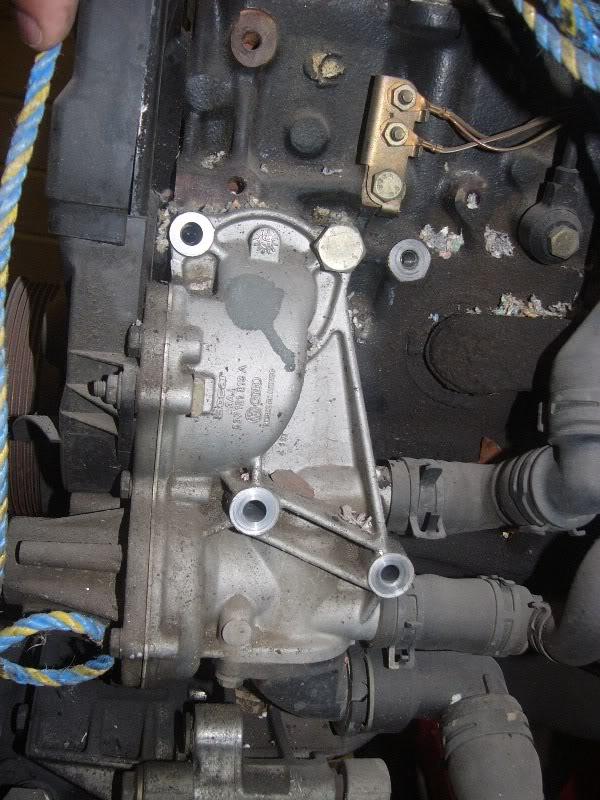
I dummy assembled the alternator bracket on the block today, and I've run into a couple of problems..
The bracket fouls on the waterpump by a couple of mm. And one of the top bolt holes doesn't line up with anything.
Not a huge problem for a machinist like myself, but I'm just wondering if I've missed something or you may have sent me the wrong bracket?
Here's some pictures..
(removed)
If that's just "the way it is", i'll turn up some spacers to lift the bracket up off the waterpump 3mm or so and die grind the part that interferes with one of the waterpump bolts, either that or drill the hole through and spot face it so I can use that instead, then maybe cut the corner with the bolt hole that doesn't line up..
Thanks mate,
-Chris.
APR Tuned | KW Suspension | INA Engineering | Mocal Oil Control |
Website: http://www.tprengineering.com
Email: chris@tprengineering.comComment
-
The 2E motors have a spacer as an integral part of the stud, I suspect that's what you'll need. The spacer section is hexagonal so you can wind it in with a spanner.
I can get you dimensions tomorrow so you can make something up.79 MK1 Golf Wreck to Race / 79 MK1 Golf The Red Thread / 76 MK1 Golf Kamei Race Car
7? MK1 Caddy
79 B1 Passat Dasher Project
12 AmarokComment
-
Nice email. In summary, you could have made it better yourself
Matt told me mine has KR exhaust cams on both inlet and exhaust, through reading though most people suggest TT Street cams for kjet/digi setup, but hard to know.Comment
-
welding anything under 3mm with .9 wire is a challenge,i was going to ask you what your plan of attack was but didnt get to it, as the windage trays are fairly thin material,even dropping to .8 wire makes a huge difference
PITA regards to the mount, especially when they aint cheap.
hopefully the answer is easy.
Originally posted by Preen59Comment
-
Thanks for the help, Pete.
I've spoken to Colin from TT about it a while ago. He said that the 268 cams are great for the standard injection, but if you go bigger the inlet timing upsets the airflap, which makes sense. When I told him I was going to run DCOEs he immediately said "Oh, 276s definitely, then."Originally posted by mikinoz View Post
Yeah and it doesn't help that i'm not the best welder when it comes to really thin stuff, either. Haha.Originally posted by alex g View Post
Just got a reply from INA...
So not a big deal. I must have misplaced the spacers. If i can't find them I'll make new ones. And I'll need to trim the bracket.. I don't want that corner just sitting in the breeze, that will look u-g-l-y.Hi Chris,
2 things
1. You should have the spacers already. They are actually 5mm thick and they space the bracket off from the water pump housing.
2. You don’t have an ABA style block so what you do is the top right hand tab of the water pump housing you use a bolt to secure it and then the top right hand fixture for the bracket you just leave blank.
Final note for tonight.. I got a call from Robinsons Toolmaking today. They've got all my stuff balanced and I'm going to pick it up tomorrow. They also want to have a chat with me too, the office chick said.. It will be good to pick the brains of those guys, they do some pretty cool stuff..
APR Tuned | KW Suspension | INA Engineering | Mocal Oil Control |
Website: http://www.tprengineering.com
Email: chris@tprengineering.comComment
-
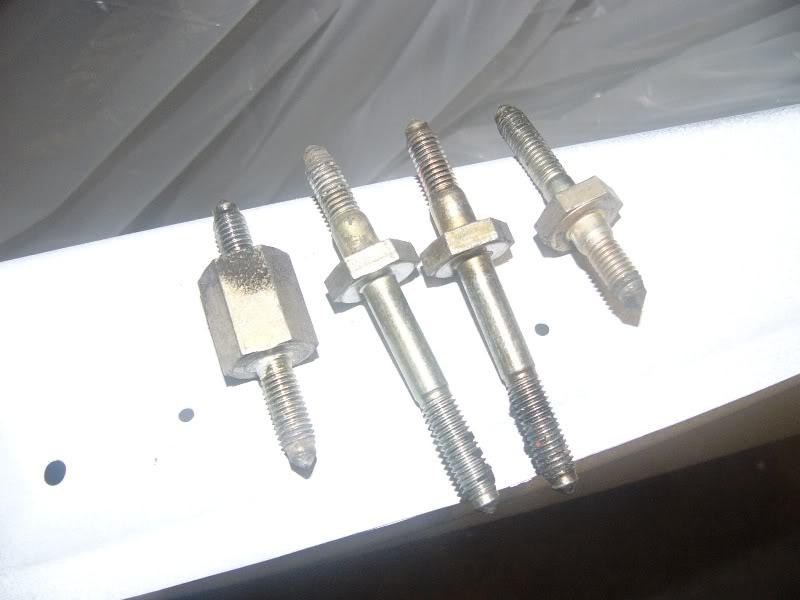
Here's what the spacers look like. Notice one goes into the block to support that corner that would otherwise be hanging out in the breeze.
Dimensions to follow.79 MK1 Golf Wreck to Race / 79 MK1 Golf The Red Thread / 76 MK1 Golf Kamei Race Car
7? MK1 Caddy
79 B1 Passat Dasher Project
12 AmarokComment
-
Ok the one on the left first.
17mm M8stud / 23.05 mm spacer / 24mm M8 stud
The two middle ones
30mm M8 Stud / 6.15 mm spacer / 55mm M8 Stud
and the other
24mm M8 Stud / 6.15 mm spacer / 34mm M8 Stud
The hex on all the spacers is 19mm
Stud lengths are to nearest mm from shoulder of spacer to tip of stud.
Lemme know if you want detail on the lengths of the threaded sections themselves79 MK1 Golf Wreck to Race / 79 MK1 Golf The Red Thread / 76 MK1 Golf Kamei Race Car
7? MK1 Caddy
79 B1 Passat Dasher Project
12 AmarokComment
-
Once you get the spacer ill hope the kit shoukd work out fine as from memory those kits arent cheap.
This isnt a very good photo but Dad runs this set up:
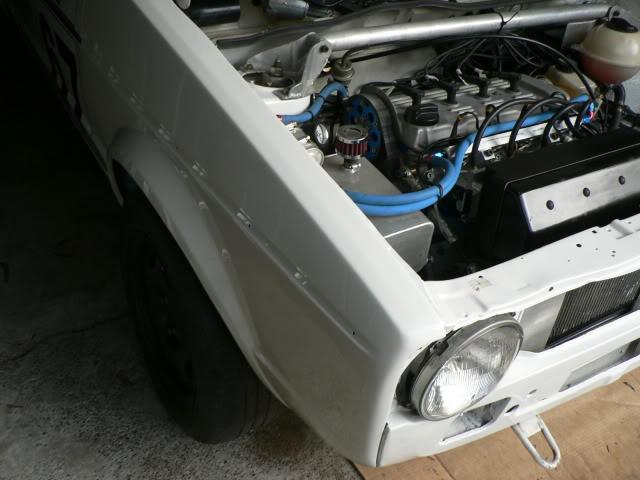
*Edit that photo is bad ill get a better one tomorrow*Comment
-
Thanks for the good old fashioned info and constructive input, fellas.
APR Tuned | KW Suspension | INA Engineering | Mocal Oil Control |
Website: http://www.tprengineering.com
Email: chris@tprengineering.comComment
-
Got my crank, rods and pistons back today. They were pretty impressed with the clutch, but a little baffled as to how it and the flywheel fitted to the crank, and hadn't done the flywheel due to that. Once I explained how it all works Hugh said "No worries, have it done for you by Tuesday". He said the Rods were spot on and was very impressed with the Spec pressure plate. He also modded my knife edging a little, to how he reckoned it should be. Which I was completely OK with.


This weekend I can begin putting this thing together. Should be fun. Dad got some advice on flushing the block and cleaning it properly from an old Drag Racer (Top Fuel and the like) too, so I'll be putting that into practice before anything gets bolted back on..
Fun times.Ross,
Everyone has their own way of doing things but this is how I was taught.
I wash the block with HOT water and dish soap. I use a brush and make sure I get
all of the locations around the cam area. I then pressure wash the entire
block. If I find anything I do it over. When the block is clean I blow all
the water off and immediately spray the internal areas with Marvel Mystery
Oil. I wipe down the cylinder walls with the same oil until I don't get any
residue. Then I wipe all of the bearing areas and blow out oil passages.
I don't paint anything because I had a bad experience where all the paint
came off during a race-in sheets. If no Marvel oil is available I use ATF.
Jay
EDIT: Here's the mod that is doing all my balancing...
They also did the Dragster's stuff. Great people.
Last edited by Preen59; 11-12-2010, 12:17 AM.
APR Tuned | KW Suspension | INA Engineering | Mocal Oil Control |
Website: http://www.tprengineering.com
Email: chris@tprengineering.comComment
-
Crank looks awesome, what sort of coins did they charge you???? If you don't mind sharing, as it was something I wasn't going to do on my motor but always wanted too.
Originally posted by Preen59Comment
-
I did the knife edging myself. Hugh just chamfered the leading edges. If I was to charge for that, probably about $250. I haven't got a bill for the whole lot yet, but i'm happy to share what it cost when i do.Originally posted by alex g View Post
Well, today I...
-Fully washed and flushed the block, then blew it dry and oiled up the inside.
-Fitted the crank, checked the end float (.12mm)
-Lubed everything up with assembly lubricant. Fitted the crank with all main caps and torqued it down (ARP Studs.. 40ft lbs, then 60.). Checking as I went that the crank continued to rotate freely.
-Then onto the pistons. I had to modify the piston buttons because I made them for standard pins and, of course, the JE ones were smaller in the ID. After that I gapped all of the rings. 14 thou top ring, 16 thou 2nd ring, 16 thou oil rings.
-I cleaned the block breather up and sand blasted it. Came up nice.
Now onto a couple of pictures.. As you may well have read, the ABF alternator bracket doesn't fit the block 100%. One of the mounts sits out in the breeze.. And that doesn't look very nice. So....


Basically I marked out a line from the top down, with a radius (nothing in particular, just something i thought looked alright) and went across in a straight line leaving space for the mounting hole recesses.
Then came the fun bit.. Out with the 32mm hole saw.. I put a hole where the radius was, so that I could hack saw straight down from the top and the side and break into it (Hacksaws will only go around corners when you DON'T want them to! haha). After that, hacksawed it out. Then grabbed a dreadnaught file (google it..) and filed the sides down flat, followed by a half round file to clean the radius up and blend it in. After that, some deburring and rounding of a few sharp corners. Finally I stuck it in the sand blaster. Then gave everything a uniform finish and I think most people who don't know won't even notice it's modified when it's all fitted!
APR Tuned | KW Suspension | INA Engineering | Mocal Oil Control |
Website: http://www.tprengineering.com
Email: chris@tprengineering.comComment

Comment