Above Forum Ad

Collapse

Announcement

Collapse
No announcement yet.

Sam's build thread

Collapse
X
 
  • Filter
  • Time
  • Show
Clear All
new posts

  • Originally posted by sambb View Post
    In the case of using aluminium vs phenolic, yeah as a heatsink material aluminium works best but not in the setting of the engine bay bolted to the rocker cover where even finned aluminium would heatsoak immediately and just become a heat source maybe even worse than the standard set up. I think phenolic would act as an insulator and might not pass all the rocker covers heat onto the neck of the coil.
    If I was to make a one off for myself the single piece adapter that takes in all 4 coils would be the easiest to make and I'd do it out of aluminium. But if I'm to do it out of phenolic where the cost of the material is higher, then doing the individual coil adapters would squeeze more units out of a sheet and be more $ efficient + I could buy 1 single coil adapter as a template for not much coin whereas the long quad adapters cost bigtime for what they are. Phenolic is just a different material that if anything may have some slight advantages to aluminium and no real disadvantages that I can see.
    At work we have these small heatsink squares. If you were really anal you could glue them onto the tops of the coil themselves with conductive paste which would probably cool them slightly but whether that's even necessary I don't know.
    At the end of the day I'll be running water injection which demands a reliable ignition system which is why I went for the R8's. anyway enough thread jacking from me. Louis seems sorted in that regard.
    cross-thread-jack... what's an R8 coil? literally from an Audi R8? this one? Audi R8 Ignition Coil Pack Set (set of 4) - 06E905115F | V-tech Australia | Engineered Performance

    I don't think you need to buy one of the aluminium adapters to copy, if I had a coil I could draw one up... the threads are there on the rocker cover so that bit's easy, it's just the size of the hole for the coil and the little cutouts that I assume are for locating lugs?

    Comment


    • ha ha I had a mate call me saying the same thing - 'I thought you were going to say you stacked it'. Been sitting here at work debating what went wrong with a fitter/engineer. I may not even try it again, although it might be nice to have it redone (but differently!) and at least have it sitting under the house ready to go in case I ever hit anything.
      Yep used in the audi R8 V8 and V10 and 2.0TFSI. From what I can gather more or less electrically the same as OE 1.8T but there's always progress in construction/materials so if I was going to replace what I had it made sense to get these. Yeah its the little cutouts which would be the tricky bit.

      Comment


      • Originally posted by sambb View Post
        ha ha I had a mate call me saying the same thing - 'I thought you were going to say you stacked it'. Been sitting here at work debating what went wrong with a fitter/engineer. I may not even try it again, although it might be nice to have it redone (but differently!) and at least have it sitting under the house ready to go in case I ever hit anything.
        bolting it in with spreader plates probably would've worked better - you're right about the welds taking the stress in a small area, and the welds would be brittle (depending on what it was welded with) but either the welds, and/or the metal around it would fracture eventually

        Originally posted by sambb View Post
        Yep used in the audi R8 V8 and V10 and 2.0TFSI. From what I can gather more or less electrically the same as OE 1.8T but there's always progress in construction/materials so if I was going to replace what I had it made sense to get these. Yeah its the little cutouts which would be the tricky bit.
        thanks... some techie crap you've probably seen: HSTuning - R8 Coil Pack and NGK Spark Plug Sale - VW GTI MKVI Forum / VW Golf R Forum / VW Golf MKVI Forum / VW GTI Forum - Golfmk6.com

        I assume they don't fit under the vacuum reservoir etc.? my SAI is going because it screams, but I'm reading mixed things about getting rid of the other bits, I guess they'd have to be lifted up, but then the engine cover wouldn't fit on, and I like the engine cover!

        Click image for larger version

Name:	Guide1-1.jpg
Views:	1
Size:	129.0 KB
ID:	1828736

        Comment


        • Doing the SAI will get rid of 1. and 5. Doing the N249 will get rid of 2. and 3. You cant get rid of the former unless you have it ticked off in a tune so that the ECU is not looking for a particular mixture change at start up. You can get rid of the latter right away. I'd recommend doing it. Its there as an extra safety net for the ECU to be able to dump boost (even not associated with throttle plate closure apparently). The car drives better without it in my opinion cos the ECU interferes quite a bit. With that gone you'll be able to simplify the pipe work enough to fit the coils.
          Haven't metered mine personally (but will now) had read that there wasn't much variation electrically but the link disputes that. The high rpm stuff wouldn't affect us but its the stronger spark especially in the presence of water that I was after. I can notice zero difference on the street but I suspect it'll be when running WI that the benefits will kick in if any.

          Comment


          • I did warn you about checking for cracks regularly, it's called a twist beam for very good reason, it twists. As I suggested in a previous post, for minimum unsprung weight increase I'd be looking at a chassis mounted rear swaybar with drop links to the shock mounting points. Until then the clamp on Whiteline bar is the go.

            Running sans rear bar is a big compromise as the much higher rear spring and damper rates required reduce the available traction. So not something that I would suggest.

            Cheers
            Gary
            Golf Mk7.5 R, Volvo S60 Polestar, Skyline R32GTST

            Comment


            • Hayden got any pics of the square tube within the beam method - can't picture how it would be welded at each end.

              Comment


              • Bugger about the beam, but I too was reading it and thinking you'd pranged it! Good luck, I'm sure you can get it sorted before next Thurs.

                Comment


                • Ford Fiestas and Chev Sonics also have twist beam rear suspension and there are some "unique" rear swaybar solutions available for them;

                  Click image for larger version

Name:	21615451805198_70.jpg
Views:	1
Size:	62.1 KB
ID:	1828737

                  Click image for larger version

Name:	torsion_large.jpg
Views:	1
Size:	38.8 KB
ID:	1828738
                  Click image for larger version

Name:	me3y4aqy.jpg
Views:	1
Size:	155.0 KB
ID:	1828739
                  Click image for larger version

Name:	Strut-Brace-Racing-Beat-And-Exchaust.jpg
Views:	1
Size:	97.4 KB
ID:	1828740
                  Click image for larger version

Name:	ddm-works-rear-suspension-brace-05.jpg
Views:	1
Size:	46.6 KB
ID:	1828743
                  Click image for larger version

Name:	103968_IMG_20160409_131552.jpg
Views:	1
Size:	147.2 KB
ID:	1828741
                  Click image for larger version

Name:	IMG_7395_zpsa3b5790c.jpg
Views:	1
Size:	91.0 KB
ID:	1828742

                  A Passat one
                  Click image for larger version

Name:	finished_snunkbar_1.jpg
Views:	1
Size:	82.7 KB
ID:	1828744

                  Audi
                  Click image for larger version

Name:	5Sl7FKW.jpg
Views:	1
Size:	58.0 KB
ID:	1828745

                  Quite a few different ideas that aren't too hard to DIY.

                  Cheers
                  Gary
                  Golf Mk7.5 R, Volvo S60 Polestar, Skyline R32GTST

                  Comment


                  • Originally posted by sambb View Post
                    Hayden got any pics of the square tube within the beam method - can't picture how it would be welded at each end.
                    I was thinking about this too, I don't know what the inside of the existing beam looks like, but I do come from a world of old pommy cars that used torsion bar independent front suspension...

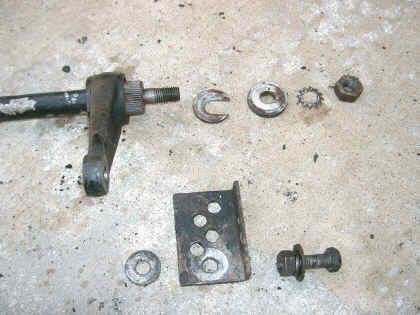
                    the torsion bar on a Morris Minor runs along the chassis rail on each side, attached to the bottom suspension arm at the front and a transverse crossmember under the front seats

                    the attachment to the crossmember looks like this:


                    the bar goes into the slot in that C plate, then the arm pushes down over the splines. The slot in the crossmember has a plate with multiple holes, and you put a bolt through the hole that gives you the ride height you want. They adjust the spring rate by using thicker torsion bars. There's a/was Group N Minor running around that has ENORMOUS torsion bars in it... very stiff front suspension

                    here are the actual parts


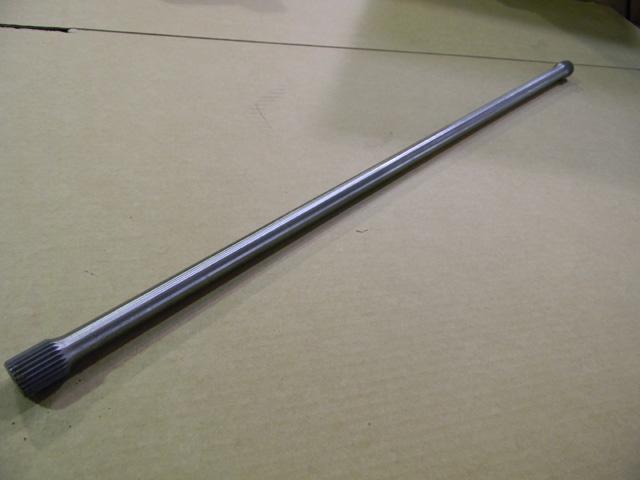
                    If you were going to put a bar inside the rear beam, then you could do it with a plate at either end that has an internally splined boss bolted to the inside of the rear beam, and a splined torsion bar joining the two plates. No welding, and can be removed

                    like this:


                    too complicated?

                    I imagine what Hayden is suggesting is much the same but using a bit of CHS going from one end to the other. Though I still think bolting it in is better than welding it. Weld plates inside the rear beam that is completely seam welded and solid, and bolt your 'new' torsion bar to that

                    edit: those pictures Gary has posted are just about exactly what I was thinking of... he must've posted just after I started writing that post and got distracted and came back to it
                    Last edited by simon k; 12-10-2017, 12:46 PM.

                    Comment


                    • This is a design for Golf Mk4 and is probably what I'm going to make for my Polo. I have a few suitable lengths of chrome molly tube with various wall thicknesses, so I'll guess (educated guess of course) what I think it needs and then try it out.
                      Click image for larger version

Name:	edcd03d9155a4c1d37efa7fdc690b7c7.jpg
Views:	1
Size:	7.0 KB
ID:	1828746

                      Cheers
                      Gary
                      Last edited by Sydneykid; 12-10-2017, 01:05 PM.
                      Golf Mk7.5 R, Volvo S60 Polestar, Skyline R32GTST

                      Comment


                      • I'm keen on this, if it means I can make it out of scrap I already have in the garage, it's something else I don't have to buy!!

                        Comment


                        • Tried finding photo's but due to Photobucket debacle. I can't seem to get any.

                          Tube sits on the lower edge of the beam, under the torsion bar.

                          Weld on the ends, similar placement of welds to that of the Shine Bar mounts.

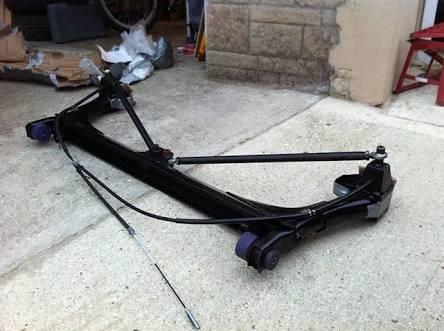
                          I did find a photo of the SCCH toe correction arms though!

                          Sent from my Moto C using Tapatalk

                          Comment


                          • Nice. love the input. simon K my Pug 205gti had semi trailing arms, a lateral torsion bar and horizontal dampers. Epic handling - anyone want to do that to my cars rear end?.
                            Yeah Gary its the red one with the V shaped bushes that I was thinking of. I was too scared to drill and mistakenly thought welding would be easier.... Just thinking out loud but what if you added a third point in the middle of the bar. eg a bearing that you could pin/bolt the bar to, that would give you a full stiff setting - remove the middle bolt allowing the bar to twist along is whole length for a softer setting.
                            Yeah I've seen some of those Hayden. I contacted a guy on a british hillclimb site wondering what the links do while back. Seems like a lot of work and weight for just stabilising the rear toe. If you ran that with a RARB you'd be getting heavy!
                            I weighed the whiteline 20mm bar today and it was 4kg. That means the plate I'd had welded only weighed 1kg!
                            Last edited by sambb; 12-10-2017, 10:45 PM.

                            Comment


                            • Bloody pics wont load from work, I'll have to add them later. I think this thread is taking up all their bandwidth!
                              Well I worked like an animal today. For some reason couldn't sleep after nightshifts so got up early and got stuck in. ****e beam out, removed the brakes and bushes, cut out the OE bushes from Seans beam and swapped it all over and fit the un modded beam back in. While I was waiting for a mate to arrive to help with the rear brake bleed I decided to remove my Bilstein B8's and swap in the dampers from the MCA coilover kit that had just arrived. So the rear end now has a 20mm whiteline RARB with rose jointed droplinks, the same H&R springs and MCA X series dampers. Was a 5 hour effort on 2 hours sleep and now I have to work all night but the beam is sorted now. The dampers are an amazing improvement. Despite now probably being overdamped (they are valved/adjusted for 350lb springs but he H&R's are less than 200lb/in) they are like butter over bumps compared to the B8's which are far more crashy in comparison, yet feel great when you lean on them. As a damper comparison on the same rate of spring they are a cut way above. Super motivated now to press on and get the whole lot in.
                              Attached Files

                              Comment


                              • Originally posted by sambb View Post
                                Yeah Gary its the red one with the V shaped bushes that I was thinking of. I was too scared to drill and mistakenly thought welding would be easier.... Just thinking out loud but what if you added a third point in the middle of the bar. eg a bearing that you could pin/bolt the bar to, that would give you a full stiff setting - remove the middle bolt allowing the bar to twist along is whole length for a softer setting.
                                I'm not sure that adding a bolt in the middle would make any difference to the anti roll. It would still link the 2 wheels together with the same overall length. Shortening the overall length is the easiest method, so you could have 3 or 4 bolts, holes and mounts at each end. Just one bolt at each outer end would be the softest setting (longest bar to twist), then 2 bolts (shorter bar to twist), 3 bolts etc.


                                Yeah I've seen some of those Hayden. I contacted a guy on a british hillclimb site wondering what the links do while back. Seems like a lot of work and weight for just stabilising the rear toe. If you ran that with a RARB you'd be getting heavy!
                                Using chrome molly tube or alloy rod and alloy spherical bearings it wouldn't weigh that much, probably less than 2kgs. How much difference it makes is the real question, I'd like to test it and see how much better the toe control is and what movement resistance is added.

                                Cheers
                                Gary
                                Last edited by Sydneykid; 13-10-2017, 08:46 AM.
                                Golf Mk7.5 R, Volvo S60 Polestar, Skyline R32GTST

                                Comment

                                Working...
                                X