 Tweet
Tweet
Hey Guys and Gals,
So we have a 2016 Beats Polo with a DSG that we've had since last year up in Darwin, recently decided to take it to work with me in remote WA, over 400km of corrugated roads to an Aboriginal community, hence decided to upgrade the lighting.
Last car was a Fiat 500 which I mounted a similar light bracket with the use of double sided tape for the numberplate for clean appearance.
My ethos is that it must look clean and near factory, or else I don't bother.
For this setup, I bought this number plate bracket:
And this light bar from a reliable eBay seller.

Last time I spent nearly $100 on a headlight switched relay wiring loom from a name brand which was a pleasure to work with. This time I couldn't source the same one as I forgot the brand.

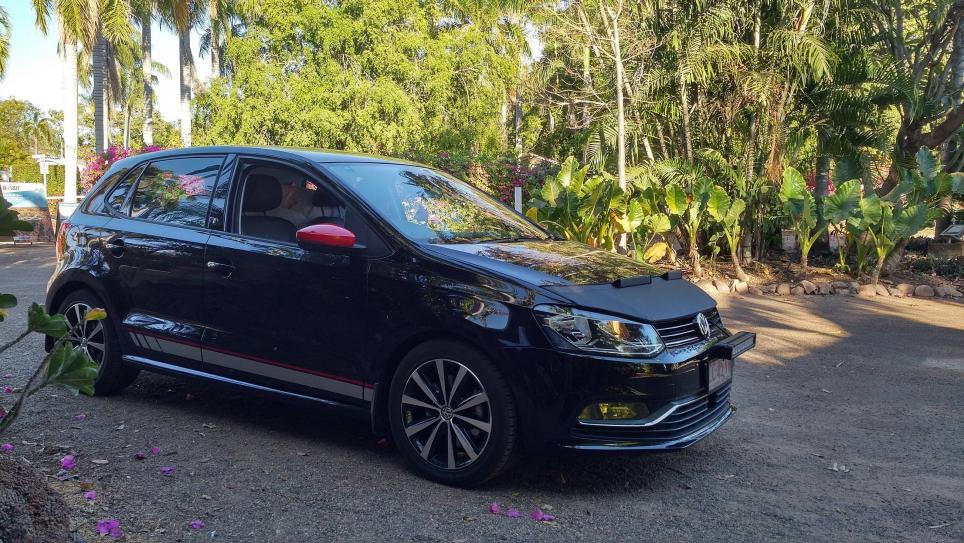
So the finished product looks like this:


I basically found some instructions on feeding wires through the firewall from an earlier polo online - the trick is to remove the passenger side wheel + wheel arch and then feed the wires through into the engine bay through the door wiring. On the inside of the cabin you can get your hand up inside and pull it through.
I pulled the wires through to the back of the entertainment unit and installed a switch where the blank covers are:

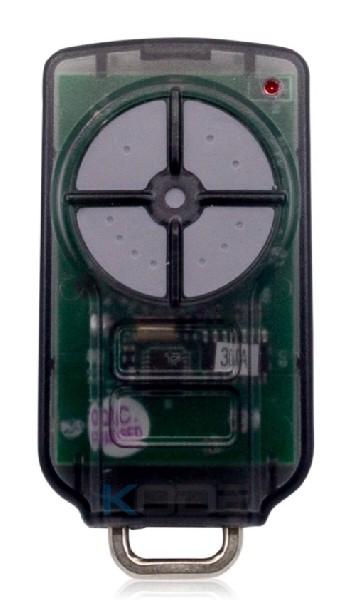
Now I had to buy a hazard switch from eBay in queensland - however then I realised that the switch was a momentary switch and not On/Off style.
I researched a few methods of using a momentary switch for my needs however it would require a flip flop IC together with some relays and a power amplifier transistor to trip the 12V relay in my case.
I removed the clicky clacky movement from the switch and epoxied in a on off switch I got from Jaycar.
Then I dremeled the inside of the old switch blanks:

And then epoxied on a plastic spacer normally used for drilling drywall and fixing screws.
It took a bit of trial and error due to tolerances and plastic expansion during hot days. Luckily I didn't epoxy anything in until it was finished as I would have been in tears otherwise.
I then made up a little sticker for the front of the switch that doesn't look too bad.
I researched water transfer decals however they basically acheive the same thing - I may do it in the future when I can justify $20 odd for the water decal paper.

The finished result is trim and flush, has a positive on/off action - can be removed to be adjusted easily, and NOTHING in the physical body of the car was cut or modified, everything is reversible and this was my goal in case we sold the car one day.
I won't go over the nuances of the wiring but all I can say is that the headlights unfortunately do not trigger the light bar as this wiring kit is not switched like that, however from my own research I have seen that tapping into headlight wires can throw error codes.

Total cost is about $300 with all the bits and pieces including double sided tape for number plate, etc.
Works very well and provides 100W of LED face melting power.
Comment with thoughts!
So we have a 2016 Beats Polo with a DSG that we've had since last year up in Darwin, recently decided to take it to work with me in remote WA, over 400km of corrugated roads to an Aboriginal community, hence decided to upgrade the lighting.
Last car was a Fiat 500 which I mounted a similar light bracket with the use of double sided tape for the numberplate for clean appearance.
My ethos is that it must look clean and near factory, or else I don't bother.
For this setup, I bought this number plate bracket:
And this light bar from a reliable eBay seller.
Last time I spent nearly $100 on a headlight switched relay wiring loom from a name brand which was a pleasure to work with. This time I couldn't source the same one as I forgot the brand.
So the finished product looks like this:
I basically found some instructions on feeding wires through the firewall from an earlier polo online - the trick is to remove the passenger side wheel + wheel arch and then feed the wires through into the engine bay through the door wiring. On the inside of the cabin you can get your hand up inside and pull it through.
I pulled the wires through to the back of the entertainment unit and installed a switch where the blank covers are:
Now I had to buy a hazard switch from eBay in queensland - however then I realised that the switch was a momentary switch and not On/Off style.
I researched a few methods of using a momentary switch for my needs however it would require a flip flop IC together with some relays and a power amplifier transistor to trip the 12V relay in my case.
I removed the clicky clacky movement from the switch and epoxied in a on off switch I got from Jaycar.
Then I dremeled the inside of the old switch blanks:
And then epoxied on a plastic spacer normally used for drilling drywall and fixing screws.
It took a bit of trial and error due to tolerances and plastic expansion during hot days. Luckily I didn't epoxy anything in until it was finished as I would have been in tears otherwise.
I then made up a little sticker for the front of the switch that doesn't look too bad.
I researched water transfer decals however they basically acheive the same thing - I may do it in the future when I can justify $20 odd for the water decal paper.
The finished result is trim and flush, has a positive on/off action - can be removed to be adjusted easily, and NOTHING in the physical body of the car was cut or modified, everything is reversible and this was my goal in case we sold the car one day.
I won't go over the nuances of the wiring but all I can say is that the headlights unfortunately do not trigger the light bar as this wiring kit is not switched like that, however from my own research I have seen that tapping into headlight wires can throw error codes.
Total cost is about $300 with all the bits and pieces including double sided tape for number plate, etc.
Works very well and provides 100W of LED face melting power.
Comment with thoughts!

Comment