 Tweet
Tweet
Hey guys,
So this is my first DIY thread, and I thought why not post it up.
I have been wanting to get rid of that horrible stock orange glow that the interior has. So I ordered some LED interior kits to try my luck. It is a really easy mod, and one that you notice every time you get in and out of your car. Unlike alot of other aesthetic mods you can do.
I did look around on the net but couldn't find a tutorial that was overly helpful. So hopefully this helps you if you want to go in this direction.
You will need, gloves (which give you grip on the bulbs if you have big fingers like I do)
Small flat blade screwdriver set
Needle Nose Pliers
To get the lighting right I needed to order 2 different sets to get the right look.
I first tried these lights in the Front Light panel -
Newly 88 SMD LED Interior Lights Kit 8pcs for Volkswagen CC GTI Passat R36 | eBay
The problem with this set was the map light LED's provided in this pack wouldn't fit in with the Reflective backing plate.

It did fit in without the plate in but this didn't look good. So I decided to try these ones.
White 9 Lights SMD LED Interior Package Kit Error Free for Volkswagen Passat B6 | eBay
To remove the transparent cover is pretty straight forward. A really small screwdriver came in handy for this, like a set of jewelers flat blade screw drivers. It make it easier to remove the panels without leaving any marks on the plastic surrounds.
I found just starting in the middle of the panel, and work your way around to be the most useful method. As you can see in the picture below, I have removed the lens cover.
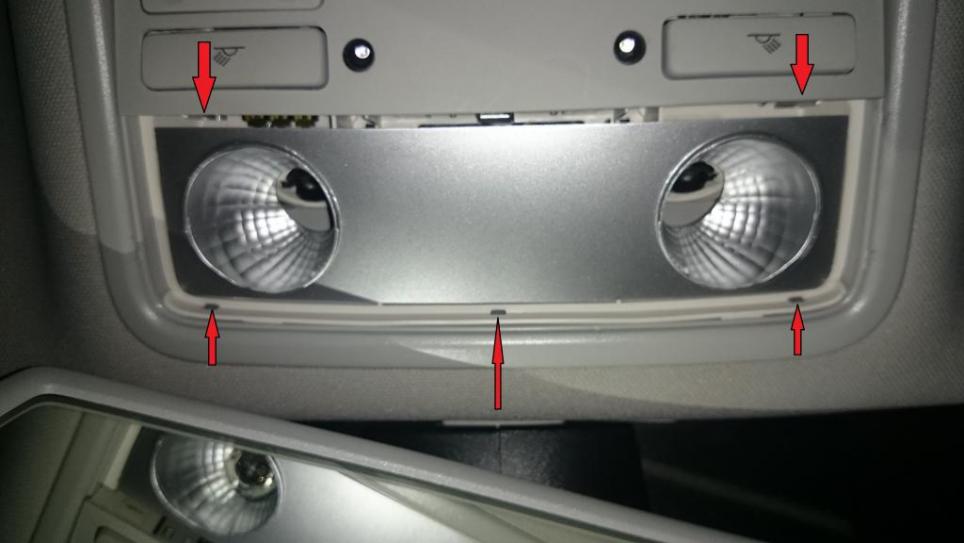
The Red Arrows indicate where the tabs are, that secure the plastic lens cover.
I struggled with this next part in the first attempt, trying to remove the old wedge bulbs from the housing, before I had removed the silver reflecting plate. This was attributed to my fat fingers. Even with some Nitrile gloves on (had read in a thread while looking for a DIY for this), that gloves add the grip that would be required to grab the glass globe. As the skins natural oils could be a hinderance. With some slight rocking from side to side I could only get one of the bulbs out. So then came the removing of the backing plate.
Simply prying it from the upper middle (referring to photo above) of the plate helped to pop the clips from behind it without breaking them. Leaving you with this.
Once the stubborn light was removed, I went on to put back the metal like reflective sheet, and proceed to insert the LED replacements.
If you find that a led doesn't work, just rotate it 180 degrees. That should fix the problem.
Re-assembly is very straight forward. As you would expect its doing these above steps, but backwards.
Next was the Rear Lighting Panel.

This photo was taken after the install but indicates where the tabs are that hold on this plastic lens cover.
Same as the front set just start in middle and work around, until you can flex the plastic to release a side from the tab.

To re-insert it I found it easier to, put one side in, bend the plastic a little and slot in the other end.
From my first LED purchase for this mod with the bigger components I used this 12 LED panel to fill the middle instead of a festoon type led.
When it came to the rear book reading lights, I hit a snag. I didn't have any more Wedge Led's, but luckily for me the next day the second ebay purchase had arrived.
Yet again I was foiled by my big hands in removing the original wedge bulbs, even with the gloves.
So the next step was to investigate how to remove the Rear panel.
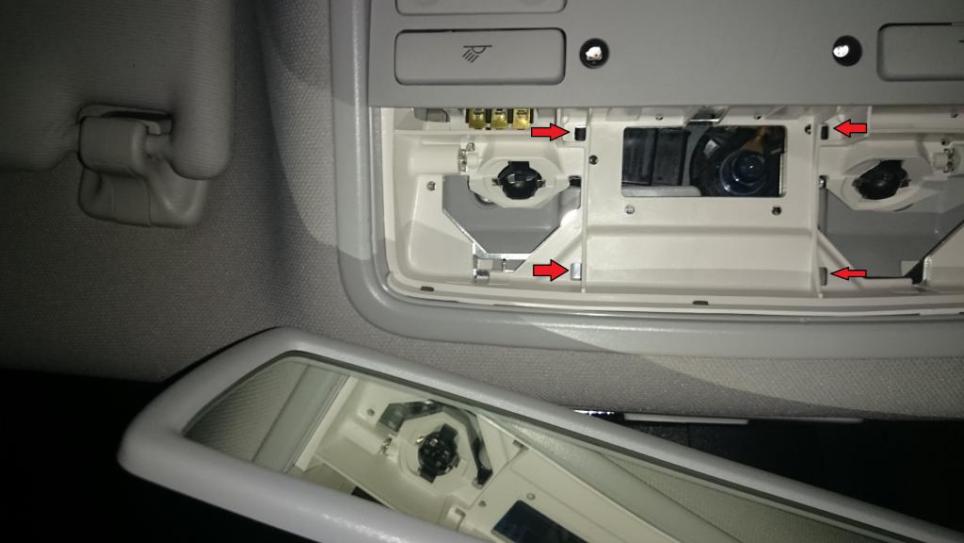
This photo depicts where the tabs are that you need to depress to drop down the rear of the panel. Then it tilts down and the front side is just plucked out. The cable isn't very long so the panel will just hang there. I didn't like it freely hanging so found supporting it best.

It was then a matter of pushing the old bulbs out from the rear.


The above photo depicts where the bulbs clip into at the back of the panel. simply pushing it out clears way for the LED Wedge.
Once LED's are installed and tested with the book light button you are good to re-assemble.
It does look so much better. Brighter and I like the look of the crisp white light.

Now be sure before beginning this mod that you have the keys removed from the iginiton. And that you turn the interior light switch to off. And that your Map/Book lights are turn off as well. This will stop you shorting out your fuse for interior lights (Like I did, with one of my Book lights).
The longest part of this mod was waiting for the LED's. And searching for a 2008 onwards Fuse Panel Diagram, needless to say, owners manual doesn't have one. And the net has some but they are all pre April 2008.
VW couldn't even help me.... Suprise Suprise.
Long story short, Its a 5 amp small wedge on drivers side.
I'll get a photo of that later for you all.
I thought we could start our own fuse mapping thread ha ha.
I hope this makes your install easier.
Happy Modding
Peace
So this is my first DIY thread, and I thought why not post it up.
I have been wanting to get rid of that horrible stock orange glow that the interior has. So I ordered some LED interior kits to try my luck. It is a really easy mod, and one that you notice every time you get in and out of your car. Unlike alot of other aesthetic mods you can do.
I did look around on the net but couldn't find a tutorial that was overly helpful. So hopefully this helps you if you want to go in this direction.
You will need, gloves (which give you grip on the bulbs if you have big fingers like I do)
Small flat blade screwdriver set
Needle Nose Pliers
To get the lighting right I needed to order 2 different sets to get the right look.
I first tried these lights in the Front Light panel -
Newly 88 SMD LED Interior Lights Kit 8pcs for Volkswagen CC GTI Passat R36 | eBay
The problem with this set was the map light LED's provided in this pack wouldn't fit in with the Reflective backing plate.

It did fit in without the plate in but this didn't look good. So I decided to try these ones.
White 9 Lights SMD LED Interior Package Kit Error Free for Volkswagen Passat B6 | eBay
To remove the transparent cover is pretty straight forward. A really small screwdriver came in handy for this, like a set of jewelers flat blade screw drivers. It make it easier to remove the panels without leaving any marks on the plastic surrounds.
I found just starting in the middle of the panel, and work your way around to be the most useful method. As you can see in the picture below, I have removed the lens cover.

The Red Arrows indicate where the tabs are, that secure the plastic lens cover.
I struggled with this next part in the first attempt, trying to remove the old wedge bulbs from the housing, before I had removed the silver reflecting plate. This was attributed to my fat fingers. Even with some Nitrile gloves on (had read in a thread while looking for a DIY for this), that gloves add the grip that would be required to grab the glass globe. As the skins natural oils could be a hinderance. With some slight rocking from side to side I could only get one of the bulbs out. So then came the removing of the backing plate.
Simply prying it from the upper middle (referring to photo above) of the plate helped to pop the clips from behind it without breaking them. Leaving you with this.

Once the stubborn light was removed, I went on to put back the metal like reflective sheet, and proceed to insert the LED replacements.
If you find that a led doesn't work, just rotate it 180 degrees. That should fix the problem.
Re-assembly is very straight forward. As you would expect its doing these above steps, but backwards.
Next was the Rear Lighting Panel.

This photo was taken after the install but indicates where the tabs are that hold on this plastic lens cover.
Same as the front set just start in middle and work around, until you can flex the plastic to release a side from the tab.

To re-insert it I found it easier to, put one side in, bend the plastic a little and slot in the other end.
From my first LED purchase for this mod with the bigger components I used this 12 LED panel to fill the middle instead of a festoon type led.
When it came to the rear book reading lights, I hit a snag. I didn't have any more Wedge Led's, but luckily for me the next day the second ebay purchase had arrived.
Yet again I was foiled by my big hands in removing the original wedge bulbs, even with the gloves.
So the next step was to investigate how to remove the Rear panel.
This photo depicts where the tabs are that you need to depress to drop down the rear of the panel. Then it tilts down and the front side is just plucked out. The cable isn't very long so the panel will just hang there. I didn't like it freely hanging so found supporting it best.

It was then a matter of pushing the old bulbs out from the rear.


The above photo depicts where the bulbs clip into at the back of the panel. simply pushing it out clears way for the LED Wedge.
Once LED's are installed and tested with the book light button you are good to re-assemble.
It does look so much better. Brighter and I like the look of the crisp white light.

Now be sure before beginning this mod that you have the keys removed from the iginiton. And that you turn the interior light switch to off. And that your Map/Book lights are turn off as well. This will stop you shorting out your fuse for interior lights (Like I did, with one of my Book lights).
The longest part of this mod was waiting for the LED's. And searching for a 2008 onwards Fuse Panel Diagram, needless to say, owners manual doesn't have one. And the net has some but they are all pre April 2008.
VW couldn't even help me.... Suprise Suprise.
Long story short, Its a 5 amp small wedge on drivers side.
I'll get a photo of that later for you all.
I thought we could start our own fuse mapping thread ha ha.
I hope this makes your install easier.
Happy Modding
Peace


Comment