G-8VXWWTRHPN Bling bling for the car door - VWWatercooled Australia

Announcement

Collapse
1 of 2 < >

Email Notifications Failing (mostly Telstra)

Hello everyone. Seems there is an issue with Telstra (possible others) blocking email from our server. If you are trying to sign up I would suggest a different email if possible. If you're trying to reset your password and it fails please use the Contact Us page:
2 of 2 < >

Welcome to the new look VWWatercooled

After much work and little sleep there is a new version of the forums running on more powerful and recent hardware as well as an upgraded software platform.

Things are mostly the same, but some things are a little different. We will be learning together, so please post questions (and answers if you've worked things out) in the help thread.

The new forum software is an upgraded version of what came before, it's mostly the same but also a little different. Hopefully easier to use and more stable than before. We are learning together here, so please be patient. If you have questions, please post them here. If you have worked something out and can provide an answer,
See more
See less

Bling bling for the car door

Collapse
X
 
  • Filter
  • Time
  • Show
Clear All
new posts

  • #31
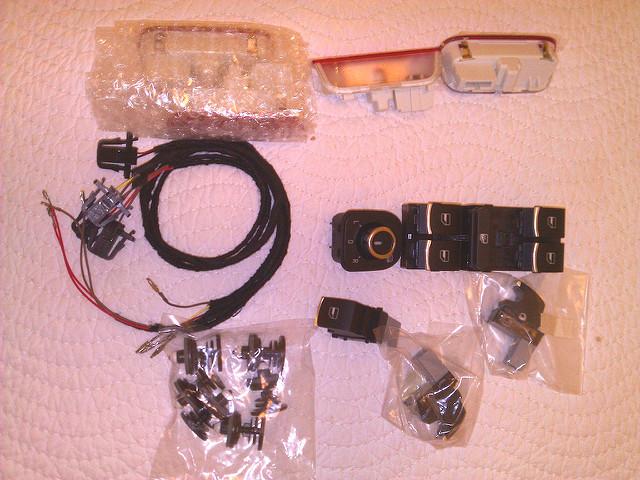
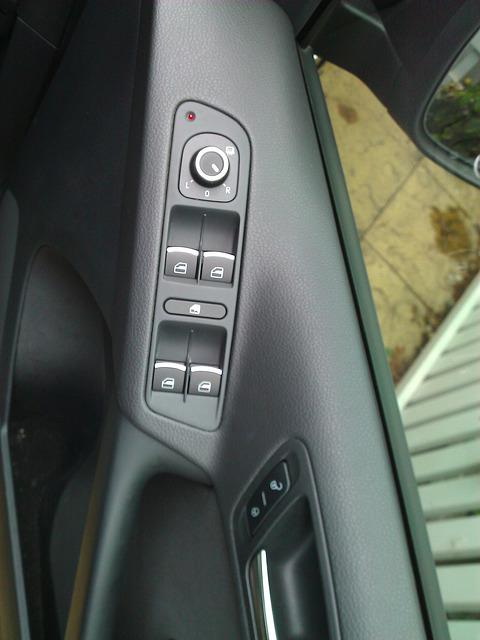
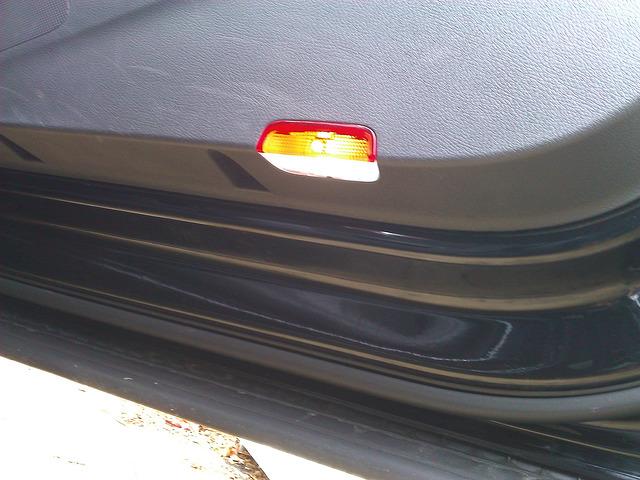
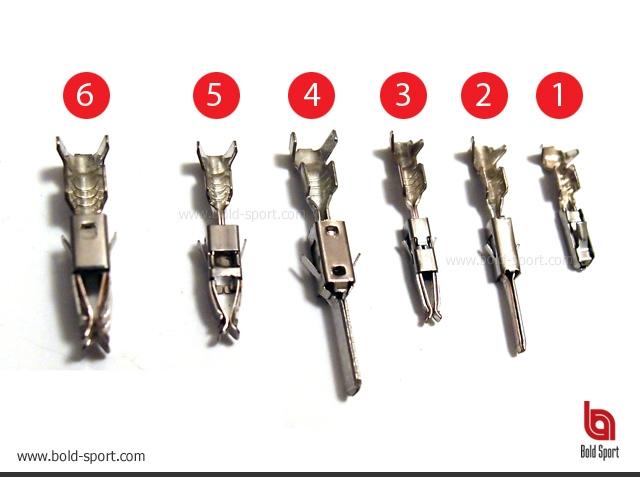
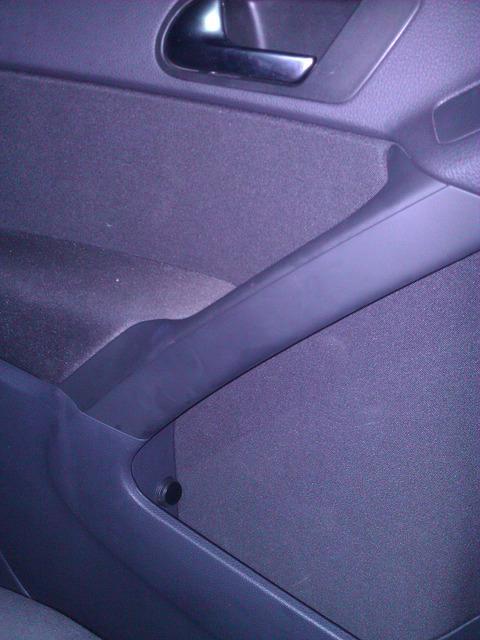
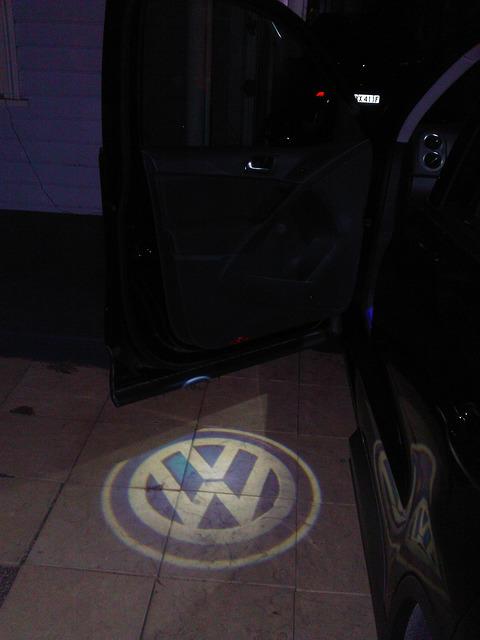
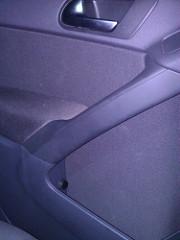
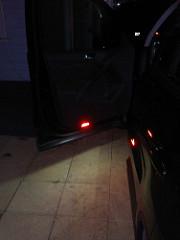
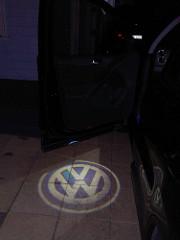
    OK This weekends project arrived a couple of days ago - door bling. Well perhaps a little more toned down than the other door bling that didn't quite make it onto the car. More like putting all the OEM bits back on which got taken off for cost savings measures.


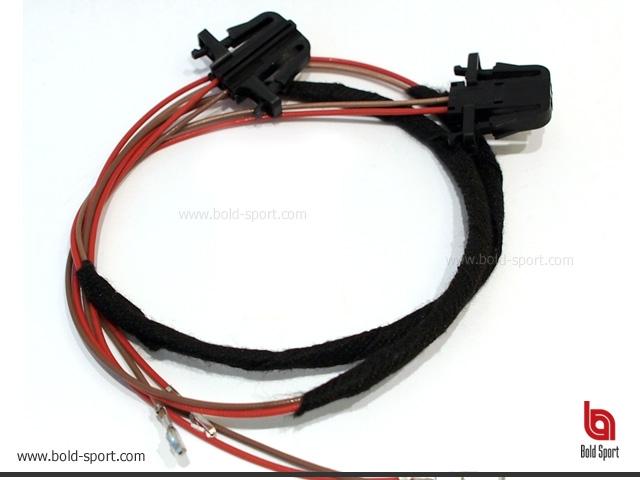
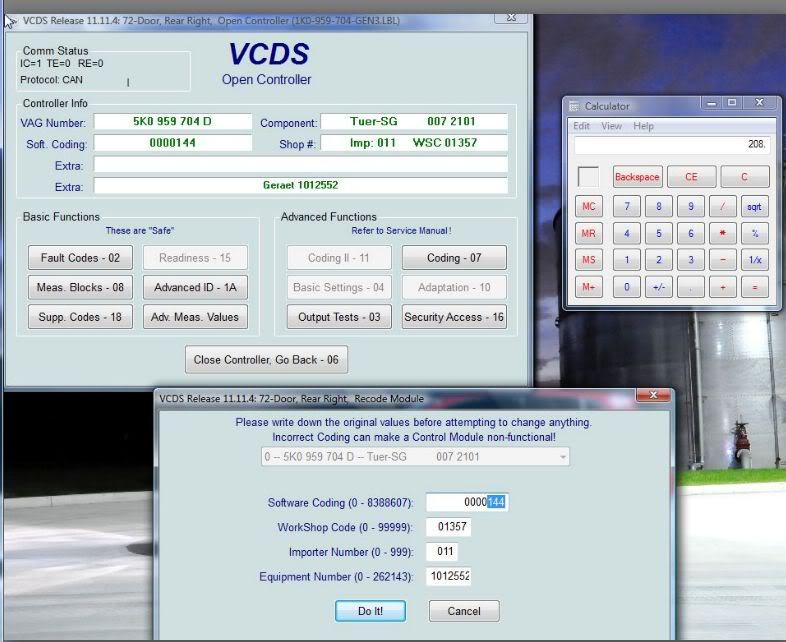
    Apparently (and I'll find out soon enough) the connections are already in the door to plug the connector for the lights into and all that is needed is to code them up.
    Last edited by tigger73; 11-01-2013, 11:12 PM.

    2017 Tiguan Sportline - Tigger73's 162TSI Sportline

    2016 Scirocco R, stage 1, 205kwaw (sold) - Tigger73's Scirocco R Build
    2013 Tiguan 155TSI, stage 1, 144kwaw (sold) - Tigger73's 155TSI Build
    2011 Tiguan 125TSI, Stage 2+, 152kwaw (sold)
    - Tigger73's 125TSI Build


    Comment


    • #32
      Think that's the only GTI upgrade I'm missing from my car (besides the round shifter). Let us know how easy they are to install.
      Some say he was the Stig... all we know is that he drives a VW Transporter.
      Audi A3

      Comment


      • #33
        Door Warning Lights &amp; Chrome Buttons Installation

        Installation complete - door lights and switches are all in and working.

        A couple of pictures:


        Strongly recommend getting the pre-made wires/connectors for the warning lights as it saves a lot of stuffing around. These come with the warning lights that I bought here: Door Warning Lights - Pair


        Also if you purchase the bits from Bold-Sport.com I suggest getting the following items:

        Door Panel Clip (in case you bust a few getting the door panels off)
        Cloth Webbed Adhesive Tape (useful for stopping wires rubbing / vibrating inside panels)

        As far as installations go it was (reasonably) straight forward. The only problem I encountered was the ground connection on the connector for both front doors were already being used (pin 19). So I used pin 21 on the passenger front and ended up splicing into the wire in pin 19 on the drivers side (tried picking off another ground on connector "C" but this ended up not being a "proper" ground).

        The other thing you'll find is the connectors for the front and rear doors are different so the connection cables have slightly different terminal connectors (1 vs 3 in photo):


        The only thing left to do was to enable the safety lights in VCDS (info courtesy of VWGolf.net.au user - M4RK0):


        42-Door Elect Drive => Coding 07 => Software coding: Add 64
        52-Door Elect Pass => Coding 07 => Software coding: Add 64
        62-Door Rear Left => Coding 07 => Software coding: Add 64
        72-Door Rear Right => Coding 07 => Software coding: Add 64


        The Old code is 0000144 the New code adding 64 is 0000208

        As soon as you click Do it! the lights should work.

        2017 Tiguan Sportline - Tigger73's 162TSI Sportline

        2016 Scirocco R, stage 1, 205kwaw (sold) - Tigger73's Scirocco R Build
        2013 Tiguan 155TSI, stage 1, 144kwaw (sold) - Tigger73's 155TSI Build
        2011 Tiguan 125TSI, Stage 2+, 152kwaw (sold)
        - Tigger73's 125TSI Build


        Comment


        • #34
          Hi there guys, dropping in from the Polo section after I found this thread on a search.


          I ordered a couple of these LEDs and they turned up today yet I'm unsure of a) where to put them and B) how to wire them.

          Ive seen them in the door as per the video and that looks pretty cool but I was also thinking of maybe putting them under the seat shining into the footwell to illuminate it when you open the door?

          If anyone has any ideas that you'd think would be cool, but didn't want to try Im open to suggestions, and if you have any tips for things to watch out for I'd appreciate that too!

          Cheers!

          Brendan
          PRUDENCE: 2008 POLO CLUB 9N3, 17s, BODY KIT, LOTS OF MEMORIES. FOR SALE HERE

          KRISTINA: 2013 POLO 77TSI, COMFORT & SPORT PACK, BLACK BOAVISTA 17s, MATTE BLACK FRONT EMBLEM, REAR BADGE DELETE

          Comment


          • #35
            Originally posted by BTJ View Post
            Hi there guys, dropping in from the Polo section after I found this thread on a search.
            We won't hold that against you

            Originally posted by BTJ View Post
            I ordered a couple of these LEDs and they turned up today yet I'm unsure of a) where to put them and B) how to wire them.
            a) I've only seen them put on the door sills or on the boot, however 95% are on door sills.

            b) pretty simple - red wire to +12V and black wire to 0V.... but I'm assuming you already knew that. I'd suggest tapping into one of your existing light circuits that go on when you open the doors. Doors or boot are always good. I'm not sure what options you have on the Polo for interior/door lighting though or if you have lights in your doors - as the safety lights above.

            Originally posted by BTJ View Post
            Ive seen them in the door as per the video and that looks pretty cool but I was also thinking of maybe putting them under the seat shining into the footwell to illuminate it when you open the door?
            If you have footwell lights you could tap into these wires, however in Golf/Tig the footwell lights are "on" at night so you'd also get the logos "on" if you tapped them into this circuit.

            Otherwise you'd have to tap into the door open switch somewhere and use this to trigger the lights - again not sure where this is in a Polo.

            Originally posted by BTJ View Post
            If anyone has any ideas that you'd think would be cool, but didn't want to try I'm open to suggestions, and if you have any tips for things to watch out for I'd appreciate that too!
            Running one off the boot in a Polo would be cool.

            2017 Tiguan Sportline - Tigger73's 162TSI Sportline

            2016 Scirocco R, stage 1, 205kwaw (sold) - Tigger73's Scirocco R Build
            2013 Tiguan 155TSI, stage 1, 144kwaw (sold) - Tigger73's 155TSI Build
            2011 Tiguan 125TSI, Stage 2+, 152kwaw (sold)
            - Tigger73's 125TSI Build


            Comment


            • #36
              Hi Tigger,

              Thanks for the info mate. Its seems what we've been saying in the polo section about you Tiguan owners isn't true after all

              Unfortunately I'm away from my car till the end of the month with work but when I get home and get them up and running I'll be sure to drop in and let you know what it looks like.

              Cheers
              PRUDENCE: 2008 POLO CLUB 9N3, 17s, BODY KIT, LOTS OF MEMORIES. FOR SALE HERE

              KRISTINA: 2013 POLO 77TSI, COMFORT & SPORT PACK, BLACK BOAVISTA 17s, MATTE BLACK FRONT EMBLEM, REAR BADGE DELETE

              Comment


              • #37
                Originally posted by BTJ View Post
                Hi Tigger,

                Thanks for the info mate. Its seems what we've been saying in the polo section about you Tiguan owners isn't true after all

                Unfortunately I'm away from my car till the end of the month with work but when I get home and get them up and running I'll be sure to drop in and let you know what it looks like.

                Cheers
                I'd check what you Polo guys have as far as door control modules go. If it's the same as the Golf (which is the case for the Tiguan), then you'll have a couple of connectors designed for door warning lights that you can use for the laser lights. This would be the simplest.

                You can get repair/trigger wires from bold-sport: Custom made trigger wire

                Otherwise I believe JayCar can supply similar connectors also.

                Pull the connector apart in your door and remove one of the existing wires to check exactly what connector you require.

                2017 Tiguan Sportline - Tigger73's 162TSI Sportline

                2016 Scirocco R, stage 1, 205kwaw (sold) - Tigger73's Scirocco R Build
                2013 Tiguan 155TSI, stage 1, 144kwaw (sold) - Tigger73's 155TSI Build
                2011 Tiguan 125TSI, Stage 2+, 152kwaw (sold)
                - Tigger73's 125TSI Build


                Comment


                • #38
                  Some say he was the Stig... all we know is that he drives a VW Transporter.
                  Audi A3

                  Comment


                  • #39
                    Might sound ricey of me, but I reckon a couple of LEDs to light up the logo would look awesome on the front grill of my TSI.

                    White car, matte black wheels and badges with the white LED highlighting the badge would look wicked.


                    Hmmmmm
                    PRUDENCE: 2008 POLO CLUB 9N3, 17s, BODY KIT, LOTS OF MEMORIES. FOR SALE HERE

                    KRISTINA: 2013 POLO 77TSI, COMFORT & SPORT PACK, BLACK BOAVISTA 17s, MATTE BLACK FRONT EMBLEM, REAR BADGE DELETE

                    Comment


                    • #40
                      Originally posted by BTJ View Post
                      Might sound ricey of me, but I reckon a couple of LEDs to light up the logo would look awesome on the front grill of my TSI.

                      White car, matte black wheels and badges with the white LED highlighting the badge would look wicked.


                      Hmmmmm
                      If it was red LED you could call your car Rudolf!

                      I had to be thankful that one of the reindeer antlers fell off when Mrs Tigger went through the drive-through so I got the chance to take the other one off.

                      If my wife had her way I'd have fairy lights and tinsel on my front grille at Christmas.

                      2017 Tiguan Sportline - Tigger73's 162TSI Sportline

                      2016 Scirocco R, stage 1, 205kwaw (sold) - Tigger73's Scirocco R Build
                      2013 Tiguan 155TSI, stage 1, 144kwaw (sold) - Tigger73's 155TSI Build
                      2011 Tiguan 125TSI, Stage 2+, 152kwaw (sold)
                      - Tigger73's 125TSI Build


                      Comment


                      • #41
                        So after a couple of false starts, I've managed to complete the install on the passenger door - switchable safety and laser lights.

                        Switch installed in rear of door pocket:


                        Safety light:


                        Switchable laser light:


                        Now to just duplicate on the drivers door....

                        2017 Tiguan Sportline - Tigger73's 162TSI Sportline

                        2016 Scirocco R, stage 1, 205kwaw (sold) - Tigger73's Scirocco R Build
                        2013 Tiguan 155TSI, stage 1, 144kwaw (sold) - Tigger73's 155TSI Build
                        2011 Tiguan 125TSI, Stage 2+, 152kwaw (sold)
                        - Tigger73's 125TSI Build


                        Comment


                        • #42
                          DIY Install of Switchable Safety/Laser Lights

                          For this install it assumes that you already have the door warning/safety lights installed and running, however if you don't you'll need to add a couple of repair wires and include the VCDS option to add safety lights as per DIY for the door safety lights. In this case you won't need the switch - just the 2-pin connector so you can detach the lights to take the door trim off.

                          I'll have to take some more photos and post them later as I didn't take photos during the install.

                          Here's the bits that you'll need:

                          1 x set of laser lights:


                          DPDT switch: Part# SK0966


                          2 pin connector: Part# PP2062


                          2 x 30cm of black/red auto wire: Part# WH3080 / Part# WH3082


                          Crimp spade connectors: Part# TH1848


                          I had some left over wire lying around left over from a previous job (RVC install) that I used for this one as well as some female spade connectors so I just bought the switches and 2-pin connectors.

                          OK once you've got all your bits together now you're ready to start the installation.

                          Step 1:
                          Remove door trims and drill a hole for the laser light using the cutter provided. You'll need to check the inside of the door to ensure where you're cutting the hole that the laser light will fit. Also (from experience) it's best if you place the hole towards the outer edge of the door. This way when the light is on the outer edge of the door won't cut off the laser light image. You'll need to clean up the hole with a knife/sharp edge and then install the laser light.

                          Step 2:
                          Drill a 19mm hole through the back of the door pocket. Clean up the edge of the hole and install the switch.

                          Step 3:
                          Next take some wire cutters and cut the safety light wire coming from the door control module to the safety light. Make sure the safety light is not on when you do this otherwise you'll likely short out the wire when you cut it. Cut this about half-way between the door controller and the safety light. Connect one side of the 2 pin plug to the wires attached to the door control module. Connect the other side of the 2-pin plug to the 2 x 30cm "spare" auto wires. I suggest soldering these wires as well as crimping them. Make sure the red matches up with the red and black with black on the connector (it will still work, however could make things confusing).

                          The 2-pin connector is a bit of a nicety but will allow you to disconnect the wiring if/when you need to take your door trims off in the future.

                          Step 4:
                          Now take the red +12V 30cm wire from the 2 pin plug and solder/crimp a female spade connector on it. Connect this spade connector to the centre connector on one side of the switch.

                          Step 5:
                          Now connect female spade connectors to the both red +12V wires from the two lights (safety light and laser light). Plug one on the bottom and one on the top of the side of the switch with the +12V connection.

                          Step 6:
                          Connect all the black 0V wires together. I suggest soldering them all together into another spade connector and attaching it to the other side of the switch. This is just a good spot to put it - you could just as easily connect them all together and cover with electrical tape.

                          Step 7:
                          Test before putting the door back together and trims on. You may need/want to adjust the direction/orientation of the image before clipping the door back together.

                          You should now have a fully functional/switchable safety/laser light set - enjoy


                          2017 Tiguan Sportline - Tigger73's 162TSI Sportline

                          2016 Scirocco R, stage 1, 205kwaw (sold) - Tigger73's Scirocco R Build
                          2013 Tiguan 155TSI, stage 1, 144kwaw (sold) - Tigger73's 155TSI Build
                          2011 Tiguan 125TSI, Stage 2+, 152kwaw (sold)
                          - Tigger73's 125TSI Build


                          Comment


                          • #43
                            Oh wow, I wished i searched door warning lights in vwwatercooled instead of just generic google/ebay, the pair I bought for my Scirocco Doors came with the wrong harness connector, (3 instead of 1) and I spent like 1 hour trying to shove one connector into the door harness only to scratch up my harness and still not be able to get it all the way in. Anyways got the ebay seller sending me the correct connectors now, just have to take the door trim off again. Great guide though!

                            Click image for larger version

Name:	harness damaged.jpg
Views:	1
Size:	52.8 KB
ID:	1810840
                            2012 MY13 Scirocco R, DNA Stage 1+, Volant CAI, SPM Dump Pipe, HPFP, 221kW.

                            Stary's Scirocco R Journey

                            Comment

                            Working...
                            X