If this is your first visit, be sure to
check out the FAQ by clicking the
link above. You may have to register
before you can post: click the register link above to proceed, registering will remove the in post advertisements. To start viewing messages,
select the forum that you want to visit from the selection below.
This means you should apply for your renewal now to avoid any disruptions to your membership whilst the renewal process is taking place! NOTE: If you have an auto renewing subscription this will happen automatically.
Hmmm, Aussietig's definitely look thicker - I'd be at least asking the question of Whiteline, after all "prevention is better than a cure" (or in this case - failing and spitting you off the road) Bit extreme I know, but hey "better safe than sorry" (full of them/it today aren't I)
Apart from the name, am yet to convinced that Whiteline is the best around either! I know they're Aussie, but so is Superpro I believe. Looked at the WL ALK originally, and perhaps luckily at the time they weren't available due to a production problem (a flaw in the housing I heard), so went with Superpro instead - seriously considering their urethane replacement for both my rear trailing arm bushes. Apart from being more heavy duty than the OE ones, I can probably get both replaced for the same as what the stealer will want just for one
Having bagged WL, their frt lwr control arm bushes are easier to replace because they include the whole bush & hsg assy, and I'm sure there are plenty out there very happy with them. Will find out some pricing tomorrow anyway.
As an aside, rotated my tyres while I had it up on the hoist - front ones were noticeably more worn than the rear! Would explain whay she's been spinning the front and not going around corners as well lately on wet roads (and that's still with stock tune since bloody dealer wiped my Viezu one at last service). Definitely ditching the Bridgestones at earliest opportunity.
BTW, just updated Auto-polar to latest version 3.3 - although haven't really had a chance to check whether issues with mirror dipping setting not being saved has been fixed.
Cheers
2011 147TSi 7spd DSG Reflex Silver, 18" New York Alloys, Leather with MDI, ECB Nudge Bar, Viezu Tune (Work in Progress), Eibach ProKit Springs, SuperPro Poly ALK & Rear Trailing Arm Bushes, H&R 26mm Rear ASB and Whiteline HD Adjustable End-Links, VAR Design 3" Downpipe, Sprint Booster, Auto-Polar FIS+ Advanced Module, GTI Sports Pedals, Flappy Paddle Strg Wheel, LED fogs as DRL, chrome blingy bits
Just got my whiteline 24mm rear swaybar installed a week or so ago. Noticing a lot of creaking and noises out of the back end since?
Any ideas about what it could be? I have contacted the place that installed it and they said they would have to take it for a drive.
The noises appear most when the car has been idle for a while (i.e. when I leave for work in the morning) and present themselves even at a crawl out of my garage..
Ok,so I've now fitted a Super Pro Roll Control 2 position adjustable Rear Sway Bar to my wife's Tiguan.
My initial impression is two thumbs up,as the difference was immediately noticeable. The car feels much more stable in the rear,which allows the front to tuck in with a sudden direction change without the rear end getting light and pulling the whole car off-line. I've set the bar to the softer of the two positions as the front bar is still original.
Driving in manual mode you can be far more aggressive with your turn-in and swerving from side to side is less onerous than before,even on the stock 16's. I imagine I'd notice an even larger improvement on lower profile tyres.
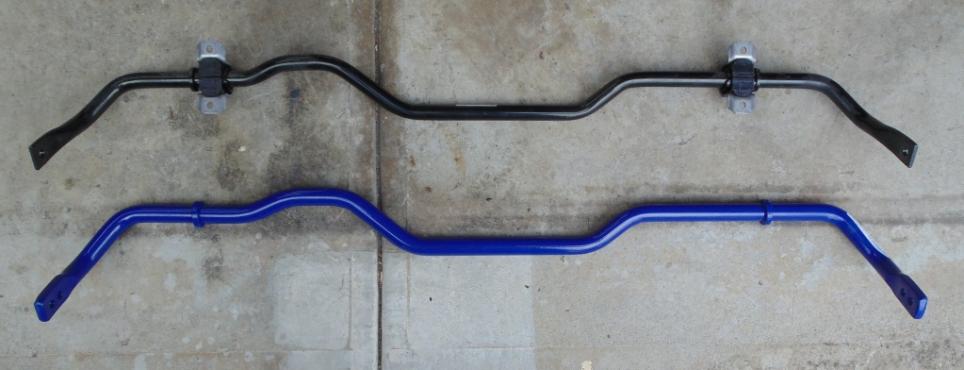
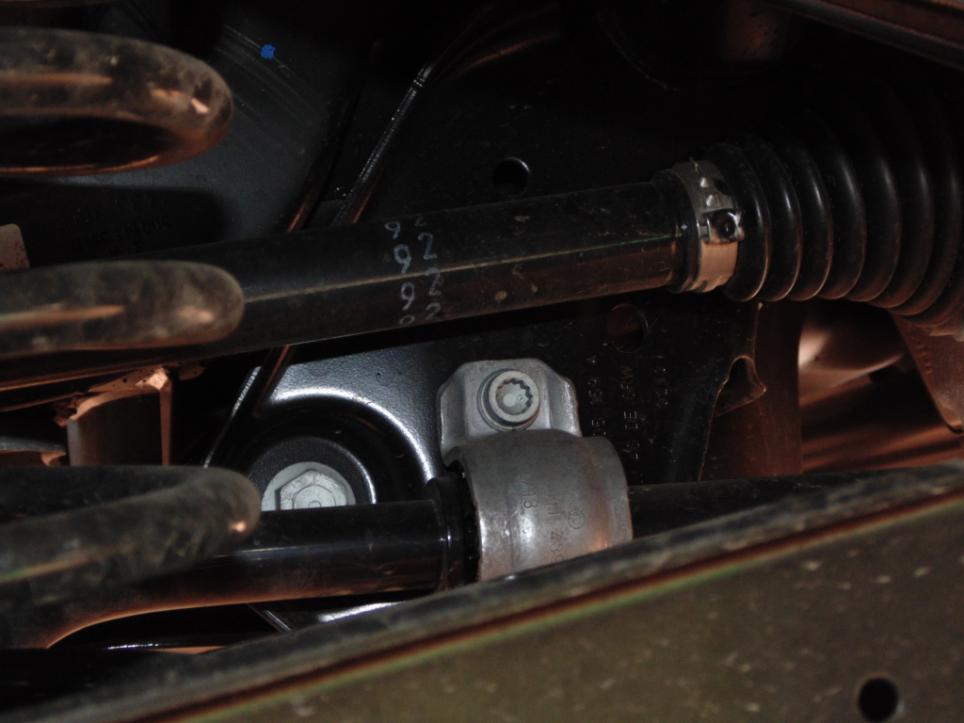
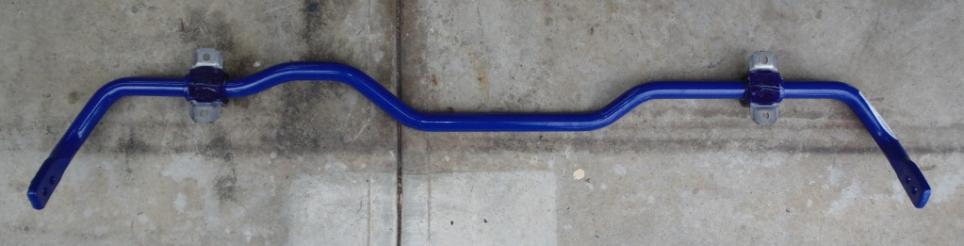
The bar I fitted is the RC0006RZ-24,which measures 25mm in diameter,and is solid compared to the ~22mm thick,hollow OEM bar as shown here:
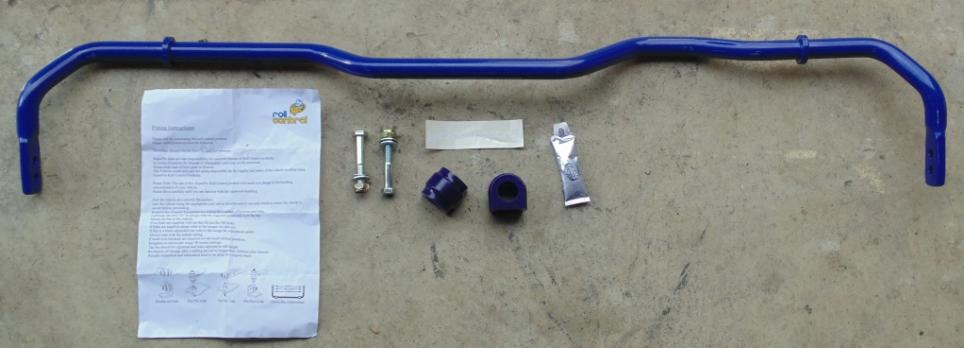
The kit includes two new D bushes,replacement lower link bolts,nuts and washers,fitting grease,a sticker (my toolbox now has 10 extra HP!),and some generic fitting instructions.
As this job is well within the scope of the weekend DIY'er,I'll give you all a quickish how-to for this job.
Tools required:
*3/8" ratchet with 2" and 5" extensions.
*M6 Multi hex socket
*M10 Multi hex socket
*16mm spanner (ratchet spanners are ideal)
*17mm spanner (ratchet spanners are ideal)
How-to:
Ideally,you want to do this job on a four post hoist,or with the rear of the car up on ramps,sitting on it's suspension at normal ride height. The D bracket upper multi hex bolts are obscured by the rear driveshafts with the suspension at full droop,which them means that you have to jack up each lower arm independantly,remove the bolt,and then do the other side. As I did the job in my driveway at home and wasn't in any great rush,this was the method I used. It's not a big deal,it just adds a few extra steps to the task overall.
Overall time to do the job (drive-in,drive-out) should be around 90min if you're on the ground using jack stands and taking your time,and well under an hour if you're on a hoist.
First up,check that your new kit is complete as shown above,then remove the OEM bar.
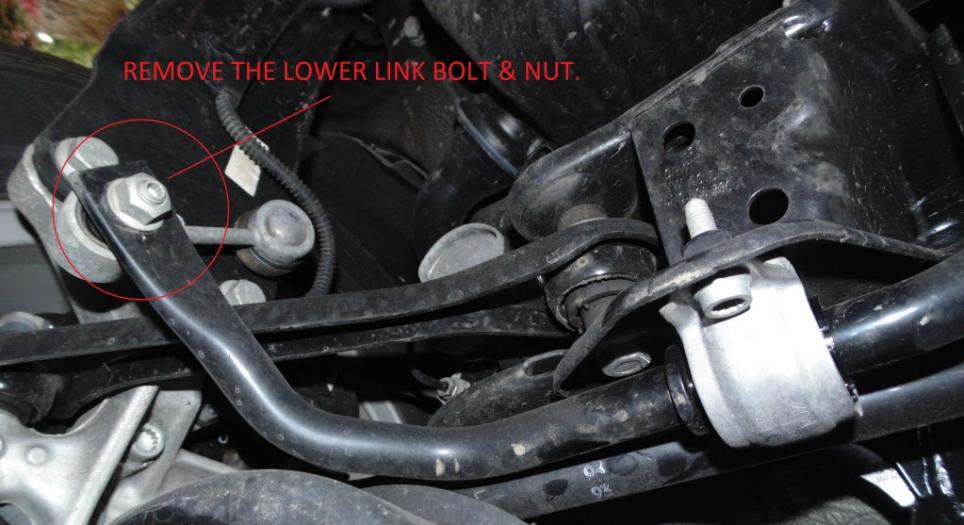
Remove the lower link bolts first (M6 multi hex socket and 16mm spanner),and put the bolt and nut aside,these will NOT be re-used.
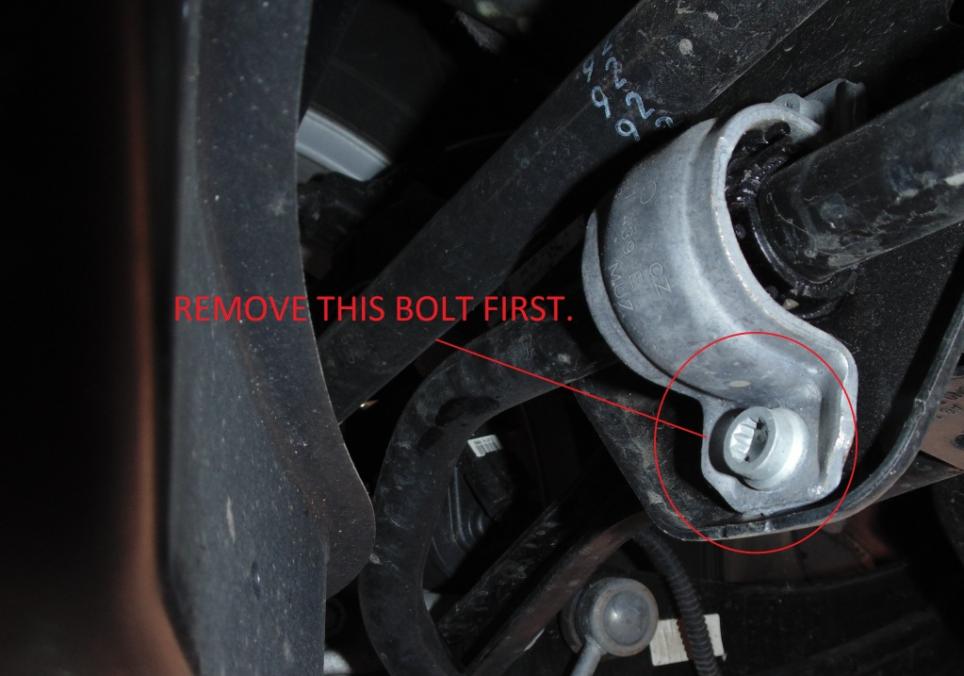
As mentioned previously,the upper bolts are obscured when the rear suspension is at full droop,like so:
You will need to remove the lower D bolt first,then jack up the rear LCA until the head of the upper bolt is clear,and then you can remove it.
Once the LCA is jacked up,it will be clear like this,and you can remove the upper bolt on that side:
Once the bar is un-bolted,you will need to feed it out around the rear diff and exhaust. The trick to this is to swing the left hand side out and down first,and then rotate the bar around until it's facing towards the rear of the car and feed it out of the rear of the car,between the diff housing and the rear muffler. You may need to push the exhaust down ever so slightly to get the D bush bracket through.
Once the bar is out of the car,you need to remove the original D bush brackets,as these are re-used. Mount one flange side of the bracket in a vise and twist the bar away from it until the bush pops out of the bracket. Remove both D bush brackets.
Open the supplied tube of grease and lube up the bar well on the inside of the two flanges,as well as the inside of the two supplied polyurethane bushes. Apply a decent smear of grease to the inside of the D bush brackets also to ensure no unwanted noise occurs later on.
Once it's all greased and put together,it's ready to put in and should look like this:
Feed the new bar in the same way you removed the old one,but don't fit the D bracket bolts just yet.
First,feed in the new swaybar lower link bolts into the bottom half of the OEM link,making sure that the head of the bolt faces the OUTSIDE. This is important as while the bolt will go in and bolt up either way,the end of the bolt can foul the trailing arm when the car is back on it's wheels if it's put in backwards.
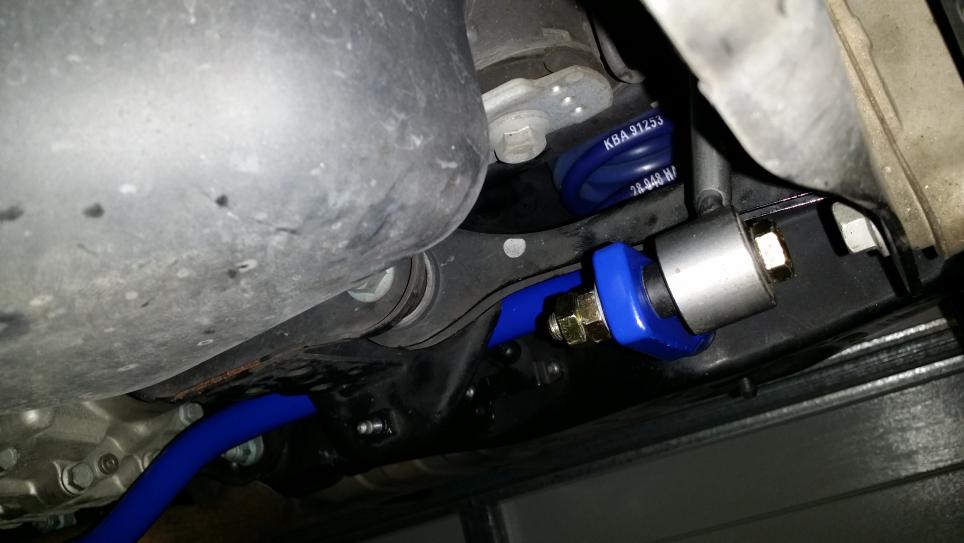
The correct installation setup for the bolts is as pictured:
The OEM lower swaybar link bushes are on an angle that's ideal for the car being at ride height,so they will be very hard to install at full droop if the bar D brackets are installed first. Fit both link bolts into the links,and attach them to the bar loosely BEFORE you attach the D brackets to the sub-frame.
Once the links are on,you can install the D brackets back onto the sub-frame. Tighten the end links up fully once the D brackets are installed.
And the job is done,bar putting the car back on the ground and putting your tools away!
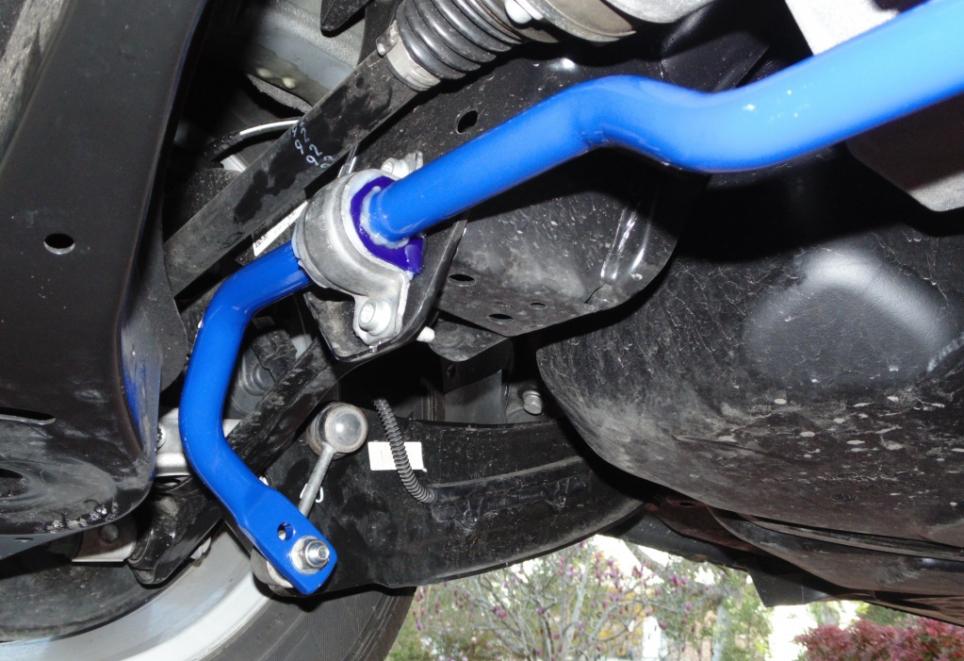
The finished product looks like this:
Super Pro also offer a thicker 26mm option for the rear bar on a Tiguan / Mk5/Mk6 AWD platform. This would suit people who are looking for the flattest possible handling setup,or who regularly carry a lot of extra weight around in the car.
If anyone has any questions about the above,or would like a price quote on this or any other Super Pro product,please let me know.
There's no difference in the bars or any of the suspension bushings for either petrol or diesel Tiguans bar the torque arm insert bush,which is softer on the diesels as there can be NVH issues if you use a petrol one on the oilers.
Regards,
Justin...
Justin - Enthusiast's Warehouse. Need parts? Pm me.
Cars in the driveway: 2021 Passat B8 RLine 206TSI Wagon, Mk8 Golf 110TSI Wagon, Toyota AE86.
Ok,so I've now fitted a Super Pro Roll Control 2 position adjustable Rear Sway Bar to my wife's Tiguan.
My initial impression is two thumbs up,as the difference was immediately noticeable. The car feels much more stable in the rear,which allows the front to tuck in with a sudden direction change without the rear end getting light and pulling the whole car off-line. I've set the bar to the softer of the two positions as the front bar is still original.
Driving in manual mode you can be far more aggressive with your turn-in and swerving from side to side is less onerous than before,even on the stock 16's. I imagine I'd notice an even larger improvement on lower profile tyres.
The bar I fitted is the RC0006RZ-24,which measures 25mm in diameter,and is solid compared to the ~22mm thick,hollow OEM bar as shown here:
The kit includes two new D bushes,replacement lower link bolts,nuts and washers,fitting grease,a sticker (my toolbox now has 10 extra HP!),and some generic fitting instructions.
As this job is well within the scope of the weekend DIY'er,I'll give you all a quickish how-to for this job.
Tools required:
*3/8" ratchet with 2" and 5" extensions.
*M6 Multi hex socket
*M10 Multi hex socket
*16mm spanner (ratchet spanners are ideal)
*17mm spanner (ratchet spanners are ideal)
How-to:
Ideally,you want to do this job on a four post hoist,or with the rear of the car up on ramps,sitting on it's suspension at normal ride height. The D bracket upper multi hex bolts are obscured by the rear driveshafts with the suspension at full droop,which them means that you have to jack up each lower arm independantly,remove the bolt,and then do the other side. As I did the job in my driveway at home and wasn't in any great rush,this was the method I used. It's not a big deal,it just adds a few extra steps to the task overall.
Overall time to do the job (drive-in,drive-out) should be around 90min if you're on the ground using jack stands and taking your time,and well under an hour if you're on a hoist.
First up,check that your new kit is complete as shown above,then remove the OEM bar.
Remove the lower link bolts first (M6 multi hex socket and 16mm spanner),and put the bolt and nut aside,these will NOT be re-used.
As mentioned previously,the upper bolts are obscured when the rear suspension is at full droop,like so:
You will need to remove the lower D bolt first,then jack up the rear LCA until the head of the upper bolt is clear,and then you can remove it.
Once the LCA is jacked up,it will be clear like this,and you can remove the upper bolt on that side:
Once the bar is un-bolted,you will need to feed it out around the rear diff and exhaust. The trick to this is to swing the left hand side out and down first,and then rotate the bar around until it's facing towards the rear of the car and feed it out of the rear of the car,between the diff housing and the rear muffler. You may need to push the exhaust down ever so slightly to get the D bush bracket through.
Once the bar is out of the car,you need to remove the original D bush brackets,as these are re-used. Mount one flange side of the bracket in a vise and twist the bar away from it until the bush pops out of the bracket. Remove both D bush brackets.
Open the supplied tube of grease and lube up the bar well on the inside of the two flanges,as well as the inside of the two supplied polyurethane bushes. Apply a decent smear of grease to the inside of the D bush brackets also to ensure no unwanted noise occurs later on.
Once it's all greased and put together,it's ready to put in and should look like this:
Feed the new bar in the same way you removed the old one,but don't fit the D bracket bolts just yet.
First,feed in the new swaybar lower link bolts into the bottom half of the OEM link,making sure that the head of the bolt faces the OUTSIDE. This is important as while the bolt will go in and bolt up either way,the end of the bolt can foul the trailing arm when the car is back on it's wheels if it's put in backwards.
The correct installation setup for the bolts is as pictured:
The OEM lower swaybar link bushes are on an angle that's ideal for the car being at ride height,so they will be very hard to install at full droop if the bar D brackets are installed first. Fit both link bolts into the links,and attach them to the bar loosely BEFORE you attach the D brackets to the sub-frame.
Once the links are on,you can install the D brackets back onto the sub-frame. Tighten the end links up fully once the D brackets are installed.
And the job is done,bar putting the car back on the ground and putting your tools away!
The finished product looks like this:
Super Pro also offer a thicker 26mm option for the rear bar on a Tiguan / Mk5/Mk6 AWD platform. This would suit people who are looking for the flattest possible handling setup,or who regularly carry a lot of extra weight around in the car.
If anyone has any questions about the above,or would like a price quote on this or any other Super Pro product,please let me know.
Regards,
Justin...
i just bought exactly the same RSB but mine somehow did not come with an installation manual (mainly how to slide the bushings past those bits that stop the bar from moving sideways). Mine did not come with longer bolts plus nuts and washers either...
for anyone who has bought superpro RC0006RZ-24 RSB, did you have to cut the bushings with a jigshaw to fit?
Mitsubishi Pajero Sport - Super Select 2WD/4WD Toyota 86 GTS Performance Pack Moon Slate - RWD MINI Cooper S Clubman - FWD
The bushes on all three kits that I've fitted to our Tiguan (24mm front bar, 24mm rear bar and 26mm rear bar) were all split already and didn't need to be cut.
They all came with the appropriate hardware also.
I'd suggest that you take your issues up with whomever it was that supplied you the kit Nat225.
Regards,
Justin...
Justin - Enthusiast's Warehouse. Need parts? Pm me.
Cars in the driveway: 2021 Passat B8 RLine 206TSI Wagon, Mk8 Golf 110TSI Wagon, Toyota AE86.
The bushes on all three kits that I've fitted to our Tiguan (24mm front bar, 24mm rear bar and 26mm rear bar) were all split already and didn't need to be cut.
They all came with the appropriate hardware also.
I'd suggest that you take your issues up with whomever it was that supplied you the kit Nat225.
Regards,
Justin...
Thanks for the help Justin.
New D bushings with split and bolts / nuts / washers are being sent from Fulcrum / Superpro headoffice today.
It was an omission by whoever worked there in packing the items by hands (obviously not a robot).
Mitsubishi Pajero Sport - Super Select 2WD/4WD Toyota 86 GTS Performance Pack Moon Slate - RWD MINI Cooper S Clubman - FWD
so i finally had the superpro rsb fitted. the package i received does not have any instruction manual (apart from missing longer bolts and unsplitted bushings). so i relied to vw technical guide and my previous experience with H&R rsb in my golf 6 gti.
first of all, fitment without a pair ramps is fxxk shxt due to the way thicker ends than oem and even h&r. kind of regretted i did not go with h&r instead. the end link bolts are impossible to slot trhu the rsb ends at even a slight angle due to thicker ends (by at least 5mm) as i only used jack stands and trolley jacks. changing from soft to hard on h&r in my gti was a breeze, even on jack stands and not on ride height, but i don't see it possible without the car (Golf R and Tiguan) on ride height with superpro rsb.
i can understand thicker ends = minimise breakage on the bar as seen on a few on golfmk6 forum. but i think something else (link bolts, links, bracket, bracket bolts) will likely break first before the rsb itself breaks (hence minimising warranty costs for them).
at the moment, i only managed to use soft hole on the left and hard hole on the right, until i get myself a pair of ramps.
i can't find any technical info on superpro whether they can be set at medium (soft on one side and hard on the other side), but h&r / neuspeed 2 holes on each end can be used as 3 way adjustable bar.
the diy wihout ramps non friendly culprit.
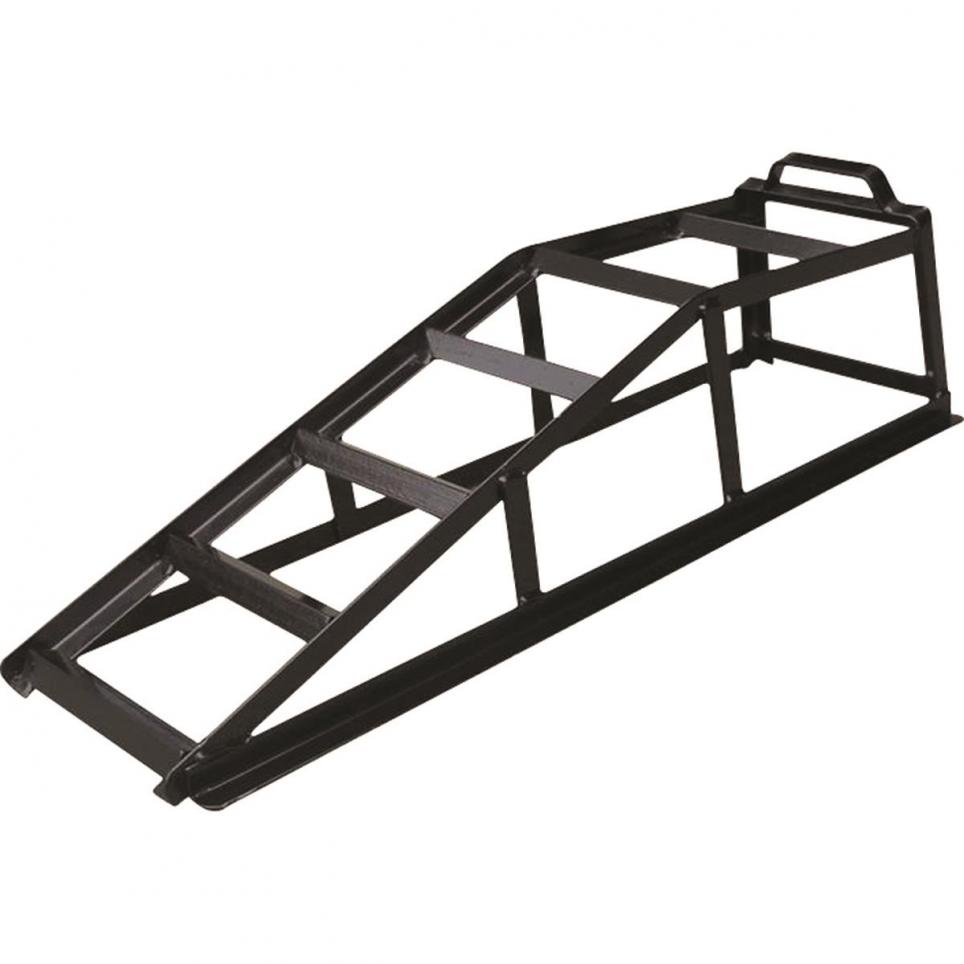
i don't have a pair of ramps cos most of them are useless for my mk6 gti and golf r, the front bumper would scrape first before going up the ramps plus the ramps (see below) sold at supercheap / repco will likely damage my wheels' lip with low profile tyres.
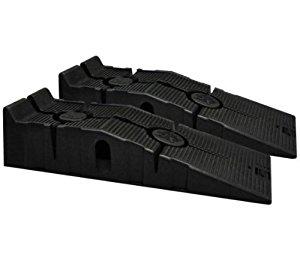
so, i have bought a pair of rhino ramps instead which should be much friendlier with low profile tyres and wheels:
BUT, just now i managed to squeeze under the car at ride height (my house is about 1m above the road with angled driveway. i used 2 wheel chokes to ensure the car wouldn't roll) and changed the right on to soft from hard. I guess i won't have any worry with the superpro rsb for this:
or
and finally, superpro head office is local here in Brisbane and their customer service (prompt responses) has been top notch! missing bolts were posted in an express post envelope to ensure fast arrival.
 Tweet
Tweet


Comment