If this is your first visit, be sure to
check out the FAQ by clicking the
link above. You may have to register
before you can post: click the register link above to proceed, registering will remove the in post advertisements. To start viewing messages,
select the forum that you want to visit from the selection below.
This means you should apply for your renewal now to avoid any disruptions to your membership whilst the renewal process is taking place! NOTE: If you have an auto renewing subscription this will happen automatically.
Hey, does anyone know how to remove the black plastic trim, circled in the photo, where the fog light would normally be installed from a 90TSI Comfortline? I want to get some foglights retrofitted.
pyromaniac: I had a further thought. To get a better view of what's happening at the back of the bumper bar where the black trim is fitted, you could remove the wheel housing liner.
Please don't PM to ask questions about coding, or vehicle repairs. The better place to deal with these matters is in the forum proper. That way you get the benefit of the wider expertise of other forum members! Thank you.
Thanks for your input. I managed to do it after about 10 minutes of careful prying. However I had to remove the front wheels as well as the wheelwell cover (as dv52 suggested) and slowly unclip from BEHIND the bumper. It is very tightly clipped in
Thanks for your input. I managed to do it after about 10 minutes of careful prying. However I had to remove the front wheels as well as the wheelwell cover (as dv52 suggested) and slowly unclip from BEHIND the bumper. It is very tightly clipped in
If you have a trim tool you can just pry it from the front and it will *snap* through.. and not break .
Thanks for your input. I managed to do it after about 10 minutes of careful prying. However I had to remove the front wheels as well as the wheelwell cover (as dv52 suggested) and slowly unclip from BEHIND the bumper. It is very tightly clipped in
pyromaniac: the fog lights look genuine-good choice! the wiring loom looks interesting. As you probably already know, Mk7s don't have conventional fuse arrangements for their exterior lights - all the protection/sensing activities seem to be controlled by the BCM. So, I assume that you will need to run a supply wire from each of the left/right lamps back to the BCM and that there is an earthing wire somewhere in the loom.
Not sure if you know about the Leuchte adaptation channels that the mk7 uses to manage exterior lights (each light has a set of 19 of these channels). You might need to do a bit of Leuche programming depending on whether the channels are correctly set up already (it's not difficult). Do you own a VCDS cable?
Also, did you buy a Euro switch replacement (i.e. the rotary switch for the lights), or did you already have one of these?
Please don't PM to ask questions about coding, or vehicle repairs. The better place to deal with these matters is in the forum proper. That way you get the benefit of the wider expertise of other forum members! Thank you.
DV52: That sounds exactly right - wiring loom connects to the left and right fog lights on one end and to the body control module and an earthing point on the other end.
I have had a little play with the Leuchte channels previously, such as to keep DRLs on when low/high beams are operating. I don't personally have a VCDS cable but I've just been borrowing my mate's cable.
At this stage, I have not purchased a euro switch replacement. I have yet to decide whether to activate them via the high beams (ie. turning on with high beams) or separately as front fogs. I will most likely activate them with the high beams initially, eliminating the need for a euro switch.
pyromaniac: Good thinking! That certainly saves you the cost of a Euro switch! If you want to operate the fogs without the euro-switch, you can extend the fog light function to be part of the low beam set-up - Just a suggestion. The additional programming isn't that difficult.
Not sure if you have read my paper on how to do Leuchte programming HERE - might be useful.
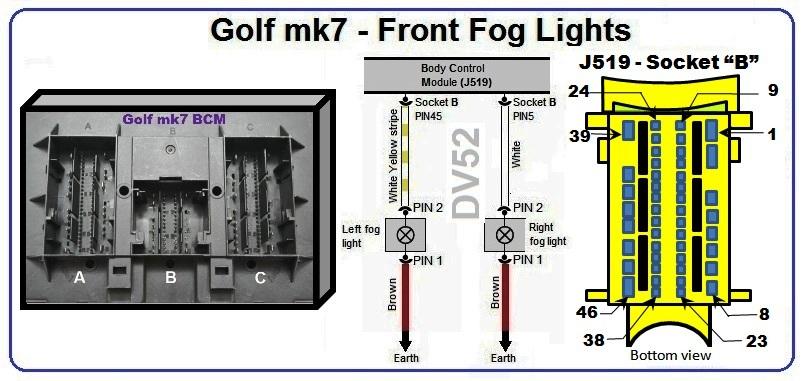
You don't need to wait for your installation instructions from the seller because you already have the wiring diagram for your project! As I say in my paper, a part of the adaptation channel descriptor for the Leuchte functions is the PIN-OUT and the identification of the socket on the BCM for each lamp (see table 4 in my paper).
It's all in the name! For example, the descriptor for the Leuchte adaptation channel-set for:
the left front fog light is Leuchte12NL LB45, and
the right front fog light is Leuchte13NL RB5.
The anatomy of the channel descriptor goes like this:
NL means "NebelschlussLicht ", or "fog light" in English.
The numbers 12 & 13 relate to the twin "lighting configuration channels" (not of interest here).
The L before "B45" is German "Links", or Left in English and the R before "B5" is German "Rechts", or Right in English
However, the most important bit about this channel descriptor is the last 2/3 digits which tells you that:
the left front fog light is on PIN 45 - Socket "B", and
the right front fog light is on PIN 5 - Socket "B"
I've drawn-up a wiring diagram for you below from just looking at the names in the adaptation channels - It's that easy!!
Please don't PM to ask questions about coding, or vehicle repairs. The better place to deal with these matters is in the forum proper. That way you get the benefit of the wider expertise of other forum members! Thank you.
DV52: you are an absolute lifesaver - I'd +rep you but it says I need to 'spread it around' first! I'm not sure where you are getting these diagrams from but they are legendary. I will definitely be following your advice when I wire up the fogs (which might not be for a little while thanks for the busy few weeks to come). Thanks again mate!
 Tweet
Tweet

Comment