If this is your first visit, be sure to
check out the FAQ by clicking the
link above. You may have to register
before you can post: click the register link above to proceed, registering will remove the in post advertisements. To start viewing messages,
select the forum that you want to visit from the selection below.
This means you should apply for your renewal now to avoid any disruptions to your membership whilst the renewal process is taking place! NOTE: If you have an auto renewing subscription this will happen automatically.
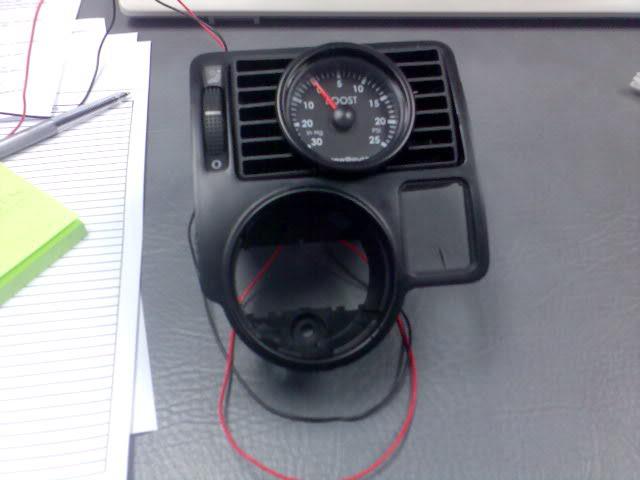
You need to remove the left and right adjustable slats behind the horizontal slats and slowly cleanly melt your way thru slat by slat without damaging the top and bottom slats to much...
oh by the way you need to remove the vent from the entire pod (the pod is the vent surround that houses your head light switch and yada yada)
the next part is the right bitch you gotta take it easy to not **** it up
but you need to put the any fittings on to the back of your gauge to gauge what you have to cut out of the back of the pod to make it all sit in tight..
i had a square brass fitting on the back of my gauge which allowed me to cut a opening just small enough for the cube brass fitting to squeeze in to and hold everything in place!
(you have to remove the entire thing from the car like in my example photo) i should have got some photos from the back of it to show you i might try do that tonight if i can see my old car)
now!
upon installing the main pod back in to the car you will have to slowly start cutting away at the annoying peices of plastic supports that sit behind it (but block the gauge and pod being inserted back in!) it takes time but end result is its custom.. its your own doing.. and you can actually lay claim to making it yourself...
also!!!
when i ran my boost line i ran it up the drivers side of the engine bay following the bonnet release cable in to under the windscreen cowling and thru the rubber grommet on the wiring loom box thingy (its a white annoying plastic box thing under the wiper motors you gotta remove em to get at it and do it properly!!!!)
Hey guys i stole the SWG motorsport idea and took to my spare Vent with a Heated knife..
at which point i installed my New South Performance Gauge! this is a old post from my Forum so excuse it but i have just C&P'd for your information
I can highly reccoment the NSP gauges.. i think imho they are the nicest of the lot! and a very very close match!
----!!Begin C&P of Old Thread!!----
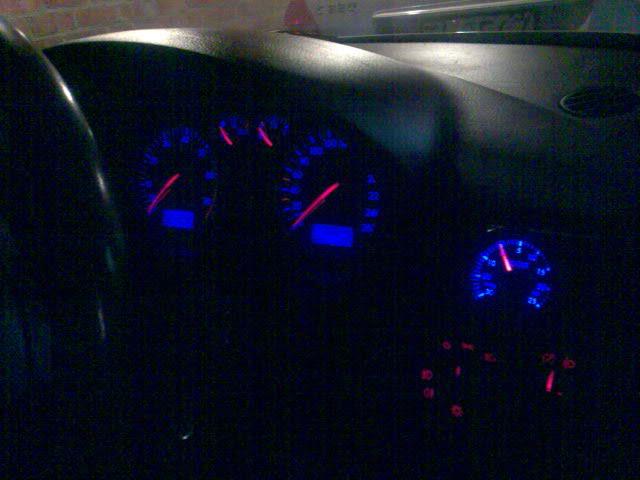
Well finally found a Perfect match guage for my car that has proper EL Lighting in "Indigo" colouring and a similar font..
So I had to decide where to put it so it didnt stick out to much and didnt get in the way to much
So after seeing Vent side pods for sale on the net i thought hmm ill do that and buy one..
After falling over at the price of 260 New Zealand Dollars Landed i thought Flip that idea ill make my own
So I tootled of down to a Reputable VW Parts dealer "Platinum VW Spares" and purchased myself a Surround and Vent for the Driver Side
Measured out how I wanted to put the Guage in where I wanted it and how i wanted to sit grabbed a sharp but old knife and grabbed my propane blow torch and melted out the where I wanted the Guage to Seat
worked a treat here are the results
The 42DD gauges are utter**** and have been a complete let down they ****ed up FIZZ's order 3 TIMES!!!! and the illumination wasnt what they claimed it to be
the NSP and SWG gauges have nice even illumination!
have u got a link of where you bought your gauge from and how much it cost?
2009 Volkswagen R36 Wagon 1968 Audi F103 75L Coupe 1966 Volkswagen Beetle Deluxe
 Tweet
Tweet


Comment