 Tweet
Tweet
Does anyone know the proceedure to remove the front door interior trim ie the grey plastic door liners?
-
-
I have the workshop manual on cd, but don't know at this stage how to transfer onto this post at this stage, maybe later this week.
RobUnderstand how it works, troubleshoot logically BEFORE replacing parts.
2001 T4 TRAKKA Syncro 2.5TDI,2006 Mk5 2.0TDI Golf manual,2001 Polo 1.4 16V manual [now sold], '09 2.0CR TDI Tiguan manual,
Numerous Mk1 Golf diesels -
Hi Rob,
That would be fabulous.
It's all a bit of a mystery otherwise.
Regards,
PeteComment
-
T4 Door trim removal for manual windows.
1. Crank down window.
2. Remove window crank -9- => see diagram 3
3. Unscrew locking button -5- and lever out rosette -6-.
4. Unscrew inner part of clip -8- with Allen key.
5. Lever off trim cover -4-, unscrew countersunk screws -3- and take off handle -2-.
6. Unscrew cross-head screw -10-.
7. Take off trim -1-.
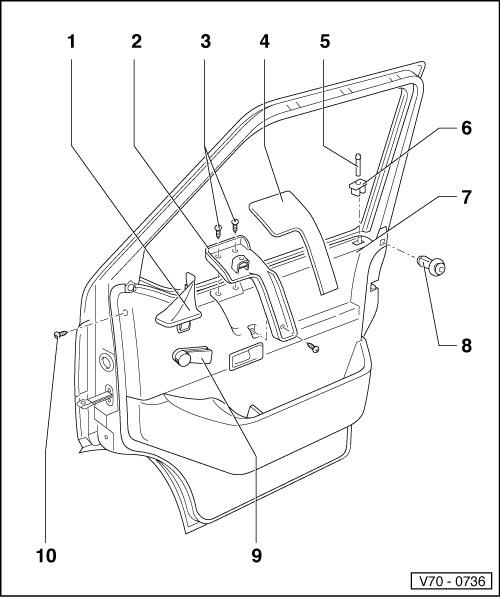
Diagram 1
8. Lift door trim -1- together with inner window slot seal -2- out of the mounting holes in direction of arrow.
Note:
Before inserting the door trim, attach rider -3- into mounting holes.
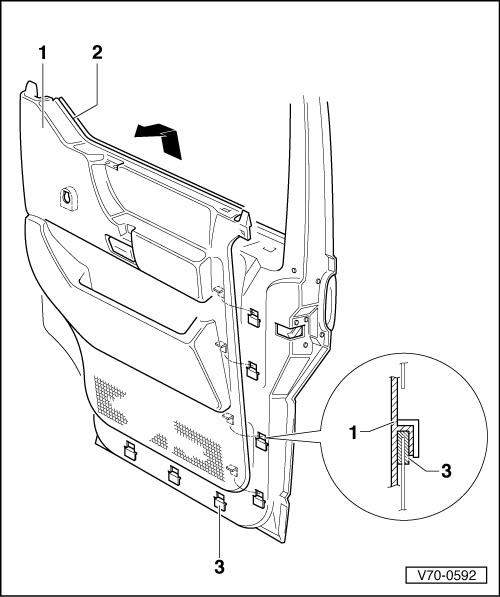
Diagram 2
Removing window crank
9. Unclip cover in direction of arrow.
10. Unscrew cross-head screw together with serrated washer.
11. Pull off window crank together with crank base.

Diagram 3
Installing window crank
12. After being installed, window crank must be in the position shown with the window closed.
Arrow- = Direction of travel
Angle -a- = 25° to 37°
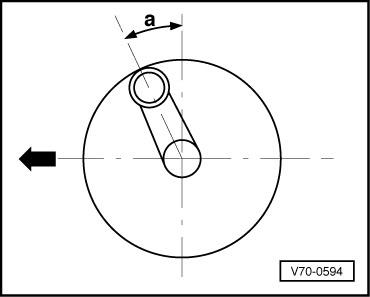
Diagram 4Understand how it works, troubleshoot logically BEFORE replacing parts.
2001 T4 TRAKKA Syncro 2.5TDI,2006 Mk5 2.0TDI Golf manual,2001 Polo 1.4 16V manual [now sold], '09 2.0CR TDI Tiguan manual,
Numerous Mk1 Golf dieselsComment
-
Welcome to VWwA quinnpetec@hotmail.com
Can you post pics of the T4 please - Ben
- Ben
1961 Karmann Ghia Coupé - 1993 Golf Cabriolet - 2006 Golf Comfortline 1.9L TDI
2008 Jetta 2.0L FSIComment
-
You may get frustrated by the plastic connector, part 8 in the diagram. The middle is supposed to screw out and release the plastic tabs on the outer section but they often won't unscrew. If this happpens you can only force them off with a screw driver or something and it is best to replace them with a new one, even if you get it out in one piece.
They go in easily though. They are not made to be screwed in, just a gentle hit of the middle pin with a hammer to push it home.
Anyway, good luck!Bob
Ex 2004 Transporter TDI T4
2007 Multivan Comfortline T5 128kw TDI AutoComment
-
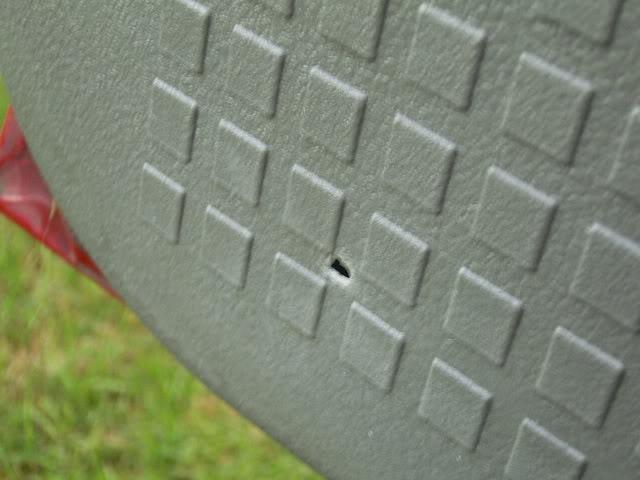
Small word of warning... be carefull with the clips (no. 3 in the electric windows version) they can pull through and leave holes in your trim...as the dealer found out when I took it back to get the power window fixed...
 "One is too many, three's not enough" Harry's Reasons - V Spy V Spy
Comment
-
Also if your window winder crank is like my '96 T4, then the crank is mounted using a quick release clip rather then a screw hidden underneath the crank trim as shown. Looking at diagram 3 above, the o-ring between the crank and door trim actually slides sideways, just gently place your fingers around the clip and push it sideways, it will release from it's locked position (it doesn't seperate completely) and the crank handle will just pull off the spindle.Last edited by Tornado T5; 22-09-2007, 01:40 PM.Comment
-
Fabulous, thanks everyone.
Yep, i have the clip and not screw on the window winder.
The pictures were a great help.
Again many thanks,
Regards,
PeteComment
-
I forgot to say that the details I posted are for the 2001 model. This thread shows the importance of being specific on your model & specs/options when looking for info.
I am pleased that it has been of help.Understand how it works, troubleshoot logically BEFORE replacing parts.
2001 T4 TRAKKA Syncro 2.5TDI,2006 Mk5 2.0TDI Golf manual,2001 Polo 1.4 16V manual [now sold], '09 2.0CR TDI Tiguan manual,
Numerous Mk1 Golf dieselsComment
-
I only "discovered" this when watching a central locking kit service man do his thing...as I know I would have gone crazy later on trying to remove the trim...and broken it for sure. I made it a point of watching the mobile phone installer fit a fixed-phone kit to my new T5 transporter as the dash trim gaps are much tighter on the T5 and there aren't as many smaller pieces to remove as before (which makes it easier working on a T4 I think) and "learnt" a few tips that will come in handy come GPS install time.Originally posted by quinnpetec@hotmail.com View PostComment
-
You did well to get the trim off and back on without breaking anything or making a hole.
I have seen a few doors like that Melissa. Its because the clips are tight and don`t pull outwards like most other VW doors.sigpic Camden GTI Performance. VW / AUDI Specialists
All Mechanical Work, Log book Servicing, New and used Parts and Imports
19-20/6 Badgally Road, Campbelltown, 2560
02 4627 3072 or 0423 051737 www.camdengti.comComment
-
The dealer did it, not me! LOLOriginally posted by Golf Loon View Post") They then got the plastic welding guy to fix it, he did a very good job.
"One is too many, three's not enough" Harry's Reasons - V Spy V Spy
They then got the plastic welding guy to fix it, he did a very good job.
"One is too many, three's not enough" Harry's Reasons - V Spy V SpyComment
-
Finally got around to pulling the driver door trim on my 98 T4 to reattach the door check strap which came adrift at Christmas (the bolts vibrated loose, one was missing, I saw the other as it fell out).
Removing the trim was sooo easy thanks to this thread, especially the diagram and numbered instructions. I allowed an hour for the job and steeled myself for broken bits. It took 15 minutes and no breaks.
A few extra notes: On '98s (or at least on my model), there's no trim (1) and the inside of clip ( 8 ) isn't screwed in with an allen head, it's simply levered out with a sharp edge, allowing the external part to be withdrawn so there are obviously different types of these; gently does it levering off rosette (6) and start in the middle of the long edge; lever off trim cover (4) starting from the long edge that falls under your palm when holding the handle then, when the 'handle' portion of the cover unclips, slide the top portion away from the door; when lifting the door trim raise one side, then the other and when it's ready to come out it'll do so easily - if there's resistance, don't tug (I think that's how the clips get broken), just try raising the trim some more.
If you're repairing the check strap so the door has nothing to hold it open as I was, it could be handy to have someone hold the door for you. The trim is a two-hander once it's off and the other person can hold the door steady for you while you put the trim down. I did it on my own and it was a bit awkward at that point.
Before putting the trim back on, check that none of the rubber inserts in the clip holes on the door have come adrift - I found one had come off and dropped inside the door. I also found the check strap inner plastic shroud inside the door (must have come adrift when the check strap did).
When repositioning the trim, take it as gently as removing it - when it's in the right position you'll know. Don't push or force it (again, I think that's how the clips get broken).
All in all I was delighted at how straightforward it was. Thanks again Jets for the diagrams!Last edited by Deeceer; 11-04-2010, 09:35 PM.-----------------------------
1998 T4 LWB 2.4D
2007 Ford Escape
Google ClimategateComment
-
You are welcome. I've been off the net for the last week or so getting a new computer, glad that it has helped you.Understand how it works, troubleshoot logically BEFORE replacing parts.
2001 T4 TRAKKA Syncro 2.5TDI,2006 Mk5 2.0TDI Golf manual,2001 Polo 1.4 16V manual [now sold], '09 2.0CR TDI Tiguan manual,
Numerous Mk1 Golf dieselsComment
Comment