Above Forum Ad

Collapse

Announcement

Collapse
1 of 2 < >

Email Notifications Failing (mostly Telstra)

Hello everyone. Seems there is an issue with Telstra (possible others) blocking email from our server. If you are trying to sign up I would suggest a different email if possible. If you're trying to reset your password and it fails please use the Contact Us page:
2 of 2 < >

Welcome to the new look VWWatercooled

After much work and little sleep there is a new version of the forums running on more powerful and recent hardware as well as an upgraded software platform.

Things are mostly the same, but some things are a little different. We will be learning together, so please post questions (and answers if you've worked things out) in the help thread.

The new forum software is an upgraded version of what came before, it's mostly the same but also a little different. Hopefully easier to use and more stable than before. We are learning together here, so please be patient. If you have questions, please post them here. If you have worked something out and can provide an answer,
See more
See less

SAI and N249 Removal

Collapse
X
 
  • Filter
  • Time
  • Show
Clear All
new posts

  • #31
    Blanking plate collected today.

    So it seems the N75 uses the boost pressure to control the n75, so I should be fine to leave that connected (don't think the Vac system will affect this).

    So if i remove the VAC system, I'm affecting:
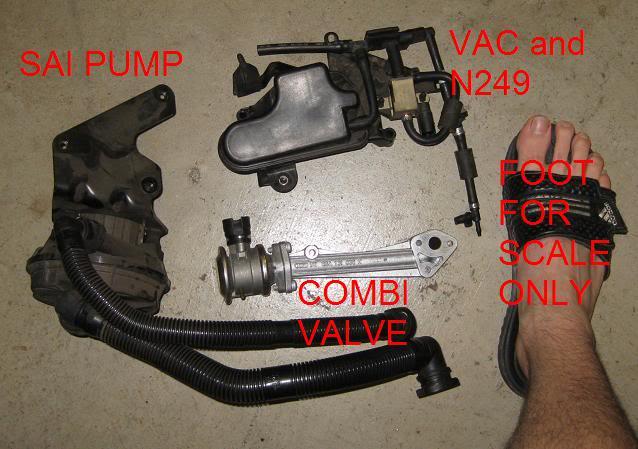
    N249 (bypassed)
    SAI (removing)
    Diverter (running from manifold)

    What else? There are lots of guides, but seem to be for Audi's and mk4's, so slightly different..

    Comment


    • #32
      Originally posted by noone View Post
      Blanking plate collected today
      Any chance of pictures as you proceed with this - for we who follow.......................?!

      Comment


      • #33
        Sure, no worries. Looking to start next weekend, assuming I have all the little bits and knowledge sorted by then.

        Comment


        • #34
          Did the SAI removal today. Was a good little project. Boost has changed and car has been a little jerky, my a/f ratios have changed, have not had a chance to let it settle, I was not really expecting any change in that department.

          No issues yet, normal startup was fine after blanking. Will hack together a diy later. Need to clock up a few k's to get the boost under control again.

          Comment


          • #35
            thanks noone, interesting topic
            06 Polo GTI - REVO Stage 2 = 140kw @ wheels.
            06 Golf GTI - Bluefin Stage 1 blacked out with ED30 theme, leather, xenon, etc.

            Comment


            • #36
              For anyone wanting to see a DIY, I used this one from SeatCupra.Net

              The thread is a little brief about some of the details, but is based on the same engine.

              The bypass is pretty simple over all, I'm using 10W, 30 Ohm resistors for the time.

              Basically, the process goes:

              - Remove the Air intake section or PD160 to the airbox.
              - Remove the Coolant connection on the side of the engine block (you loose a fair amount of coolant, so use something under there to collect as much as possible). This allows access to the 3rd screw to remove the combi valve.
              - Remove the Combi Valve (not as shown in the guide, from the side of engine mount).
              - Use blanking plate (eg Forge) to blank of SAI.
              - Remove the Pump (under manifold) - (for its size, its quite easy to remove with the air intake piping out of the way. Only 3 bolts holding in position.
              - Remove Vac reservoir, N112 and N249 from on top of the engine block.
              - Plum Diverter vac direct to available var port from manifold.
              - Use resistors in place of 3 electrical connections (N249, N112 and Pump).
              - Refill Coolant
              - Reattach all connections that may have been removed
              - Plug the hole in the Airbox (assuming you have one). I made a disc out of plastic, used elec tape and cable ties to secure.

              This is not a complete DIY, more a comment to the Seat forum one which is the most relevant as its based on the BJX engine, not an AGU, or other variant that requires more work.

              Comment


              • #37
                Some pics to ilustrate the topic.


                SILVER TEAM

                Comment


                • #38
                  Thanks Plautos.

                  So after not much driving, but a few trips around, there seems to be a little more boost (i'm sure the ECU will suck this out again once its settled).

                  I have thrown 1 code: Secondary air flow. Not concerned, its not affecting the vehicle in any way I can tell, cold starts sound much the same, no dash lights.

                  for the time, I'm calling this a win.

                  Comment


                  • #39
                    A few photos:

                    This is most of the hardware that came out when removing the SAI system


                    Here is the airbox plugged. For the time i cut a plastic disk and taped it over the hole, securing the tape with cable ties.


                    I've reused the N112 as shown on the left as the resistor for that device was throwing a code. I will solder the correct resistor into all the cables down the track if I keep it all this way (so I bit of a temp setup whilst I've been testing the system). The other item is the MBC as per a different thread.


                    Here is the combi valve before taken out. To get to the bottom of the connection, the coolant line had to be removed. I lost over a liter of coolant whilst removing the combi valve.


                    Here is the space where the SAI pump used to be. Was fairly easy to remove with the intake hose out, surprising for how large it is.


                    Looks like it will stay this way, only 1 code when scanned for incorrect flow from SAI, no issues, no rough idle, no problems to date.

                    Comment


                    • #40
                      Nice foot
                      MY2008 VW Polo GTi / GIAC Tune / Forge FMIC / Forge 007 DV / N75 Race / BMC OTA / KW V1 Coilovers / Whiteline Front&Rear Swaybars + Toe-In Shim / Weichers Front&Rear Strut Braces / Full Non-Res Milltek Exhaust / 17" Bora Sport

                      Comment


                      • #41
                        Thanks for the photos noone. I'm intending to do this, but still need to get a blanking plate.

                        But - do you need to remove the tower on which the combi valve sits, or just the valve itself? The Forge blanking plate (if that's what you have) seems to be made to fit on the top of the tower, not over the hole where the tower joins the block. This would also mean not having to disconnect the coolant line in the process.

                        Appreciate your comment.

                        Comment


                        • #42
                          The plate is designed to cover the air connection on the engine, it is not common on other 1.8T's to have this part.

                          I thought removing this part would be a better idea, 1 less place for air to leak and less hardware sitting in the engine bay...

                          removing the combi valve only would have been difficult as there are still parts in the way, I thought about this, but didn't have the tools to do it.

                          Comment


                          • #43
                            So do you think the Forge plate will fit either the top of the tower or the hole with the tower removed?

                            I haven't been able to find any other blanking plate but the Forge one, and don't want to order till I'm sure.

                            Comment


                            • #44
                              The DIY I've linked shows it used there, but it is designed to be used on the side of the engine as per my install.

                              Comment


                              • #45
                                Removing all these parts give another look to the engine bay. It is much better.
                                SILVER TEAM

                                Comment

                                Working...
                                X