 Tweet
Tweet
Here is a project anyone can do with a few tools and spare time so as to utilize the space inside the spare wheel.
I made up a storage insert, made of high density foam from Clark Rubber, so as to fit inside the spare wheel where tools or other items can fit neatly away. The beauty of this storage area is that it alos acts as an added support for the floor in case you put anything heavy on the floor.
Here are some photos of the foam storage insert in situ, with my tools and occy straps etc stored. You can also see the foam insert I made for my torque wrench on the right side of the photo.:
Photo 1

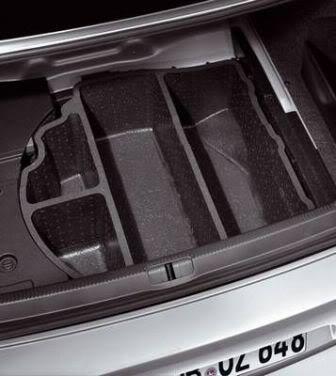
Tools etc removed to show cut outs:
Photo 2

As you can see, it is made from 4 layers of 50mm high density foam - and 1 layer of 25mm - and they taper slightly from top to bottom to suit the taper of the 18" spare wheel.
Photo 3

The 25mm layer with the hole in it is to take into account the dish of the spokes of the rim and to allow for fitment over the screw that holds the spare in place. The 25mm layer brings it up to the mounting flange of the wheel. The hole in the 1st 50mm layer of the foam is to allow for the screw that holds the spare wheel.
Photo 4

At an angle to show the depth of the top two layers of 50mm foam giving a total depth of 100mm of storage.
Photo 5

Here is my socket set in situ:
Photo 6

This is a 17" version I had for my previous Passat, the 3.2lt V6 4 Motion as it had 17"rims before I upgraded to 18"rims for that car. I didn't glue the top two layers on with this set up.
Photo 7

The project will cost under $100 all up if you get the foam from Clark Rubber.
You will need the following tools and items:
1) For those who have 18"rims, you will need a piece of 50mm high density foam that is 1,800mm x 450mm and a piece of 25mm high density foam that is 400mm x 400mm. For those with 17" rims, you will require a 50mm thick piece about 1,700mm x 430mm and a 25mm piece 400mm x 400mm. I use 50mm thick material as it is cuttable with a jigsaw and most importantly, the 4 x 50mm layers and the single 25mm layer sits perfectly under the floor to give it support.
2) I used a jigsaw with a new sharp wood cutting blade and set it on the fastest speed which gives a reasonably neat cut as can be seen from the photos.
3) I used clear liquid nails to stick the layers together, but you could use silicone or self contact adhesive. Make sure you apply pressure to all these methods until they are cured.
4) An Artline 90 texta or similar.
5)To get the circles that are required, I used a piece of timber about 40mm wide and 330mm long and 18mm thick. I then drilled a 12mm hole to suit the nib of the artline texta so that the felt tip prtruded the desired amount. I then drilled 3mm holes at the required distances for insertion of a nail as a pivot point. See photos:
Photo 8

Photo 9

How to make:
a) When marking out the circles, mark the spot where you are going to insert the nail so as you have a centre point reference. Draw the circle close to the edge of the foam so as to minimise wastage.
b) the top most circle is cut so as the blade is verticle or 90 degrees to the cut and needs to be cut at a diameter of 440mm for 18"rims and 415mm for 17"" rims. All diameter cuts for 17" rims will be 25mm smaller than the 18" rim cuts. Put a drill hole at 220mm from the centre of the texta hole for the nail hole.
c) The second layer down requires that the blade be set on an angle as the 18" rim starts to taper inwards at that point. See the 3rd photo above. To set the blade, you need to have the blade so that it is about 9mm more at the top than the bottom as this will mean that the top of the circle will be 440mm and the bottom will be 422mm. See photo. Set the nail hole at 220mm from the centre of the texta hole and this will mean that the bottom will be about 422mm. To set the blade, get an offcut of 50mm foam and mark it at say 50mm in from the top and 59mm in from the bottom and then align the blade so it matches the mark on the side of the foam.
Alternatively, you can just cut the second circle to 424mm, but you will have a stepped affect to each circle.
Photo 10

d) The 3rd layer from the top will be 422mm at the top and 404mm at the bottom, so set the nail hole at 211mm so that the top will end up being 422mm and the bottom will be about 404mm.
e) The fourth layer, or bottom layer of the 50mm foam will need to have the nail set at 202mm, so that the top will be the same as the bottom of the 3rd layer at 404mm and the bottom will end up about 392mm. You need to cut the centre of this last layer out as well to 210mm, so set the nail at 105mm from the texta tip and cut.
f) Cut the 25mm thick piece to 380mm OD and 260mm ID.
g) Once you've cut out all the layers, check to make sure they fit by putting the 25mm ring in first, then the 4th layer piece, then the 3rd layer, the 2nd layer and the top layer. If any are too tight, you may need to trim them with the jigsaw.
h) You need to work out how you want to cut out the top 2 layers for your storage area. As you can see, I cut mine out in a "+" fashion to suit my socket set and tool pouch, but you can do anything within the limits of the tools required to cut it and also to allow for strength of the final product.
i) Once you're satisfied with the final result, you need to glue the lot together. I used clear liquid nails and used a caulking gun to aply it. Run a bead near the edge of each circle and on the inside edge of each circle and on wider layers, along the middle as well. Once glued, put a board on the lot and put a bucket of water on top, or some other reasonably heavy object, to clamp it all together. Leave it 24 hours and then put in your car.
I think I covered it all. Any questions, please ask.
I have the 17" version - photo 7 - for sale for $20 if anyone would like it as I now have the 18" version.
I made up a storage insert, made of high density foam from Clark Rubber, so as to fit inside the spare wheel where tools or other items can fit neatly away. The beauty of this storage area is that it alos acts as an added support for the floor in case you put anything heavy on the floor.
Here are some photos of the foam storage insert in situ, with my tools and occy straps etc stored. You can also see the foam insert I made for my torque wrench on the right side of the photo.:
Photo 1
Tools etc removed to show cut outs:
Photo 2
As you can see, it is made from 4 layers of 50mm high density foam - and 1 layer of 25mm - and they taper slightly from top to bottom to suit the taper of the 18" spare wheel.
Photo 3
The 25mm layer with the hole in it is to take into account the dish of the spokes of the rim and to allow for fitment over the screw that holds the spare in place. The 25mm layer brings it up to the mounting flange of the wheel. The hole in the 1st 50mm layer of the foam is to allow for the screw that holds the spare wheel.
Photo 4
At an angle to show the depth of the top two layers of 50mm foam giving a total depth of 100mm of storage.
Photo 5
Here is my socket set in situ:
Photo 6
This is a 17" version I had for my previous Passat, the 3.2lt V6 4 Motion as it had 17"rims before I upgraded to 18"rims for that car. I didn't glue the top two layers on with this set up.
Photo 7
The project will cost under $100 all up if you get the foam from Clark Rubber.
You will need the following tools and items:
1) For those who have 18"rims, you will need a piece of 50mm high density foam that is 1,800mm x 450mm and a piece of 25mm high density foam that is 400mm x 400mm. For those with 17" rims, you will require a 50mm thick piece about 1,700mm x 430mm and a 25mm piece 400mm x 400mm. I use 50mm thick material as it is cuttable with a jigsaw and most importantly, the 4 x 50mm layers and the single 25mm layer sits perfectly under the floor to give it support.
2) I used a jigsaw with a new sharp wood cutting blade and set it on the fastest speed which gives a reasonably neat cut as can be seen from the photos.
3) I used clear liquid nails to stick the layers together, but you could use silicone or self contact adhesive. Make sure you apply pressure to all these methods until they are cured.
4) An Artline 90 texta or similar.
5)To get the circles that are required, I used a piece of timber about 40mm wide and 330mm long and 18mm thick. I then drilled a 12mm hole to suit the nib of the artline texta so that the felt tip prtruded the desired amount. I then drilled 3mm holes at the required distances for insertion of a nail as a pivot point. See photos:
Photo 8
Photo 9
How to make:
a) When marking out the circles, mark the spot where you are going to insert the nail so as you have a centre point reference. Draw the circle close to the edge of the foam so as to minimise wastage.
b) the top most circle is cut so as the blade is verticle or 90 degrees to the cut and needs to be cut at a diameter of 440mm for 18"rims and 415mm for 17"" rims. All diameter cuts for 17" rims will be 25mm smaller than the 18" rim cuts. Put a drill hole at 220mm from the centre of the texta hole for the nail hole.
c) The second layer down requires that the blade be set on an angle as the 18" rim starts to taper inwards at that point. See the 3rd photo above. To set the blade, you need to have the blade so that it is about 9mm more at the top than the bottom as this will mean that the top of the circle will be 440mm and the bottom will be 422mm. See photo. Set the nail hole at 220mm from the centre of the texta hole and this will mean that the bottom will be about 422mm. To set the blade, get an offcut of 50mm foam and mark it at say 50mm in from the top and 59mm in from the bottom and then align the blade so it matches the mark on the side of the foam.
Alternatively, you can just cut the second circle to 424mm, but you will have a stepped affect to each circle.
Photo 10
d) The 3rd layer from the top will be 422mm at the top and 404mm at the bottom, so set the nail hole at 211mm so that the top will end up being 422mm and the bottom will be about 404mm.
e) The fourth layer, or bottom layer of the 50mm foam will need to have the nail set at 202mm, so that the top will be the same as the bottom of the 3rd layer at 404mm and the bottom will end up about 392mm. You need to cut the centre of this last layer out as well to 210mm, so set the nail at 105mm from the texta tip and cut.
f) Cut the 25mm thick piece to 380mm OD and 260mm ID.
g) Once you've cut out all the layers, check to make sure they fit by putting the 25mm ring in first, then the 4th layer piece, then the 3rd layer, the 2nd layer and the top layer. If any are too tight, you may need to trim them with the jigsaw.
h) You need to work out how you want to cut out the top 2 layers for your storage area. As you can see, I cut mine out in a "+" fashion to suit my socket set and tool pouch, but you can do anything within the limits of the tools required to cut it and also to allow for strength of the final product.
i) Once you're satisfied with the final result, you need to glue the lot together. I used clear liquid nails and used a caulking gun to aply it. Run a bead near the edge of each circle and on the inside edge of each circle and on wider layers, along the middle as well. Once glued, put a board on the lot and put a bucket of water on top, or some other reasonably heavy object, to clamp it all together. Leave it 24 hours and then put in your car.
I think I covered it all. Any questions, please ask.
I have the 17" version - photo 7 - for sale for $20 if anyone would like it as I now have the 18" version.

Comment