 Tweet
Tweet
Originally posted by brad
View Post
-
Yes I can confirm this - the R caliper/rotor set was about 50Kg in total including pads and brake lines while my stock GT/GTi set was only 30kg so more closer to 10kg extra per corner. Could not believe how heavy they are but then again its a lot of metal.2007 Black Magic VW Golf GT TDi, Latte Leather, Sunroof, Bluefin Superchip, 18" Detroits, APR lower torque arm insert, APR Carbon Fibre Cold Air Intake system, GTi sideskirts & front lip, R32 Rear Bar, GTi Steering wheel, RNS-510,Infinity BassLink Subwoofer,stubby antenna, R8 Oil Cap, Golf R front calipers, slotted front rotors, ceramic brake pads, LITEC LED tail-lights, Dension Gateway Five, Rear Emblem Reverse Camera, H&R Ultralow coil-overs, Badge-less front grille -
Added this Audi R8 oil cap to add some BLING to the engine bay.

Looks better than the standard plastic VW cap in my opinion and it was only about $50 from ebay.
 2007 Black Magic VW Golf GT TDi, Latte Leather, Sunroof, Bluefin Superchip, 18" Detroits, APR lower torque arm insert, APR Carbon Fibre Cold Air Intake system, GTi sideskirts & front lip, R32 Rear Bar, GTi Steering wheel, RNS-510,Infinity BassLink Subwoofer,stubby antenna, R8 Oil Cap, Golf R front calipers, slotted front rotors, ceramic brake pads, LITEC LED tail-lights, Dension Gateway Five, Rear Emblem Reverse Camera, H&R Ultralow coil-overs, Badge-less front grille
Comment
-
-
Decided it was time to upgrade the in-car entertainment and opted to go for an RNS-510.
There are apparently issues with battery drain if you get a unit with firmware over 2660 and your CANBUS has not been upgraded so considering my CANBUS is probably quite old I decided to get an older Version B unit with version 1120 firmware installed. Happy to report that I have no battery drain issues at all. Could look into upgrading the CANBUS and firmware but to date I have read nothing about the benefits to warrant the upgrade.
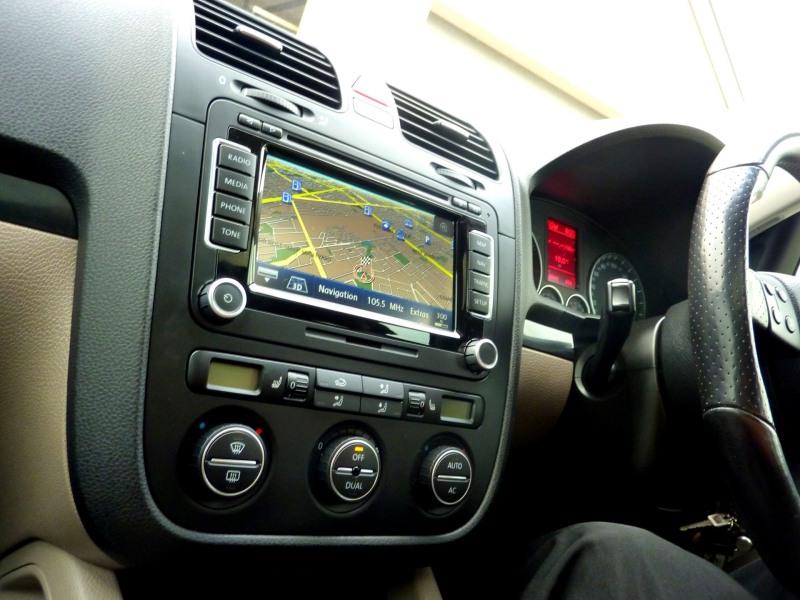
Installation was very easy. Essentially plug and plug but if you want the unit to interact with the MFD you will need to code it. I hear its fairly simple if you have a VAGCOM but I just asked the dealer to do it at my last service. Once its coded it will display navigation directions on the MFD. If you don't care you don't need to code it - it will still work fine.
Have to say that this unit is FANTASTIC! Not only does it feature a really user friendly satellite navigation but you get an 800x480 16:9 touch screen display, Am/FM radio, CD/DVD player with MP3, AAC and WMA support and it has a handy 30GB hard-drive so you can store all your MP3's. I have pretty much my entire music collection saved to the hard-drive. Also features a very handy SD card slot on the front too.

Best of all is that it can play your DVD videos too. Mine seems to be able to play any region I throw at it and even plays my burned DVD-R movies. I also have Video in motion enabled so it can play while driving. Not that I condone watching the screen while driving but its really useful for me when I have my daughter in the car - she can watch her cartoons while I drive in peace.

Of course there are quite a few extra optional things you can connect to the RNS-510 which I will be tackling in the future such as a bluetooth phone connection and a reverse camera so stay tuned....2007 Black Magic VW Golf GT TDi, Latte Leather, Sunroof, Bluefin Superchip, 18" Detroits, APR lower torque arm insert, APR Carbon Fibre Cold Air Intake system, GTi sideskirts & front lip, R32 Rear Bar, GTi Steering wheel, RNS-510,Infinity BassLink Subwoofer,stubby antenna, R8 Oil Cap, Golf R front calipers, slotted front rotors, ceramic brake pads, LITEC LED tail-lights, Dension Gateway Five, Rear Emblem Reverse Camera, H&R Ultralow coil-overs, Badge-less front grilleComment
-
Poyta's GT
Nice upgrade. I noticed that when I upgraded from the standard unit to the RCD-310 the sound quality was so much better also.
2007 Golf MKV 2.0 TDI DSG | CustomCode Phase1 ECU + DSG | aFe Stage 2 | SprintBooster | KW Variant 3 | 19" Breyton GTS-R | GTI Side Skirts | GTI Front Bar | GTI ShifterComment
-
awesome car! loving all the mods so farr!
Comment
-
Poyta, your car is in inspiration, all tasteful mods.Comment
-
Looking good Poyta. Such a nicely modified TDI GT.Comment
-
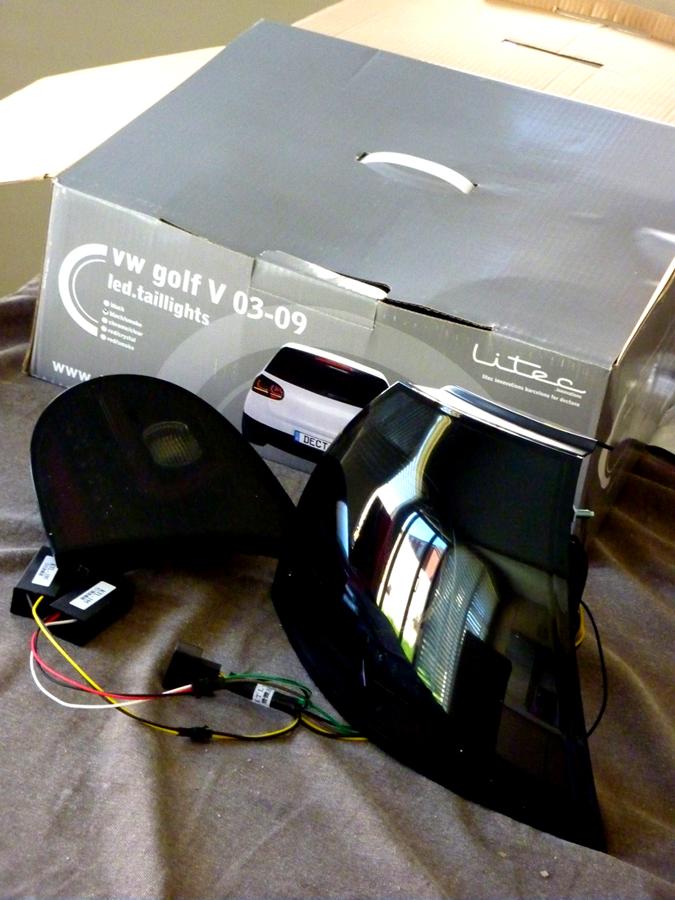
Santa has brought me something.
 2007 Black Magic VW Golf GT TDi, Latte Leather, Sunroof, Bluefin Superchip, 18" Detroits, APR lower torque arm insert, APR Carbon Fibre Cold Air Intake system, GTi sideskirts & front lip, R32 Rear Bar, GTi Steering wheel, RNS-510,Infinity BassLink Subwoofer,stubby antenna, R8 Oil Cap, Golf R front calipers, slotted front rotors, ceramic brake pads, LITEC LED tail-lights, Dension Gateway Five, Rear Emblem Reverse Camera, H&R Ultralow coil-overs, Badge-less front grille
Comment
-
Poyta's GT
Awesome. Can't wait to see these fitted. You will have to cruise past and show me.
2007 Golf MKV 2.0 TDI DSG | CustomCode Phase1 ECU + DSG | aFe Stage 2 | SprintBooster | KW Variant 3 | 19" Breyton GTS-R | GTI Side Skirts | GTI Front Bar | GTI ShifterComment
-
Poyta's GT
Are they like Adrian's? Or different light display? Either way looks good keen to see how it blends in with the black
Hennessy Auto Styling MK5 TDI [SIZE=3]|| United Grey || Sunroof & Leather || 18x8.5 +45 Rotiform BLQ and 17x8 17x9 +39 Stern Reverse Face II || K Sport Deluxe Air Suspension || After Market OEM Style Body Kit and Accessories!
Hennessy Auto Styling - Bumpers, Spoilers, Carbon, Lips and more.Comment
-
They are a set of LITEC Led Tailights in black/smoke finish that I managed to get from Dectane for just over $300 delivered.Originally posted by lhennessy View Post
Anyone looking to get a set of these needs to be aware that there are a few issues with them -
First of all they don't have any built in reflectors which is illegal as all Australian cars need at least one. I don't have that issue because I have an R32 rear bar which has a set of reflectors built in the bottom but all other golf models don't have these so you can run into problems with the law.
Secondly, being European spec the Reverse light is on the right side of the car and the fog light is on the left (the opposite of our Australian models ) - I was able to get past this quite easily and will explain how later.
Thirdly, the inner taillights that sit on the boot-lid section on these LED models also contain indicators and parking/brake globes whereas from factory they only contain the fog and reverse light so there's no actual wiring there to power them. The new LED taillights have a long wiring loom that runs from the main side taillights to these smaller inner lights but it means you need to run the wiring all the way from the rear of the lights, up the sides, through the rubber grommet in the hatch and into the rear hatch as shown with this purple line -
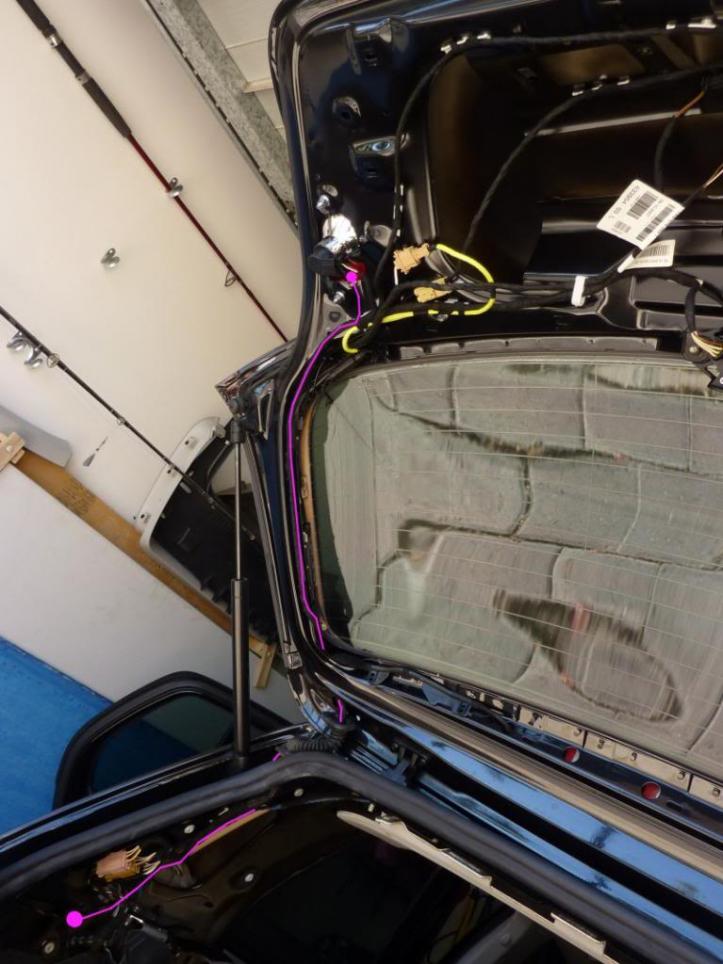
As you see - a lot of panels need to be removed to gain access to do this - I will attempt to try and explain the order they need to be removed.
1. The inner rear hatch panel - There are two small screws that are hidden inside the hand grab recesses. You need to remove these first and then all that's left are clips so just yank on the panel hard and it will come out - it will feel like something else is holding it but trust me there's only clips - a really strong pull and it will let go with a loud BANG. Hopefully you won't snap any clips.
2. Lower rear window surround - this one is just clipped in, pull and it will just pop out.
3. The boot floor - easy
4. Bottom boot lip - This is the plastic panel around the latch catch. Another one that's just clipped in - just pull. Try starting on the sides first.
5. The hanging shelf - easy
6. The Left and Right side plastic side trims - If you drop your back seats forward it will reveal a pop out panel each side. If you pop this panel off you will see a screw that's easy to remove and below it a small hole - look in the hole and you'll see deep inside another screw that's not that easy to get too ( try using blu-tak on the end of your torx bit to hold the screw as you pull it out ) and then there's on last screw at the far end that was exposed when you removed the boot lip in step 4.
7. Ceiling lining end panel - this is the plastic section right at the end of your ceiling lining where it contacts the boot lid - its just clipped in so pull and it will pop out revealing a 10mm bolt holding the C pillar trims.
8. C-pillar trims - in addition to the 10mm bolt that you've just exposed there is also a hidden screw right behind the AIRBAG tag - the tag just pops out if you lever the bottom out. The screw is quite deep so again use some blu-tak on your torx bit. The rest is clipped in, pull and it will pop out.
9. The rubber grommet.
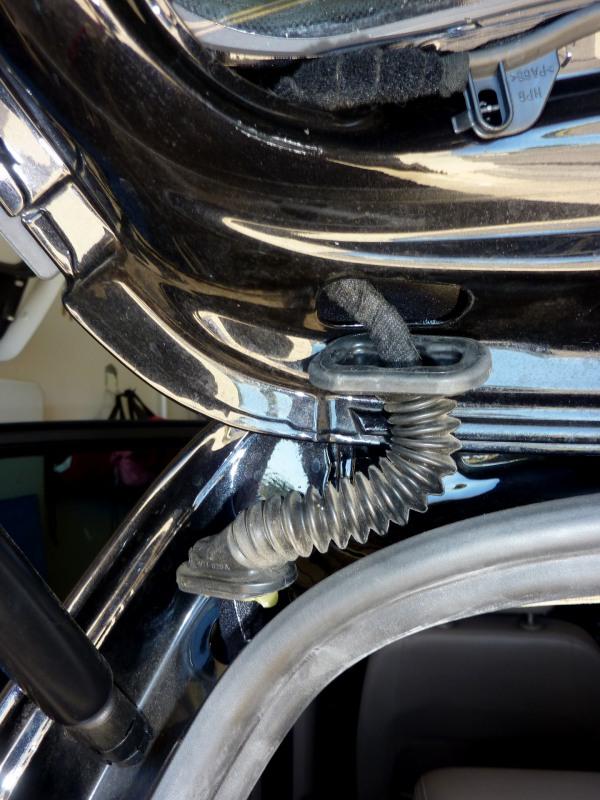
The top of the rubber is just slid in so it can be pulled out easily but be careful with the bottom, as you can see in the photo it has a clip holding it. Just look inside the C-pillar now that the trim is not there and you can see the tab that you need to press to release it.
Now you are ready to run your additional wiring that came with the lights through it all .
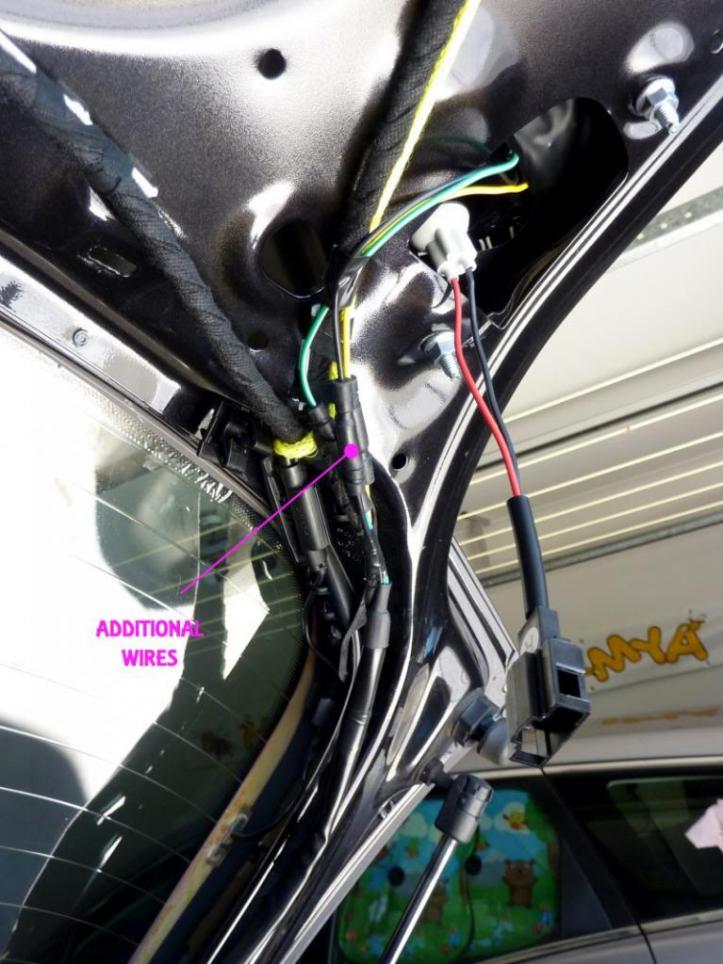
As you can see I just taped it up to run along with all the other wires that run through the grommet so it looks neat and won't get in the way.
Once all your wiring is done you just remove your original taillights- very easy. Each light has a pair of 10mm bolts that can be easily accessed from the rear. Take these out and the lights come out easily.
One thing I did notice is that my car seemed to have these plastic bolt things sticking out that need to removed for the new LED taillights to be installed. See photo below -

I have no idea how to remove these - they seemed to be clipped in and you can access the clips from the back but they are a pain to press it and push out so I just gave them a whack with the hammer from the rear and they popped out.
Fitting the new lights is just the reverse of taking the originals out. Slide them in and bolt them up from the rear.
Now...the problem with the reverse light being on the wrong side - a few forum members mention that you can open the lights and change the lenses or you can code the car to reverse the input or something but I thought why not just flip the wiring over so that the FOG wiring loom that originally ran to the right side now runs to the left and the original REVERSE wiring loom that ran to the left now runs to the right.
As you can see in the following photo -

the right FOG light lead is actually very long so once you un-clip it you'll find it easily reaches the left side inner taillight loom. The REVERSE light lead is however very short and won't reach so all I did was cut the plug off and made an extension lead using simple speaker wire and some male/female plugs.
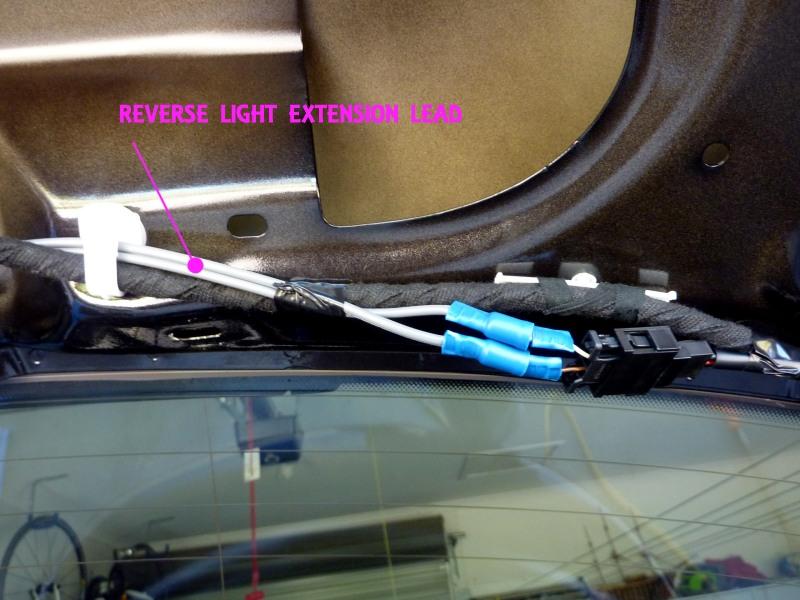
This gave me enough wire to reach the right side taillight and if I ever want to go back to original I can just unplug it, discard the extension lead and put the plug back.
It means that my reverse light is now on the right side of the car and the fog on the left but who cares???
Now I bet you're all dying to see how they look.....well... sorry unfortunately my camera died on me before I could take a photo of the finished product so you'll all have to wait a bit while I get a replacement camera but trust me- they look sofa king good!
2007 Black Magic VW Golf GT TDi, Latte Leather, Sunroof, Bluefin Superchip, 18" Detroits, APR lower torque arm insert, APR Carbon Fibre Cold Air Intake system, GTi sideskirts & front lip, R32 Rear Bar, GTi Steering wheel, RNS-510,Infinity BassLink Subwoofer,stubby antenna, R8 Oil Cap, Golf R front calipers, slotted front rotors, ceramic brake pads, LITEC LED tail-lights, Dension Gateway Five, Rear Emblem Reverse Camera, H&R Ultralow coil-overs, Badge-less front grille
sorry unfortunately my camera died on me before I could take a photo of the finished product so you'll all have to wait a bit while I get a replacement camera but trust me- they look sofa king good!
2007 Black Magic VW Golf GT TDi, Latte Leather, Sunroof, Bluefin Superchip, 18" Detroits, APR lower torque arm insert, APR Carbon Fibre Cold Air Intake system, GTi sideskirts & front lip, R32 Rear Bar, GTi Steering wheel, RNS-510,Infinity BassLink Subwoofer,stubby antenna, R8 Oil Cap, Golf R front calipers, slotted front rotors, ceramic brake pads, LITEC LED tail-lights, Dension Gateway Five, Rear Emblem Reverse Camera, H&R Ultralow coil-overs, Badge-less front grilleComment
-
Still looking good man. Can't wait to see the finished LED Rears.Driver Motorsport Tuned | Melbourne Car Meets | Insta: @VLNTVADERRComment
-
Poyta's GT
Quite interested to see them
Hennessy Auto Styling MK5 TDI [SIZE=3]|| United Grey || Sunroof & Leather || 18x8.5 +45 Rotiform BLQ and 17x8 17x9 +39 Stern Reverse Face II || K Sport Deluxe Air Suspension || After Market OEM Style Body Kit and Accessories!
Hennessy Auto Styling - Bumpers, Spoilers, Carbon, Lips and more.Comment

Comment